

Happy Tuesday, everyone! Right now I am looking out the window of our condo in Big Sky, MT...and watching the snow silently fall. I brought some of my supplies with me, in order to create a couple of things that I just didn't have time to get done last week.
My card today is for Stamper's Dream. I also used CPS Sketch #215 for it, and the Play Date Cafe #78 (red, light blue, pink) challenges. Here is what I created:
My card today is for Stamper's Dream. I also used CPS Sketch #215 for it, and the Play Date Cafe #78 (red, light blue, pink) challenges. Here is what I created:
"Happy Mother's Day" supplies:
Cardstock: Papertrey Ink (vintage cream)
Paper/Diecut/Jewels: Glitz Design (Love Nest: Polka, Damask)
Stamps: JustRite Stampers (Happy Everything set)
Ink: Clearsnap (Pigment: cranberry)
Ribbon: Renaissance by Design
Flowers: Recollections
Glitter: DecoArt
Border Punch: Fiskars (Upper Crest)
Diecut Machine: Cuttlebug by Provo Craft
Steel Die: Spellbinders (Nested Sentiment Custom Dies for JustRite)
Instructions: Will be added later....
Well, I better get going for now. Trying to spend as little of our precious vacation time on the internet! Have a wonderful day! ♥♥♥
Until later,
~Lea L.

Happy Wednesday, everyone!! Welcome to this month's Taylored Expression "Blast from the Past" blog hop!! This month's theme is clean and simple...and I decided to use one of my tried and true themes/designs for it....rainbows!!
I often use a similar design concept when bringing the rainbow theme into a card, and it just happens to really work well. Here is what I created!

I often use a similar design concept when bringing the rainbow theme into a card, and it just happens to really work well. Here is what I created!
"Friends are Flowers...." supplies:
Cardstock: Papertrey Ink (white) & Bazzill Basics (yellow)
Cardstock: Papertrey Ink (white) & Bazzill Basics (yellow)
Stamps: Taylored Expressions (Friendship Blooms set)
Ink: Clearsnap (Pigment: scarlet, orange, canary, lime, aqua, heliotrope, raven black)
Jewels/Button: Doodlebug Designs
Twine: May Arts
Corner Rounder: EK Success
Instructions: Fold white cardstock in half to make card base, and round the bottom corners. Stamp the flowers in a rainbow pattern across the top of the card, and accent the middles with a matching colored jewel. Stamp the sentiment to a yellow cardstock strip, and cut a flag shaped end. Adhere the sentiment strip to the right side of the card. Tie a twine bow through a button, and then adhere to the sentiment strip to finish.
Speaking of rainbow cards, if you frequent my blog at all....you might know that I created a fun rainbow themed card using twine for the Lawn Fawn release of "Smitty's ABCs". Well, that card got a bit of recognition, and I wanted to share that with you. First off...it was a daily feature in the 2Peas gallery on the day it was posted, and then Kristina also included it in the April 12th Newsletter!! There also happened to be a twine challenge at Wee Memories that same week, and I entered the card in for it.
 Well, I was picked as the "Top Hoot" and won a prize package from The Twinery!! Yay!! Who knew one little card would be so popular...you just never know what people are going to love!
Speaking of rainbow cards, if you frequent my blog at all....you might know that I created a fun rainbow themed card using twine for the Lawn Fawn release of "Smitty's ABCs". Well, that card got a bit of recognition, and I wanted to share that with you. First off...it was a daily feature in the 2Peas gallery on the day it was posted, and then Kristina also included it in the April 12th Newsletter!! There also happened to be a twine challenge at Wee Memories that same week, and I entered the card in for it.
Anyways, be sure to check out all of the rest of the blogs on the hop...I know that I am about to grab a cup of coffee and sit down for a bit!!♥♥♥
Until later,
~Lea L.
Want to join in next month?
Want to join in next month?
Happy Tuesday, everyone!! I hope that you had a wonderful weekend, and a great start to your week! It has been a little slow at my blog, and for the next couple of weeks it is going to stay that way. We are getting ready to leave for a week at Big Sky with Josh's parents this Friday, and I have a lot to do to get ready to go. So- sorry if posts are a bit sparse! I hope you will still enjoy what I do get to post, and will come back once I am home!!
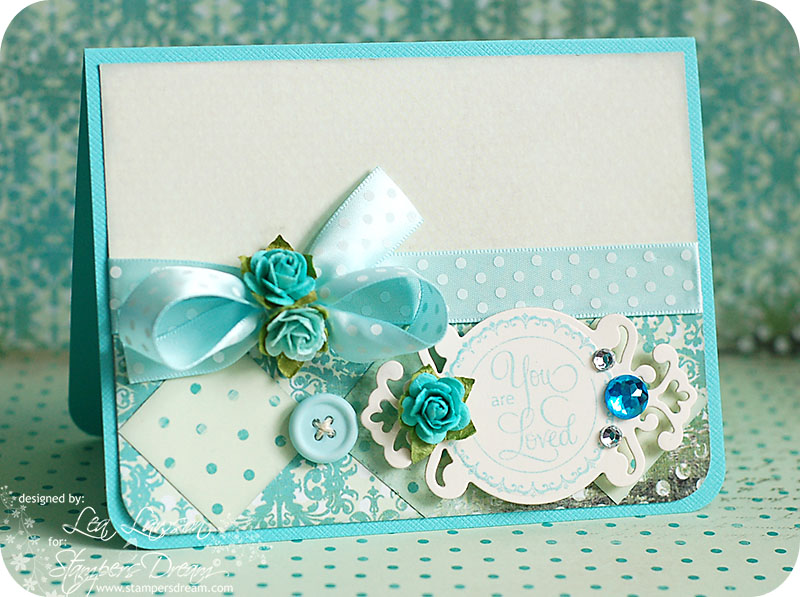
Today I have a card to share with you for Stamper's Dream. It is also my card for CPS Sketch #214, and I used the colors from CR84FN24 (light blue, aqua, cream). This is what I came up with!

Today I have a card to share with you for Stamper's Dream. It is also my card for CPS Sketch #214, and I used the colors from CR84FN24 (light blue, aqua, cream). This is what I came up with!
"You are Loved" Supplies:
Cardstock: Bazzill Basics (aqua) & Papertrey Ink (vintage cream)
Paper: Glitz Design (Hoopla: Pipework, Polka, Zebra)
Stamps: JustRite Stampers (A Warm Hello set)
Ink: Clearsnap (Pigment: aqua)
Ribbon: Renaissance by Design
Twine: May Arts
Button: Papertrey Ink
Flowers: Recollections
Jewels: Doodlebug Designs & International Greetings USA
Corner Rounder: EK Success
Corner Rounder: EK Success
Diecut Machine: Cuttlebug by Provo Craft
Die: Spellbinders (Parisian Accents)
Instructions: Fold aqua cardstock in half and round the bottom corners. Layer a strip of damask paper to the bottom of a cream paper block, and round the bottom corners. Add three dotted squares of paper on an angle to the middle of the damask paper block, and tie ribbon around the seam. Adhere the entire piece to the card front. Stamp the sentiment and circle border to vintage cream cardstock, then diecut. Adhere to the lower right corner of the card with foam adhesive, and accent the right side with jewels. Add flowers to the left side, and to the middle of the bow. Stitch a button to the front using twine to finish.
So, on Saturday I got to see my bro! It had been SO long since I last saw him (like my birthday in January?!)....and I was so excited! I got to watch him play a bit of scrimmage football, and I got to see his championship ring. It is amazing and ginormous...here is a shot of it:
How cool is that?! As a {much} older sister, I have always hoped and prayed that his dream's would come true. And here he is...playing football in college and getting a ring his first year. I have been watching him turn into this amazing man during his first year of college, and I can't help but believe that in some way football and being at this small private college has helped bring it out in him. Casey is right where he should be, and pretty much everything that has happened in his life this year proves that. I am just so proud of him, and the person he continues to become! Love you, brother! ♥♥♥
Until later,
~Lea L.

Happy Friday, everyone!! Are you excited for the weekend? I know that I am! My hubby has to work all weekend long, which is a bit of a bummer because his normal days off are Friday and Saturday. But, it is the life of retail and we take it all in stride. So- I am heading off for a day in Helena tomorrow! First on the docket...to watch the bro play in the last spring scrimmage of the season. Can't wait to watch him play, and just get to see him and my parents and Tara. It has been forever! It will just be a day trip though, and I will head home at some point! Can't wait!
Today I have my first WPlus9 Color Cue post as a design team member. Here is the awesome color combo that we are challenging you with:
Of course, you can add in white/cream as a helpful neutral! I just adore this color combo...it is one of my faves!! The paper I used is a scrap leftover from one of my favorite pieces of Hambly Screen Prints paper...and was so happy that I found a use for it!! I also used Clean & Simple Stamping FTL #135 for my card...which was last week's sketch. I am a little late on it...but I think that is probably okay! Tee hee! Here is what I created:

Today I have my first WPlus9 Color Cue post as a design team member. Here is the awesome color combo that we are challenging you with:
"Best Wishes" supplies:
Cardstock: Papertrey Ink (kraft, vintage cream)
Paper: Hambly Screen Prints (Vintage Plaid)
Stamps/Die: WPlus9 (Filigreed Frames set, Labels Layer Die 1)
Stamps/Die: WPlus9 (Filigreed Frames set, Labels Layer Die 1)
Ink: Clearsnap (Pigment: chestnut, cranberry, turquoise)
Ribbon: Renaissance by Design & Webster's Pages (bloomers)
Jewels: Glitz Design (red) & Doodlebug Designs (brown)
Pearls: Kaiser Craft
Corner Rounder: EK Success
Diecut Machine: Cuttlebug by Provo Craft
Instructions: Fold kraft cardstock in half to make card base, and round the bottom corners. Diecut the label shape from a block of patterned paper, and round the bottom corners. Cover the the back with vintage cream cardstock, and adhere to the card front. Stamp the label outline and the sentiment to the cream cardstock, and accent with a brown jewel and turquoise pearls. Adhere a strip of red bloomers across the top of the diecut frame, and then accent with a turquoise bow and a red jewels.
Don't forget to see what all the other WPlus9 gals have come up with as well!! I am sure it will be amazing! ♥♥♥
Dawn Woleslagle - www.stampawaywithme.blogspot.com
Elise Durenberger - www.mamacowcreations.blogspot.com
Hannah Craner - www.sherbetblossom.com
Jinny Newlin - www.jinnynewlin.blogspot.com
Kerrianne Gwin - www.retrogirlycreative.blogspot.com
Elise Durenberger - www.mamacowcreations.blogspot.com
Hannah Craner - www.sherbetblossom.com
Jinny Newlin - www.jinnynewlin.blogspot.com
Kerrianne Gwin - www.retrogirlycreative.blogspot.com
Savitri Wilder - www.scrapbit.com
April Guest Designer: Paulina Nakamura - www.prettypinkposh.blogspot.com
Until later,
~Lea L.

Happy Thursday, everyone!! I hope your day has been a good one so far! I have been busy making a couple cards, and in a little bit I have to run to church to help out. They are having a church planting meeting, and the person who was supposed to watch the children from 3-5p ended up not being able to do it...so in comes a call to Lea! I am more than willing to help out when needed, so I am glad that they called me.
Today I have a card to share with you for Stamper's Dream. I used the Viva la Verve! April 2011 Sketch #2 for this card, and it was a perfect layout for it!! I also used the Color Throwdown #137 (teal, summer sun, celery) & the Flourishes "Spring Has Sprung" challenge (inspiration photo) for it. Here is what I created!
Today I have a card to share with you for Stamper's Dream. I used the Viva la Verve! April 2011 Sketch #2 for this card, and it was a perfect layout for it!! I also used the Color Throwdown #137 (teal, summer sun, celery) & the Flourishes "Spring Has Sprung" challenge (inspiration photo) for it. Here is what I created!
"Dare to Dream" supplies:
Cardstock: Bazzill Basics (yellow)
Paper: GCD Studios (Ava: Topaz, Flutter, Petit Garden, Delish)
Paper: GCD Studios (Ava: Topaz, Flutter, Petit Garden, Delish)
Stamps: JustRite Stampers (Dare to Dream & Fancy Labels sets)
Ink: Clearsnap (Pigment: citrine, turquoise)
Ribbon: Cosmo Cricket & Making Memories
Pearls: Kaiser Craft
Flowers: Recollections
Pins: craft supply
Corner Rounder: EK Success
Sandpaper
Instructions: Fold yellow cardstock in half to make card base. Round the corners and sand the edges of a slightly smaller blue paper block, and adhere to the front. Sand the edges of a floral block, adhere to the middle, and then wrap two layers of ribbon around the bottom. Round the top edges of 4 paper blocks, sand the edges and adhere together. Stamp the borders, sentiment and medallion to the fronts and then adhere to the card. Cut a butterfly from patterned paper, adhere to the front, and accent with pins & pearls. Add two paper flowers to the right of the butterfly, and then accent the card with pearls to finish.
I love how soft and spring like this card is...these papers from last year's GCD Studio release were perfect for it! Not to mention...it was my fave collection from last year GCD as well.
Well, I better get going for now!! Have some things to do before heading to the church! Talk to you soon! ♥♥♥
Until later,
~Lea L.

Hi everyone!! Welcome to the last day of the April Lawn Fawn release sneak peek!! Hasn't it been a glorious few days, full of lovely projects and inspiration? Sigh...I always love release weeks. They make me happy! :)
Today we are sharing a teeny stamp set called "Year One"! Last month Lawn Fawn celebrated their first birthday, and this cutie little set went out with orders over a certain dollar amount. Well, this month it is available for purchase, and it is really the sweetest little birthday set! I am certain it will be very affordable, and would make a fabby addition to your collection of birthday stamps!!
I used the Sweet Sunday Sketch Challenge #112 for my card, which is an awesome little sketch and was PERFECT for this cute stamp set. I was also inspired by the Off The Wall Craftiness Challenge #50 (pink, yellow, light green) for my color choice. I used more of a sea foam than a true light green...but I think it still fits! ;) Here is what I created!
And don't forget that the Lawn Fawn blog always has some amazing giveaways during release week!! Here is where you can win so far...be sure to follow the commenting instructions!! ♥♥♥
Today we are sharing a teeny stamp set called "Year One"! Last month Lawn Fawn celebrated their first birthday, and this cutie little set went out with orders over a certain dollar amount. Well, this month it is available for purchase, and it is really the sweetest little birthday set! I am certain it will be very affordable, and would make a fabby addition to your collection of birthday stamps!!
I used the Sweet Sunday Sketch Challenge #112 for my card, which is an awesome little sketch and was PERFECT for this cute stamp set. I was also inspired by the Off The Wall Craftiness Challenge #50 (pink, yellow, light green) for my color choice. I used more of a sea foam than a true light green...but I think it still fits! ;) Here is what I created!
"Happy Birthday" supplies:
Cardstock: Bazzill Basics (yellow) & Papertrey Ink (white)
Paper: American Crafts (City Park: Waterfront Park, Riverfront Park & Dear Lizzy Spring: Sunny Spot)
Stamps: Lawn Fawn (Year One set)
Ink: Clearsnap (Pigment: robin's egg, old rose) & Tsukineko (Versafine: onyx black, Momento: Dandelion)
Jewels/Paper Frill/Button: Doodlebug Designs
Ribbon: Renaissance by Design
Twill: craft supply
Twine: The Twinery
Flowers: Recollections
Corner Rounder: EK Success
Instructions: Fold yellow cardstock in half to make card base. Cut two blocks of patterned paper, round the top corners, and layer together. Round the top corners of a white cardstock block, and stamp the sentiment & cake to it {you will need to stamp the cake separately with each different color. Just mask the parts you don't want inked up with tape, and then peel off before stamping!}. Add three twill tabs to the left side of it, and then adhere the entire block to the patterned paper piece. Accent the tabs with three jewels. Add a yellow scalloped paper frill to the bottom of the card, and then tie ribbon around the top of it. Tie a button around the bow using twine. Adhere the entire piece to the card front. Cut out the banner from patterned paper, and adhere to the top. Accent it with two paper flowers to finish.
Alright everyone...just so you know, the stamps will be available tomorrow at 12:01am in the Lawn Fawn Store! Which stamps do you think you want to pick up this time around? I always think it is so hard to make a decision like that...and I normally end up with everything in my cart...tee hee! Don't forget to check out what all the other lovely design team gals have come up with for the "Year One" set. It is sure to be a treat!!
Chan Vuong
Julie Campbell
Latisha Yoast
Lea Lawson {You are here!!}
Lynnette Kauffman
Teri Anderson
Tiffany Johnson
Julie Campbell
Latisha Yoast
Lea Lawson {You are here!!}
Lynnette Kauffman
Teri Anderson
Tiffany Johnson
And don't forget that the Lawn Fawn blog always has some amazing giveaways during release week!! Here is where you can win so far...be sure to follow the commenting instructions!! ♥♥♥
Until later,
~Lea L.

....I would still choose you as a friend. This is the lovely sentiment on my card this week, and I just love it. It is the complete truth about my own mom...even though I am much happier to have her as my mom, and not just a friend. :) You may have noticed that my blog looks slightly different. I have really cleaned up the sidebar on the right hand side, and turned it into pages at the top of my blog. I really dislike cluttered websites, and that is how I felt about my sidebar. I left the followers on the sidebar, in case someone wants to follow my blog- they easily can. And I left blog archive, as I use it quite often. I really think it looks so much better, and I love having all my favorite links in different pages at the top!! Yay for a cleaner looking blog!
The card I have to share with you today is for CPS Sketch #213, where we were sponsored by My Favorite Things this week. I used this week's CR84FN23 Color Challenge (light pink, black, cream) & The Shabby Tea Room Challenge #53 (Doilies &/or Lace + inspiration photo) as well. Here is what I created!
The card I have to share with you today is for CPS Sketch #213, where we were sponsored by My Favorite Things this week. I used this week's CR84FN23 Color Challenge (light pink, black, cream) & The Shabby Tea Room Challenge #53 (Doilies &/or Lace + inspiration photo) as well. Here is what I created!
"Happy Mother's Day" supplies:
Cardstock/Felt: Papertrey Ink (vintage cream)
Paper: Teresa Collins Designs (Welcome Home: Chandelier, Chic Bebe Girl: Fleur De Lis, Crush: Houndstooh, Sweetheart Tags)
Stamps/Dies: My Favorite Things (Clearly Sentimental about Mothers set)
Ink: Tsukineko (Versafine: onyx black) & Ranger Industries (Distress Ink: antique linen)
Ink Blending Tool: Ranger Industries
Lace: vintage craft supply
Pearls: Zva Creative
Corner Rounder: EK Success
Diecut Machine: Cuttlebug by Provo Craft
Instructions: Fold vintage cream cardstock in half to make card base. Cut a chandelier paper block slightly smaller than the card base, round the corners and ink the edges with antique linen distress ink using the blending tool. Cut two blocks from houndstooth paper, round the proper corner, and ink the edges the same way. Adhere the blocks to the chandelier paper, zig-zag stitch along the seams, and then adhere to the card front. Round the top corners of a pink dot paper block, and ink the edges. Stamp the sentiment to the top of it, wrap vintage lace around the bottom, and adhere to the card front. Add the pearl flourish to the lower right corner of the card. Diecut the butterflies from vintage cream felt and pink dotted paper, and adhere together. Accent the middle of it with pink pearls, and adhere to the card front to finish.
Well, I better get going for now! I hope that you have a wonderful Tuesday ahead of you!! ♥♥♥
Until later,
~Lea L.
P.S. Here are the inspiration graphics from the challenges I created this for:

P.S. Here are the inspiration graphics from the challenges I created this for:

Hi there, everyone!! Are you excited for day 3 of the April Lawn Fawn sneak peeks?! I think the design team did an amazing job with Fanciful Frames yesterday, and there were so many different styles and uses of them!! Gotta love that!
Today we are showcasing a brand new alphabet set that I just know you are going to love!! It has a bit of a typewriter look to it, and is really clean as well!! Scrapbookers- this set will be perfect for journaling, and adding subtitles to your layouts. Card makers- you can create pretty much ANY sentiment you could ever want with this set, and that is just awesome!! It would look really awesome inside of a Fanciful Frame as well....just sayin'. Tee hee!
I chose to utilize the stamp set by itself on a card, and I just love how it turned out. It was time to break out my favorite rainbow theme, and channel my CAS side. I also just got some new twine in the mail, and I wanted to play around with it. I used Chupa's Sketchbook Saturday #6 again for this one, and I love how completely different this card looks from the other one....that is what I love about sketches!! They can be used over and over again, and you will never get the same result twice! It also fits the Wee Memories Challenge #51 again, which is to use twine. Well, this one REALLY fits that challenge...tee hee! And last but definitely not least, Lily Pad Cards "Kathy's Color Throw Down" is all kinds of rainbow goodness...and my card fits it perfectly!! Here is what I came up with:
And don't forget that the Lawn Fawn blog always has some amazing giveaways during release week!! Here is where you can win so far...be sure to follow the commenting instructions!! ♥♥♥
Today we are showcasing a brand new alphabet set that I just know you are going to love!! It has a bit of a typewriter look to it, and is really clean as well!! Scrapbookers- this set will be perfect for journaling, and adding subtitles to your layouts. Card makers- you can create pretty much ANY sentiment you could ever want with this set, and that is just awesome!! It would look really awesome inside of a Fanciful Frame as well....just sayin'. Tee hee!
I chose to utilize the stamp set by itself on a card, and I just love how it turned out. It was time to break out my favorite rainbow theme, and channel my CAS side. I also just got some new twine in the mail, and I wanted to play around with it. I used Chupa's Sketchbook Saturday #6 again for this one, and I love how completely different this card looks from the other one....that is what I love about sketches!! They can be used over and over again, and you will never get the same result twice! It also fits the Wee Memories Challenge #51 again, which is to use twine. Well, this one REALLY fits that challenge...tee hee! And last but definitely not least, Lily Pad Cards "Kathy's Color Throw Down" is all kinds of rainbow goodness...and my card fits it perfectly!! Here is what I came up with:
"You Color My World" supplies:
Cardstock: Bazzill Basics (red) & Papertrey Ink (white)
Stamps: Lawn Fawn (Smitty's ABCs set)
Ink: Clearsnap (Pigment: frost white)
Twine: The Twinery
Jewels/Paper Frill: Doodlebug Designs
Border Punch: Fiskars (Upper Crest)
Instructions: Fold red cardstock in half to make card base. Punch an upper crest border to the bottom of white cardstock block, and adhere an aqua scalloped paper frill to the top. Tie size pieces of rainbow colored twine around the block, and arrange as shown. Stamp the sentiment to the bottom of the card, and then adhere the entire twine block to the front. Accent the lower right corner with a rainbow of jewels to finish.
I am really excited to see what all the other design team members have created with Smitty's ABCs! There is so much that can be done with this stamp set, and I bet we are going to see a ton of different styles and uses....so be sure to check out what everyone has done!!
Chan Vuong
Julie Campbell
Latisha Yoast
Lea Lawson {You are here!!}
Lynnette Kauffman
Teri Anderson
Tiffany Johnson
Julie Campbell
Latisha Yoast
Lea Lawson {You are here!!}
Lynnette Kauffman
Teri Anderson
Tiffany Johnson
And don't forget that the Lawn Fawn blog always has some amazing giveaways during release week!! Here is where you can win so far...be sure to follow the commenting instructions!! ♥♥♥
Until later,
~Lea L.

**If you are looking for my Lawn Fawn "Fanciful Frames" post, either scroll down to the next post, or CLICK HERE.**
Happy Monday, everyone!! I hope that you had a wonderful weekend!! We had an amazing dinner with our good friends Grant & Meagan on Friday night. Chicken Cordon Bleu, twice baked potatoes, spinach salad with red onions & bacon, and fabulous cappuccino cupcakes to finish....it was YUM! We also had strawberry daiquiris while watching the first two (filmed) Star Wars films, as Meagan hasn't ever watched them. It was a good time! They actually stayed at our house that night, so we could wake up and have an awesome breakfast together as well. There is a restaurant in Missoula that we all love called The Shack, and they are known for their amazing breakfast. So, we created our own version of their Buffalo Pie, and blueberry pancakes. It...was fabulous. Yum! I would normally have huckleberry pancakes at The Shack, but huckleberries are a wild berry that only grow in the summer. So, unless you have some frozen from the last season, which we did not, there was no way to get them. Blueberries were {almost} as good. ;)
Anyways, enough about my weekend...because we are having an awesome Stamper's Dream & Friends blog hop today...and I am sure you want me to get on with it!! Tee hee! I used the Viva la Verve! April 2011 Sketch #1, and Embellish's Decorative Trim Color Trends challenge for my card. Here is what I created:
"Happy Birthday & Many More" supplies:
Cardstock: American Crafts (green)
Cardstock: American Crafts (green)
Paper: Glitz Design (Hoopla: Pipework, Polka, Floral)
Stamps: JustRite Stampers (Forever Friends cling mount stamp set)
Ink: Clearsnap (Pigment: yellow grass, citrine) & Ranger Industries (Distress Ink: antique linen)
Ink Blending Tool: Ranger Industries
Trim: Prima
Twine: Darice Inc.
Chipboard: Tattered Angels
Pearls: Kaiser Craft
Flowers: Recollections
Glitter: DecoArt
Corner Rounder: EK Success
Instructions: Fold green cardstock in half to make card base, and round the bottom corners. Cut background paper slightly smaller, apply distress ink to the edges with a blending tool, and adhere to the front. Cut a block of floral paper and a strip of yellow dotted paper. Distress ink the edges and layer on the card front. Adhere a piece of lace trim to front, and then add a glittered chipboard frame over top of it. Distress ink the edges of a square paper block, and then stamp the frame & sentiment to it. Adhere the stamped block to the card front, and accent the lower right corner with a paper flower. Tie a triple bow from twine and adhere to the upper left corner of the glittered chipboard frame. Add two paper flowers to the middle, and then accent the card with pearls to finish.
Well, of course...a blog hop isn't one without a list of amazing card makers to hop to!! There are two prizes hidden somewhere on all of these blogs, so be sure to comment on each one in order to maximize your chance of winning!!
Becca Feeken
Michelle Rodgers
Jerri Kay Jimenez
Amy Sheffer
Denise Marzec
Arlene Cuevas
Leslie Miller
Cindy Lawrence
Kellie Fortin
Tosh Leyendekker
Jeanne Streiff
Mariana Grigsby
Joan Ervin
Lea Lawson (You are here!!)
Frances Byrne
Christina Fischer
Carla Murphy
Teresa Kline
Carol Longacre
Gabriela Divine
Michelle Rodgers
Jerri Kay Jimenez
Amy Sheffer
Denise Marzec
Arlene Cuevas
Leslie Miller
Cindy Lawrence
Kellie Fortin
Tosh Leyendekker
Jeanne Streiff
Mariana Grigsby
Joan Ervin
Lea Lawson (You are here!!)
Frances Byrne
Christina Fischer
Carla Murphy
Teresa Kline
Carol Longacre
Gabriela Divine
If you happened upon my blog without knowledge of the blog hop, we would love for you to join us!! Just start at the top, and start hopping along! You are sure to find some amazing inspiration along the way! Here are the two prizes that will be awarded....so be sure to comment along the way!
Well, it is time for me to grab a cup of coffee and see what all these wonderful ladies have created as well! Happy hopping!! ♥♥♥
Until later,
~Lea L.

So...what did you think of the "Happily Ever After" sneak peek yesterday? I thought it was fabulous to see that amazing dress image used so many times, and each one so different!! Today I have another Lawn Fawn sneak peek to share with you, and it is a set called "Fanciful Frames". For all you scrapbookers out there, this is a set you are going to LOVE! It will make such cute frames for your photos!! But don't worry card makers, because it is also versatile, and makes for some amazing card options too!
Being primarily a card maker, that is what I created for the sneak peek. I used Chupa's Sketchbook Saturday Challenge #6 for my card, and it was just the perfect sketch for using this stamp set. Love it!! I teamed up the "Fanciful Frames" with another Lawn Fawn stamp set called "Hello Friend", and they work perfectly together!! Here is what I came up with:
And don't forget that the Lawn Fawn blog always has some amazing giveaways during release week!! Here is where you can win so far...be sure to follow the posting comments!! ♥♥♥
Being primarily a card maker, that is what I created for the sneak peek. I used Chupa's Sketchbook Saturday Challenge #6 for my card, and it was just the perfect sketch for using this stamp set. Love it!! I teamed up the "Fanciful Frames" with another Lawn Fawn stamp set called "Hello Friend", and they work perfectly together!! Here is what I came up with:
"You Make Me Smile" supplies:
Cardstock: Bazzill Basics (yellow) & Papertrey Ink (vintage cream)
Paper: My Mind's Eye (Quite Contrary: Serene Spots, Engaging Gingham)
Paper Frill/Jewels: Doodlebug Designs
Stamps: Lawn Fawn (Fanciful Frames & Hello Friend sets)
Ink: Tsukineko (Versafine: onyx black) & Clearsnap (Pigment: cranberry)
Ribbon: Renaissance by Design
Button: GCD Studios
Corner Rounder: EK Success
Scalloped Die: Papertrey Ink
Diecut Machine: Cuttlebug by Provo Craft
Colored Pencils: craft supply
Instructions: Fold yellow cardstock in half to make card base. Round the corners of a slightly smaller dotted paper block, and adhere to the front. Adhere an aqua scalloped paper frill to the top of a cream cardstock block. Diecut a scalloped border strip from gingham paper, and adhere to the bottom of the cardstock block. Tie ribbon around the top, and accent the middle of the bow with a button. Stamp the frame and sentiment to the cream section, and accent with three jewels. Adhere the entire stamped block to the card front, then color in the accents on the stamped frame to finish.
There is another frame in this stamp set, and I can't wait to see it used as well!! I know that I have some ideas for it!! Be sure to check out what the other gals on the design team have created, because I am sure you will see the other frame used as well!!
Chan Vuong
Julie Campbell
Latisha Yoast
Lea Lawson {You are here!!}
Lynnette Kauffman
Teri Anderson
Tiffany Johnson
Julie Campbell
Latisha Yoast
Lea Lawson {You are here!!}
Lynnette Kauffman
Teri Anderson
Tiffany Johnson
And don't forget that the Lawn Fawn blog always has some amazing giveaways during release week!! Here is where you can win so far...be sure to follow the posting comments!! ♥♥♥
Until later,
~Lea L.

Hello, my friends!! Tonight marks the start of sneak peeks for the Lawn Fawn April release!! I know that I am excited, so I hope that you are too!
Up first is the new set called "Happily Ever After", and I am sure you can tell by the title...it is a wedding themed stamp set. I used the dress image and one of the sentiments from the set, and I can't get over how fun dressing up the dress was!! I loved using the rose paper, and glittering just the top half...how pretty would a dress like this be in real life?! I also used Waltzingmouse Sketch Challenge #42 for my card, and it was the perfect fit! It also fits the Wee Memories Challenge #51 to use twine, which was just the perfect little addition to my country chic wedding card!! Here is what I came up with!
And don't forget that the Lawn Fawn blog always has some amazing giveaways during release week!! Here is where you can win so far...be sure to follow the posting comments!! ♥♥♥
Up first is the new set called "Happily Ever After", and I am sure you can tell by the title...it is a wedding themed stamp set. I used the dress image and one of the sentiments from the set, and I can't get over how fun dressing up the dress was!! I loved using the rose paper, and glittering just the top half...how pretty would a dress like this be in real life?! I also used Waltzingmouse Sketch Challenge #42 for my card, and it was the perfect fit! It also fits the Wee Memories Challenge #51 to use twine, which was just the perfect little addition to my country chic wedding card!! Here is what I came up with!
"Congrats" supplies:
Cardstock/Ribbon: Papertrey Ink
Paper/Jewel: Glitz Design (Laced with Grace: Rose, Floral)
Vellum: The Paper Company
Stamps: Lawn Fawn (Happily Ever After set)
Ink: Clearsnap (Pigment: chestnut)
Twine: Darice Inc.
Pin: Maya Road
Flower: Recollections
Pearls: Kaiser Craft
Glitter: DecoArt
Instructions: Fold vintage cream cardstock in half to make card base. Layer a block of vellum to a floral paper block, and zig-zag stitch along the seam. Adhere the entire paper piece to the card front, and tie ribbon around the bottom. Stamp the sentiment to a vintage cream cardstock strip, and adhere around a clear topped pin. Cut a flag shape to the end of it, and then adhere the entire piece to the card front. Stamp the dress to patterned paper and cut out. Mask off the dress bottom, and then cover the top in glitter. Add a pearl strip to the middle of the dress, then adhere it to the card front, slightly overlapping the sentiment flag. Tie a bow from twine, adhere to the middle of the ribbon bow, and then accent the middle with a clear jewel. Accent the dress with a paper flower to finish.
Oh, how I know you are going to just love this stamp set!! And I know that I can't wait to see what the other Lawn Fawn girls came up with...and here is a list so you can check them out too!
Chan Vuong
Julie Campbell
Latisha Yoast
Lea Lawson {You are here!!}
Lynnette Kauffman
Teri Anderson
Tiffany Johnson
Julie Campbell
Latisha Yoast
Lea Lawson {You are here!!}
Lynnette Kauffman
Teri Anderson
Tiffany Johnson
And don't forget that the Lawn Fawn blog always has some amazing giveaways during release week!! Here is where you can win so far...be sure to follow the posting comments!! ♥♥♥
Until later,
~Lea L.

Happy Thursday evening, my friends!! I hope that you have had a wonderful day and week so far!! It has been a good day here so far. I have been working on this little ditty off and on all afternoon long...in between things that needed to get done and other things that just ended up distracting me {which can happen often in my world...}. Tee hee!
I created it for the Taylored Expressions Sketch Challenge #135, which is posted on the blog, but is now being hosted at Splitcoast Stampers!! So- I gave you both links. :) And...I am kind-of in love with how this turned out.
I created it for the Taylored Expressions Sketch Challenge #135, which is posted on the blog, but is now being hosted at Splitcoast Stampers!! So- I gave you both links. :) And...I am kind-of in love with how this turned out.
"Thanks so Much" supplies:
Cardstock: Bazzill Basics (aqua) & Papertrey Ink (vintage cream)
Paper: My Mind's Eye (Quite Contrary: Berry Preserves, Share & Penny Lane: Individual Blooms)
Stamps/Die: Taylored Expressions (New Beginnings, It's A Banner Day 1 sets)
Ink: Clearsnap (Pigment: cranberry, pink, turquoise)
Ribbon: Renaissance by Design
Twine: Darice Inc.
Button/Jewels: Doodlebug Designs
Ribbon: Renaissance by Design
Twine: Darice Inc.
Button/Jewels: Doodlebug Designs
Pins/Felt Accent: Maya Road
Pearls: Kaiser Craft
Flowers:Recollections
Glitter: DecoArt
Circle Punch: Marvy Uchida
Corner Rounder: EK Success
Border Punch: Stampin Up
Diecut Machine: Cuttlebug by Provo Craft
Diecut Machine: Cuttlebug by Provo Craft
Instructions: Will be added later...
Well, this was a quickie post today! I need to get going, but I will be back soon!! ♥♥♥
Until later,
~Lea L.

....and touches your heart. That is the sentiment of my card today, and I think it is just beautiful. Happy Tuesday, everyone! I hope that you had a wonderful weekend! My blog has been quiet, because we had a very full and busy weekend. It was a lot of fun though- spending time with friends, attending a BBQ on Saturday, having a BBQ and a great night of games on Sunday. It was fabulous! But that means that I haven't had much time to sit down and create anything...so I finally had a chance! Yay!
My card today is for Stamper's Dream, and is also my card for CPS Sketch #212 this week. It also features a new collection from Glitz Design that I don't reach for as often...though I totally should! I feature Laced with Grace and Afternoon Muse a lot, but I have been neglecting "Love Games"...until today! Here it is in all its fabulous glory:
My card today is for Stamper's Dream, and is also my card for CPS Sketch #212 this week. It also features a new collection from Glitz Design that I don't reach for as often...though I totally should! I feature Laced with Grace and Afternoon Muse a lot, but I have been neglecting "Love Games"...until today! Here it is in all its fabulous glory:
"A Friend Reaches for your Hand..." supplies
Cardstock: Bazzill Basics (red)
Paper/Paper Layers/Jewels: Glitz Design (Love Games: Scorecard, Polka)
Stamps: JustRite Stampers (Friendship Nested Sentiments set) & Glitz Design (Love Games set)
Ink: Tsukineko (Versafine: onyx black) & Clearsnap (Chalk: charcoal)
Twine: Darice Inc.
Flowers:Recollections
Corner Rounder: EK Success
Corner Rounder: EK Success
Instructions: Fold red cardstock in half to make card base, and round the bottom corners. Round the bottom corners and ink the edges of a scorecard paper block, and adhere to the bottom of the card. Ink the edges of a paper layer strip, and adhere to the top. Stamp the sentiment in the lower right corner and accent with jewels and a black flower. Stamp the banners to polka dot paper, and cut out. Thread twine through them and adhere over the seam of the two papers on the card front. Accent each end with a twine bow, and add a flower center. Add a red jewel to each banner flag to finish.
Well, that is all I have to share with you today. I hope that you have a wonderful day, and thanks for checking out my little piece of the internet!! ♥♥♥
Until later,
~Lea L.

Well, tonight is the night!! It is the last day of release week at WPlus9. The stamps and die are up and available for purchase in the WPlus9 Store, so be sure to head on over and pick up what your heart has been fancying this week. We all have one more sample to share with you this week for the final group post, and it is sure to be some pure eye candy!
I did another card featuring the "Filigreed Frames" set. I utilized the frame in a vertical format again, which seemed to get your attention in yesterday's post...I am so happy you liked it! I also paired it with some of the latest Glitz Design papers, which I just utterly adore. And last, but definitely not least...I used the Viva la Verve! March 2011 Sketch #5 for my card. Here is what I came up with!
I did another card featuring the "Filigreed Frames" set. I utilized the frame in a vertical format again, which seemed to get your attention in yesterday's post...I am so happy you liked it! I also paired it with some of the latest Glitz Design papers, which I just utterly adore. And last, but definitely not least...I used the Viva la Verve! March 2011 Sketch #5 for my card. Here is what I came up with!
"For All That You Do" supplies:
Cardstock: Papertrey Ink (vintage cream, kraft)
Paper/Tulle: Glitz Design (Laced with Grace: Floral, Stripe, Rose, Butterflies)
Stamps: WPlus9 (Filigreed Frames set, Labels Layer 1 Die)
Ink: CTMH (Pigment: vanilla cream) & Clearsnap (roussillon, chestnut)
Button/Jewels: Doodlebug Designs
Lace: craft supply
Twine: Darice Inc.
Pearls: Kaiser Craft
Flowers: Recollections & Michael's brand
Border Punch: Fiskars
Diecut Machine: Cuttlebug by Provo Craft
Sandpaper
Instructions: Fold cream cardstock in half to make card base. Cut an orange paper block slightly smaller, and sand the edges. Punch an apron lace border to striped paper and adhere to a block of rose paper. Sand the edges and adhere to the bottom of the orange paper block. Zig zag stitch along the outside of the entire block, and adhere to the card front. Add the green crocheted trim to the left side of the card, and then tie brown tulle around the seam. Diecut and stamp the sentiment frame, and adhere to the front of the card. Thread a button with twine, and then tie around a calla lily floral bunch. Adhere the flower accent to the middle of the tulle bow, and then accent with an orange paper rose. Add three jewels to the bottom right of the floral accent. Cut two butterflies from patterned paper, and adhere to the sentiment tag. Add a strip of pearls to the middle of each butterfly to finish.
Well, I really hope that you have enjoyed my first release week as a WPlus9 design team member! I know that I have had a ton of fun this week using these new stamps, and I foresee myself using them a lot more in the coming weeks!! Thanks so much for coming along on this new journey with me, and I hope that you will continue to stop by my blog when the weeks aren't as exciting! :) And now, don't forget to check out what all the other amazing WPlus9 girls have come up with for the group post, as I know it will be a treat!!
Dawn Woleslagle - www.stampawaywithme.blogspot.com
Elise Durenberger - www.mamacowcreations.blogspot.com
Hannah Craner - www.sherbetblossom.com
Jinny Newlin - www.jinnynewlin.blogspot.com
Kerrianne Gwin - www.retrogirlycreative.blogspot.com
Elise Durenberger - www.mamacowcreations.blogspot.com
Hannah Craner - www.sherbetblossom.com
Jinny Newlin - www.jinnynewlin.blogspot.com
Kerrianne Gwin - www.retrogirlycreative.blogspot.com
Savitri Wilder - www.scrapbit.com
April Guest Designer: Paulina Nakamura - www.prettypinkposh.blogspot.com
I hope that you have a wonderful Friday, that is packed with fun!! ♥♥♥
Until later,
~Lea L.
Subscribe to:
Posts (Atom)


Social Icons