

Welcome to day 2 of this month's Lil' Inker Designs April release!
We've got some fantastic stamps, dies & papers to share with you
this month. They will all be linked below for easy access to viewing
& purchasing all of the new items!
For my first card I focused on the new masculine themed set! Guys aren't much for bits & baubles, so I kept it super clean & simple.
My second card uses the new critter set with the previously released "Border Builders Die set". I cut the cloud border from scrap paper, and then inked the background with two different blues to create the cloud effect.
 Please note that the dies I used were a sample set, and not the final approved dies. The dies that you purchase for this set will cut closer to the stamped image.
For your shopping convenience, I have provided a link list with all of the newly released products on it. I will only be linking Lil' Inker Designs product for today's post, but if you have questions about anything else that I used...please leave them in the comments & I will reply.
Lil' Inker Designs April 2016 Product Release
As is the case every month, this is a blog hop. Here is today's order so you don't miss a thing! There are three $15 gift certificates up for grabs...just be sure to leave comments on each blog to up your chances!
LID Blog http://www.shoplilinker.blogspot.com/
Stephanie Gold http://goldensimplicity.com/
Lisa Henke http://mylittlecreativeescape.blogspot.com/
Heather Hoffman http://housesbuiltofcards.blogspot.com
Joy Taylor http://www.simplebydesignblog.com/
Chrissy Larson http://chrissycards.blogspot.com/
Angel Rivera http://angelsworld94.blogspot.com/
Karen Baker http://thebalddragonfly.blogspot.com/
Jennifer Carter http://jensinkspot.blogspot.com/
Amy Kolling http://stamp-n-paradise.blogspot.com/
Lea Lawson http://www.lealawsoncreates.com/
Sarah Jay http://www.criminalgrace.com/
Link to Store http://lilinkerdesigns.com/
I hope you enjoyed the past 3 days of new Lil' Inker product, and can't wait to see what you create with your new goodies! Head on over to the Lil' Inker Designs store & pick up your must haves!!
Until later,
~L.
For my first card I focused on the new masculine themed set! Guys aren't much for bits & baubles, so I kept it super clean & simple.
My second card uses the new critter set with the previously released "Border Builders Die set". I cut the cloud border from scrap paper, and then inked the background with two different blues to create the cloud effect.
For your shopping convenience, I have provided a link list with all of the newly released products on it. I will only be linking Lil' Inker Designs product for today's post, but if you have questions about anything else that I used...please leave them in the comments & I will reply.
Lil' Inker Designs April 2016 Product Release
As is the case every month, this is a blog hop. Here is today's order so you don't miss a thing! There are three $15 gift certificates up for grabs...just be sure to leave comments on each blog to up your chances!
LID Blog http://www.shoplilinker.blogspot.com/
Stephanie Gold http://goldensimplicity.com/
Lisa Henke http://mylittlecreativeescape.blogspot.com/
Heather Hoffman http://housesbuiltofcards.blogspot.com
Joy Taylor http://www.simplebydesignblog.com/
Chrissy Larson http://chrissycards.blogspot.com/
Angel Rivera http://angelsworld94.blogspot.com/
Karen Baker http://thebalddragonfly.blogspot.com/
Jennifer Carter http://jensinkspot.blogspot.com/
Amy Kolling http://stamp-n-paradise.blogspot.com/
Lea Lawson http://www.lealawsoncreates.com/
Sarah Jay http://www.criminalgrace.com/
Link to Store http://lilinkerdesigns.com/
I hope you enjoyed the past 3 days of new Lil' Inker product, and can't wait to see what you create with your new goodies! Head on over to the Lil' Inker Designs store & pick up your must haves!!
Until later,
~L.

Welcome to day 2 of this month's Lil' Inker Designs April release!
We've got some fantastic stamps, dies & papers to share with you
this month. They will all be linked below for easy access to viewing
& purchasing all of the new items!
Today my cards are focused on the new Tribal Chic items! I was going to turn this first card into a shaker card, but I liked it so much in its simple form that I decided to leave it without the shaker part.

And for my second card I did one of my favorite techniques...rainbow watercolor over white heat embossing!

For your shopping convenience, I have provided a link list with all of the newly released products on it. I will only be linking Lil' Inker Designs product for today's post, but if you have questions about anything else that I used...please leave them in the comments & I will reply.
Lil' Inker Designs April 2016 Product Release
As is the case every month, this is a blog hop. Here is today's order so you don't miss a thing! There are three $15 gift certificates up for grabs...just be sure to leave comments on each blog to up your chances!
LID Blog http://www.shoplilinker.blogspot.com/
Jennifer Carter http://jensinkspot.blogspot.com/
Karen Baker http://thebalddragonfly.blogspot.com/
Stephanie Gold http://goldensimplicity.com/
Chrissy Larson http://chrissycards.blogspot.com/
Joy Taylor http://www.simplebydesignblog.com/
Amy Kolling http://stamp-n-paradise.blogspot.com/
Sarah Jay http://www.criminalgrace.com/
Angel Rivera http://angelsworld94.blogspot.com/
Lisa Henke http://mylittlecreativeescape.blogspot.com/
Lea Lawson http://www.lealawsoncreates.com/
Heather Hoffman http://housesbuiltofcards.blogspot.com
Link to Store http://lilinkerdesigns.com/
I will be back tomorrow for Day 3 of the release!
Until later,
~L.
Today my cards are focused on the new Tribal Chic items! I was going to turn this first card into a shaker card, but I liked it so much in its simple form that I decided to leave it without the shaker part.
And for my second card I did one of my favorite techniques...rainbow watercolor over white heat embossing!
For your shopping convenience, I have provided a link list with all of the newly released products on it. I will only be linking Lil' Inker Designs product for today's post, but if you have questions about anything else that I used...please leave them in the comments & I will reply.
Lil' Inker Designs April 2016 Product Release
As is the case every month, this is a blog hop. Here is today's order so you don't miss a thing! There are three $15 gift certificates up for grabs...just be sure to leave comments on each blog to up your chances!
LID Blog http://www.shoplilinker.blogspot.com/
Jennifer Carter http://jensinkspot.blogspot.com/
Karen Baker http://thebalddragonfly.blogspot.com/
Stephanie Gold http://goldensimplicity.com/
Chrissy Larson http://chrissycards.blogspot.com/
Joy Taylor http://www.simplebydesignblog.com/
Amy Kolling http://stamp-n-paradise.blogspot.com/
Sarah Jay http://www.criminalgrace.com/
Angel Rivera http://angelsworld94.blogspot.com/
Lisa Henke http://mylittlecreativeescape.blogspot.com/
Lea Lawson http://www.lealawsoncreates.com/
Heather Hoffman http://housesbuiltofcards.blogspot.com
Link to Store http://lilinkerdesigns.com/
I will be back tomorrow for Day 3 of the release!
Until later,
~L.

Welcome to day 1 of this month's Lil' Inker Designs April release! We've got some fantastic stamps, dies & papers to share with you this month. They will all be linked below for easy access to viewing & purchasing all of the new items!
For my first card I created an elegant mother's day card in black, gold & white. I added ribbon to my card, which I haven't done in ages!
For my second card I stuck with a metallic color palette, and made a graduation shaker card. I paired some of the new items with the previously released "Go Confidently" stamp set.

For your shopping convenience, I have provided a link list with all of the newly released products on it. I will only be linking Lil' Inker Designs product for today's post, but if you have questions about anything else that I used...please leave them in the comments & I will reply.
Lil' Inker Designs April 2016 Product Release
As is the case every month, this is a blog hop. Here is today's order so you don't miss a thing! There are three $15 gift certificates up for grabs...just be sure to leave comments on each blog to up your chances!
LID Blog http://www.shoplilinker.blogspot.com/
Karen Baker http://thebalddragonfly.blogspot.com/
Angel Rivera http://angelsworld94.blogspot.com/
Amy Kolling http://stamp-n-paradise.blogspot.com/
Chrissy Larson http://chrissycards.blogspot.com/
Stephanie Gold http://goldensimplicity.com/
Sarah Jay http://www.criminalgrace.com/
Jennifer Carter http://jensinkspot.blogspot.com/
Lisa Henke http://mylittlecreativeescape.blogspot.com/
Lea Lawson http://www.lealawsoncreates.com/
Heather Hoffman http://housesbuiltofcards.blogspot.com
Joy Taylor http://www.simplebydesignblog.com/
Link to Store http://lilinkerdesigns.com/
I will be back tomorrow for Day 2 of the release!
Until later,
~L.
For my first card I created an elegant mother's day card in black, gold & white. I added ribbon to my card, which I haven't done in ages!
For my second card I stuck with a metallic color palette, and made a graduation shaker card. I paired some of the new items with the previously released "Go Confidently" stamp set.
For your shopping convenience, I have provided a link list with all of the newly released products on it. I will only be linking Lil' Inker Designs product for today's post, but if you have questions about anything else that I used...please leave them in the comments & I will reply.
Lil' Inker Designs April 2016 Product Release
As is the case every month, this is a blog hop. Here is today's order so you don't miss a thing! There are three $15 gift certificates up for grabs...just be sure to leave comments on each blog to up your chances!
LID Blog http://www.shoplilinker.blogspot.com/
Karen Baker http://thebalddragonfly.blogspot.com/
Angel Rivera http://angelsworld94.blogspot.com/
Amy Kolling http://stamp-n-paradise.blogspot.com/
Chrissy Larson http://chrissycards.blogspot.com/
Stephanie Gold http://goldensimplicity.com/
Sarah Jay http://www.criminalgrace.com/
Jennifer Carter http://jensinkspot.blogspot.com/
Lisa Henke http://mylittlecreativeescape.blogspot.com/
Lea Lawson http://www.lealawsoncreates.com/
Heather Hoffman http://housesbuiltofcards.blogspot.com
Joy Taylor http://www.simplebydesignblog.com/
Link to Store http://lilinkerdesigns.com/
I will be back tomorrow for Day 2 of the release!
Until later,
~L.

Hi friends! Welcome to day 4 of the Winnie & Walter February release. Today we are showcasing the following items:
 I started with a turquoise A2 card base, then added a block of glittered paper to the middle. I diecut a white cardstock block, and then diecut the diamond from the middle of it. I left the diecut inlaid and just used a bit of washi tape to keep it in place until adding the transparency behind it. I poured some sequins to the middle of the card, then added the top layer using foam adhesive (make sure none of the sequins can escape!). I diecut the word congrats 4 times from white cardstock, and layered to the diamond. I accented the end of the sentiment with an enamel dot to finish.
I'm going to share my second card real quick, because while the colors & content are different...the directions are essentially the same!

 Just change up the card orientation, colors & sentiment word...and it is basically the same card! I love that even though the process is the same, the card is completely different from the first. This is also an easy way to create multiple shaker cards at a time!
SUPPLIES:
There are some giveaways going on at the Winnie & Walter blog to be aware of:
The rest of the Winnie & Walter talent also have amazing samples to share with you, so be sure to check out their blogs too!
Alright...some housekeeping stuff. Be sure to comment on all of the giveaway posts by 11:59pm tonight. They will be closed after that, and all winners will be posted by March 2nd. All of the new products will be available for purchase TONIGHT, so be sure to head on over to the Winnie & Walter store to pick up your must haves!!!
Until later,
~L.
Card Challenges:
LS Exclusives: So Tweet with Evelin T Designs
Flawless Diamond Cutaways
Flawless Heart Cutaways
Winnie's Sparkly Shaker Selection
Walter's Sparkly Shaker Selection
I've created two shaker cards today that are similar in concept & design, but look pretty different from each other. For the first one I've paired the new Flawless Diamond cutaway & Walter's Sparkly Shaker Selection with some previously released dies.
I've created two shaker cards today that are similar in concept & design, but look pretty different from each other. For the first one I've paired the new Flawless Diamond cutaway & Walter's Sparkly Shaker Selection with some previously released dies.
I'm going to share my second card real quick, because while the colors & content are different...the directions are essentially the same!
SUPPLIES:
There are some giveaways going on at the Winnie & Walter blog to be aware of:
- The Belated 2nd Birthday Bash Giveaway - Stamps for a Year!!
- The Big Giveaway - February stamp & creative screening release
- February Day 1 giveaway
- February Day 2 giveaway
- February Day 3 giveaway
- February Day 4 giveaway
The rest of the Winnie & Walter talent also have amazing samples to share with you, so be sure to check out their blogs too!
- Gayatri Murali
- Heather Hoffman
- Heather Pulvirenti
- Kelly GriglionSe
- Lydia Evans
- Mayuri
- Vanessa Menhorn
- Kate Capper
- Emily Leiphart (February Leading Lady)
Alright...some housekeeping stuff. Be sure to comment on all of the giveaway posts by 11:59pm tonight. They will be closed after that, and all winners will be posted by March 2nd. All of the new products will be available for purchase TONIGHT, so be sure to head on over to the Winnie & Walter store to pick up your must haves!!!
Until later,
~L.
Card Challenges:

Hi friends! Welcome to day 3 of the Winnie & Walter February release. Today we are showcasing the following items:
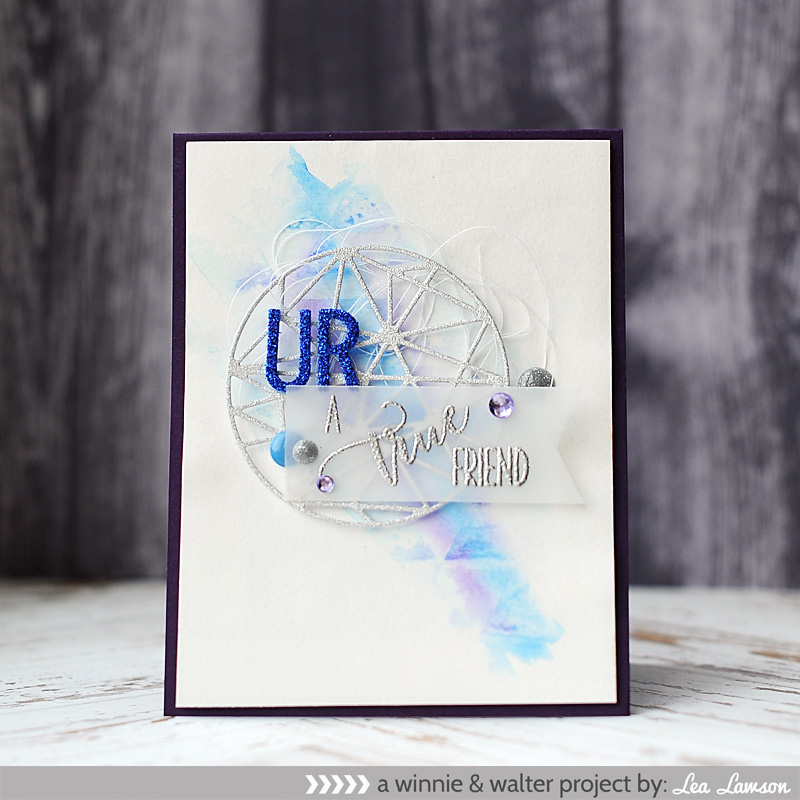
My first card uses the new True Multifaceted Heart cutaway, and combined it with the previously released My Precious stamp set. The sentiment is a little bit of an ode to Lord of the Rings :), but more just a thought of my little Arabella Grace. She is my precious treasure in Heaven.


SUPPLIES:


Kindness with Evelin T Designs stamp set
True Multifaceted Circle Cutaways
True Multifaceted Heart Cutaways
My first card uses the new True Multifaceted Heart cutaway, and combined it with the previously released My Precious stamp set. The sentiment is a little bit of an ode to Lord of the Rings :), but more just a thought of my little Arabella Grace. She is my precious treasure in Heaven.
I started with a coral A2 card base. Then I added the distress inks to a watercolor block using the smooshing technique. Once dry, I adhered the watercolor block to the card base using foam tape. I diecut the heart from gold glitter paper, then adhered it to the card front with a knot of gold thread. I stamped & heat embossed the sentiment to vellum, then cut into an arrow shape. I adhered the sentiment strip over top of the heart, then accented with enamel dots to finish.
SUPPLIES:
My next card is a fairly similar design, just flipped & with different colors. I used the True Multifaceted Circle cutaway, and created a sentiment from the previously released True stamp set. The background was also created with watercolor and the Scenery: Triangled Creative Screening.
I started with an eggplant A2 card base. Then I liberally applied color to a watercolor paper block, and placed the triangle creative screening over top of it. I placed a plastic block over top of it, and then applied weight to the top of it. Once dry, I adhered the watercolor block to the card front using foam tape. I diecut the circle from silver glitter paper, then adhered it to the card front with a knot of white thread. I stamped & heat embossed the sentiment to vellum, then cut a banner edge to the right side of it. I adhered it to the bottom of the diecut circle, and accented with enamel dots. I added the glittered foam letters to the card to finish the sentiment.
SUPPLIES:
My final card uses just the brand new Kindness stamp set. When I first saw this tree, I knew it needed to be done with a rainbow watercolor gradient!
I started with a red A2 card base. I stamped & heat embossed the tree to a watercolor block. I then painted the tree in a rainbow gradient, and the trunk in brown. Once dry, I stamped & heat embossed the large part of the sentiment in eggplant. I stamped the rest of the sentiment in brown ink using my MISTI. I adhered the watercolor panel to the card base using foam tape, then accented with a red heart sticker to finish.
SUPPLIES:
There are some giveaways going on at the Winnie & Walter blog to be aware of:
The rest of the Winnie & Walter talent also have amazing samples to share with you, so be sure to check out their blogs too!
I will be back tomorrow morning with some more projects using these brand new products! Hope to see you again!
Until later,
~L.
Card Challenges:
- The Belated 2nd Birthday Bash Giveaway - Stamps for a Year!!
- The Big Giveaway - February stamp & creative screening release
- February Day 1 giveaway
- February Day 2 giveaway
- February Day 3 giveaway
The rest of the Winnie & Walter talent also have amazing samples to share with you, so be sure to check out their blogs too!
- Gayatri Murali
- Heather Hoffman
- Heather Pulvirenti
- Kelly GriglionSe
- Lydia Evans
- Mayuri
- Vanessa Menhorn
- Kate Capper
- Emily Leiphart (February Leading Lady)
I will be back tomorrow morning with some more projects using these brand new products! Hope to see you again!
Until later,
~L.
Card Challenges:

Hi friends! Welcome to day 2 of the Winnie & Walter February release. Today we are showcasing the following items:
Scenery: Into the Woods stamp set
Wishing You with Evelin T Designs (free with purchase stamp set)
True Multifaceted Border Cutaways
For my first card, I created the sentiment with the awesome "free with purchase" stamp set, Wishing You, and paired it with the new Pattern of the Rings Creative Screening that we introduced yesterday.
 I started with a black A2 card base. I inked a white cardstock block in a rainbow gradient using the creative screening & distress inks. I sprinkled some water to the inked background, then lifted it back up with a towel. Once dry, I stamped the scripted "Wishing You" and stars to the inked background. Then I adhered it to the card base with foam tape. I stamped the rest of the sentiment to black cardstock, cut it into a thin strip & added banner edges to each end. I adhered it to the card front with foam dots, and then accented with a strip of jewels to finish.
SUPPLIES:
For my next card I did a very similar design, except I used the True Multifaceted Border cutaways to create the background. I used the same stamp set as above, and just used one of the different finishing sentiments.

 I started with a black A2 card base. I cut a block of white cardstock slightly smaller, and stamped the sentiment to it. I diecut the multifaceted border top from white cardstock 5 times, and then the border bottom from rainbow colors. I layered them together, then layered them to the stamped white cardstock block. I adhered the block to the card base using foam tape, and then accented with a strip of jewels to finish.
SUPPLIES:
My final card is very different from the two above. It is still winter in my neck of woods, and the Scenery: Into the Woods stamp set was perfect for making this seasonal card. I paired it with the previously released Scenery: Big Bang Circle creative screening to create my wintry scene. The sentiment is from the Comfort + Joy stamp set, and the cute little cardinal is from the Happiest of Holidays stamp set.

 I started with a kraft A2 card base. I stamped the trees in white pigment ink directly to the right side of the card using my MISTI. Then I applied white embossing paste using the Big Bang Circle creative screening over top of the trees & the rest of the card. Then I stamped the sentiment inside of some of the snowflakes using my MISTI. I stamped the bird to red patterned paper, cut it out & adhered it to the front with foam dots. I accented the card front with white sequins to finish.
SUPPLIES:
There are some giveaways going on at the Winnie & Walter blog to be aware of:
The rest of the Winnie & Walter talent also have amazing samples to share with you, so be sure to check out their blogs too!
I will be back tomorrow morning with some more projects using these brand new products! Hope to see you again!
Until later,
~L.
Card Challenges:
Scenery: Into the Woods stamp set
Wishing You with Evelin T Designs (free with purchase stamp set)
True Multifaceted Border Cutaways
For my first card, I created the sentiment with the awesome "free with purchase" stamp set, Wishing You, and paired it with the new Pattern of the Rings Creative Screening that we introduced yesterday.
SUPPLIES:
For my next card I did a very similar design, except I used the True Multifaceted Border cutaways to create the background. I used the same stamp set as above, and just used one of the different finishing sentiments.
SUPPLIES:
My final card is very different from the two above. It is still winter in my neck of woods, and the Scenery: Into the Woods stamp set was perfect for making this seasonal card. I paired it with the previously released Scenery: Big Bang Circle creative screening to create my wintry scene. The sentiment is from the Comfort + Joy stamp set, and the cute little cardinal is from the Happiest of Holidays stamp set.
SUPPLIES:
There are some giveaways going on at the Winnie & Walter blog to be aware of:
- The Belated 2nd Birthday Bash Giveaway - Stamps for a Year!!
- The Big Giveaway - February stamp & creative screening release
- February Day 1 giveaway
- February Day 2 giveaway
The rest of the Winnie & Walter talent also have amazing samples to share with you, so be sure to check out their blogs too!
- Gayatri Murali
- Heather Hoffman
- Heather Pulvirenti
- Kelly Griglione
- Lydia Evans
- Mayuri
- Vanessa Menhorn
- Kate Capper
- Emily Leiphart (February Leading Lady)
I will be back tomorrow morning with some more projects using these brand new products! Hope to see you again!
Until later,
~L.
Card Challenges:

Hi friends! It's been super quiet around here since I made my exciting announcement on Valentine's day. One...I haven't felt super awesome the past couple weeks. And two...I've been working hard on this month's new Winnie & Walter release! It's been a long while since I've felt able to participate in a release week, and starting back up is part of my healing process. Before I get on with my post, I just wanted to thank everyone for the sweet & encouraging comments on our announcement. I know that many of you have continually prayed for me over the past year, and words could never accurately express my gratitude.
Alright...so back to the Winnie & Walter February release day 1! This morning we are showcasing the following new items:
In Bloom: Eva's Favorite Flowers stamp set
In A Word: Kisses Cutaway
Scenery: Pattern of the Rings Creative Screening
For my first card I've combined the new Creative Screening with the new Kisses Cutaway. I paired them with the previously released In A Word: Hugs Cutaway, along with the ampersand from The Big, the Bold and the Merry stamp set.
 I started with an eggplant colored A2 card base. To create the screened background, I blended 4 shades of distress ink from purple to light pink. I adhered the inked background to the card base with foam tape. Next I diecut the words from matching dotted patterned papers, then cut each word from white cardstock a few more times. I layered them together to provide thickness & stability, and adhered them to the middle of the card. I stamped & heat embossed the ampersand to vellum, cut it out & added it to the top. I finished by accenting the card with jewels & sequins.
SUPPLIES:
For my second card, I combined the new In Bloom: Ava's Favorite Flowers stamp set, with a few previously released items. The sentiment was created from the Happiest of Holidays stamp set, and I love that you can create non-holiday themed sentiments with many of the Winnie & Walter seasonal stamp sets. I also used the In Bloom: Paulina's Greenery Cutaways to help with my accenting.

 I started with a white A2 card base. To create the background, I blended three shades of distress ink together in aqua, pink & yellow. I splattered the front with water, then picked it back up with a towel. I then stamped & heat embossed the flowers to the front. Once set, I adhered the inked background to the card base with foam tape. I stamped the sentiment to a strip of white cardstock, then cut it into an arrow shape. I adhered it over top a knot of gold thread with dimensional adhesive. I diecut the greenery multiple times from vellum, then adhered it around the sentiment banner along with pearl flourishes. To finish, I accented the front with gold dots.
SUPPLIES:
There are some giveaways going on at the Winnie & Walter blog to be aware of:
The rest of the Winnie & Walter talent also have amazing samples to share with you, so be sure to check out their blogs too!
I will be back tomorrow morning with some more projects using these brand new products! Hope to see you again!
Until later,
~L.
Card Challenges:
Alright...so back to the Winnie & Walter February release day 1! This morning we are showcasing the following new items:
In Bloom: Eva's Favorite Flowers stamp set
In A Word: Kisses Cutaway
Scenery: Pattern of the Rings Creative Screening
For my first card I've combined the new Creative Screening with the new Kisses Cutaway. I paired them with the previously released In A Word: Hugs Cutaway, along with the ampersand from The Big, the Bold and the Merry stamp set.
SUPPLIES:
For my second card, I combined the new In Bloom: Ava's Favorite Flowers stamp set, with a few previously released items. The sentiment was created from the Happiest of Holidays stamp set, and I love that you can create non-holiday themed sentiments with many of the Winnie & Walter seasonal stamp sets. I also used the In Bloom: Paulina's Greenery Cutaways to help with my accenting.
SUPPLIES:
There are some giveaways going on at the Winnie & Walter blog to be aware of:
- The Belated 2nd Birthday Bash Giveaway - Stamps for a Year!!
- The Big Giveaway - February stamp & creative screening release
- February Day 1 giveaway
The rest of the Winnie & Walter talent also have amazing samples to share with you, so be sure to check out their blogs too!
- Gayatri Murali
- Heather Hoffman
- Heather Pulvirenti
- Kelly Griglione
- Lydia Evans
- Mayuri
- Vanessa Menhorn
- Kate Capper
- Emily Leiphart (February Leading Lady)
I will be back tomorrow morning with some more projects using these brand new products! Hope to see you again!
Until later,
~L.
Card Challenges:


I took a pregnancy test when we woke up on Christmas morning. Within seconds (not minutes like the test instructs) it told me what I already knew...I am pregnant for the 3rd time. As of today I am almost 12 weeks along, and this little one is due to arrive around August 30, 2016. I've been showing since about 7 weeks along...and I am so sick of trying to "hide" being pregnant. The notion of a safe zone doesn't really mean anything to me anyways.


This was not a surprise. After going through the ectopic I don't just get pregnant, so I require a little bit of help from my doctor. This was, however, quite the journey that I am still on. Right after Ellie died, I begged God to take my longing to have a child away. The thought of getting pregnant again physically sickened me, and the thought of it happening again was extremely overwhelming.
That part...it's still overwhelming. And scary. Because the fact of the matter is that it is still possible. I have no promise or guarantee that this pregnancy will end any differently. Because they found nothing wrong with me that would have caused Ellie's issues, there are no precautions that can be taken to prevent them. My doctor has decided to separate the fact that I went into pre-term labor from Ellie's diagnosis, so there will be some things that get done from 16-36 weeks to try & stop that possibility from happening.
I could choose to carry this baby with constant fear. I could wait every single day for the other shoe to drop. I believe with certainty that no one would blame me if I did. But I just can't. I am so sick of being scared. So I'm choosing this instead:
"When I am afraid, I put my trust in You." -Psalm 56:3
Six months ago God didn't take my longing to start a family away from me. Instead, I had to struggle and fight and pray and claw my way to where I am at today. And that is a place where I can separate the death of Ellie from my view of pregnancy. I still struggle with her death. I wish it were different...but it's not. It's never going to be. But there are also realities that I've had to face about wanting to have a family that I can't wait on forever.


I am not ashamed of becoming pregnant. I am excited and happy and thrilled...but I'm also apprehensive. I'm not apprehensive to love...that is an inane part of me. We saw this little one's heartbeat at our first ultrasound. I was 5 weeks, 6 days along. At a time when everything about pregnancy is still so uncertain & volatile...and we were able to see a heartbeat. No matter what happens...I love this little baby.
I'm apprehensive of others. Of telling people our news. Not because I am ashamed or unhappy. But because I feel the need to protect myself from people. I feel the need to protect myself from unsolicited advice. Because no matter how well meaning the advice giver is trying to be...all it makes me feel is that they think I could have done something differently in my pregnancy with Ellie. That I somehow could have changed the outcome if I'd only done this or that.
Let me state this right here & right now.
I could not have eaten better.
Or drank more water.
Or rested more.
Or prayed more.
Or asked for more medical opinions.
I did everything I could for Ellie. It just wasn't enough to overcome her diagnosis. For some reason that I will never know or understand....I wasn't allowed to keep her. Her life was meant to be spent in Heaven.
So please, unless I ask for it, do not try to give me advice. Please don't allude to this one "working out" or being the baby I was meant to have. Because quite frankly, that insults the memory of my precious Arabella Grace. I've had to realize that our family will never be complete this side of Heaven. We could have a million biological, adopted or fostered children...but we will never be complete. A very precious, wanted & longed for baby girl will always be missing, and I get to deal with that reality every single day for the rest of my life.
What can you do? Be happy for me. Pray for me. Pray for my heart as I continue to grieve my Ellie at the same time I anticipate the possibility of a new life. Pray for my well being & the baby's. And just be there with me. Notice that I said with, and not for. For indicates action...and I don't really need anything done FOR me. But you can be with me, side by side, as I encounter all the different thoughts, feelings & emotions that come along with being pregnant again after a very tragic loss. I know that is an uncomfortable place to be, but it is truly the best thing you can do for those that are grieving.
I'll close this blog post with a little funny outtake from our photo shoot. My husband thought we should take a photo making fun of all the props we used. Well, technically...all the props I chose for us to use. He just obliges me. ;)

Until later,
~L.
I'll close this blog post with a little funny outtake from our photo shoot. My husband thought we should take a photo making fun of all the props we used. Well, technically...all the props I chose for us to use. He just obliges me. ;)

Until later,
~L.

Welcome to our final blog hop day for the Lil' Inker Designs first release of the year. Today I focused on Valentine themed cards.
I was really looking forward to Valentine's day with Ellie. {Who am I kidding...I was looking forward to everything with Ellie.} I would have loved kissing her all over with bright red & pink lipstick, and taking the cutest photos of her. I would have loved dressing her up in the softest, pink & red, covered in hearts outfits for the first 2 weeks of the month. Friends...these firsts are just really hard.
If I could send both of these cards to Heaven...I would do it in a heartbeat.
The first one is a shaker card, and I used the previously released Diamond Lace cover up die to create the background. Then I added the shaker feature to the top of that.
 Card Challenges:
For my next card, I created the background using the previously released Stitched Woodgrain cover up die. I stamped the lips directly to the background using last year's Smooches stamp set. Then I embossed the sentiment, added the diecut pinwheel & accented with jewels.

 Card Challenges:
For your shopping convenience, I have provided a link list with all of the newly released products on it. I will only be linking Lil' Inker Designs product for today's post, but if you have questions about anything else that I used...please leave them in the comments & I will reply.
Lil' Inker Designs January 2016 Product Release
As is the case every month, this is a blog hop. Here is today's order so you don't miss a thing!
LID Blog http://www.shoplilinker.blogspot.com/
Lea Lawson http://www.lealawsoncreates.com/
Lisa Henke http://mylittlecreativeescape.blogspot.com/
Maureen Merritt http://www.mamamostamps.com/
Jennifer Carter http://jensinkspot.blogspot.com/
Amy Kolling http://stamp-n-paradise.blogspot.com/
Karen Baker http://thebalddragonfly.blogspot.com/
Sarah Jay http://www.criminalgrace.com/
Heather Hoffman http://housesbuiltofcards.blogspot.com
Chrissy Larson http://chrissycards.blogspot.com/
Link to Store http://lilinkerdesigns.com/
I hope you've enjoyed the past three days of showcasing the newly released product from Lil' Inker Designs. You have until the 31st to leave a comment on all three of the blog hop days, which will make you eligible for winning 1 of 3 $15 gift certificates. So don't forget to comment on each blog to increase your chances.
Until later,
~L.
I was really looking forward to Valentine's day with Ellie. {Who am I kidding...I was looking forward to everything with Ellie.} I would have loved kissing her all over with bright red & pink lipstick, and taking the cutest photos of her. I would have loved dressing her up in the softest, pink & red, covered in hearts outfits for the first 2 weeks of the month. Friends...these firsts are just really hard.
If I could send both of these cards to Heaven...I would do it in a heartbeat.
The first one is a shaker card, and I used the previously released Diamond Lace cover up die to create the background. Then I added the shaker feature to the top of that.
- CASology #182 - adore
- Freshly Made Sketches #221 - sketch
- Simon Says Stamp Wednesday - anything goes
For my next card, I created the background using the previously released Stitched Woodgrain cover up die. I stamped the lips directly to the background using last year's Smooches stamp set. Then I embossed the sentiment, added the diecut pinwheel & accented with jewels.
- Simon Says Stamp Monday - love is in the air + red
- Addicted to CAS #80 - red
- Word Art Wednesday #218 - anything goes
For your shopping convenience, I have provided a link list with all of the newly released products on it. I will only be linking Lil' Inker Designs product for today's post, but if you have questions about anything else that I used...please leave them in the comments & I will reply.
Lil' Inker Designs January 2016 Product Release
As is the case every month, this is a blog hop. Here is today's order so you don't miss a thing!
LID Blog http://www.shoplilinker.blogspot.com/
Lea Lawson http://www.lealawsoncreates.com/
Lisa Henke http://mylittlecreativeescape.blogspot.com/
Maureen Merritt http://www.mamamostamps.com/
Jennifer Carter http://jensinkspot.blogspot.com/
Amy Kolling http://stamp-n-paradise.blogspot.com/
Karen Baker http://thebalddragonfly.blogspot.com/
Sarah Jay http://www.criminalgrace.com/
Heather Hoffman http://housesbuiltofcards.blogspot.com
Chrissy Larson http://chrissycards.blogspot.com/
Link to Store http://lilinkerdesigns.com/
I hope you've enjoyed the past three days of showcasing the newly released product from Lil' Inker Designs. You have until the 31st to leave a comment on all three of the blog hop days, which will make you eligible for winning 1 of 3 $15 gift certificates. So don't forget to comment on each blog to increase your chances.
Until later,
~L.

Welcome to day 2 of the January release for Lil' Inker Designs! I've got a couple more cards to share with you today. These cards are more product oriented than yesterdays, with more focus on dies than stamping.
I am always really drawn to the colors I used on this card. They were the main colors of the nursery I planned for Ellie, and what I gravitated to in her wardrobe. They are also really pretty for a love themed card. I used the new Valentine Word Tags to create the sentiment, and the Dual Dotted Hearts as accents.

Card Challenges:
It's still winter in my neck of the woods, and my next card is a fun shaker card using the new Coffee Cozy stamps & dies. I also used the previously released Dual Dotted Tags to help create the shaker accent.

 Card Challenges:
For your shopping convenience, I have provided a link list with all of the newly released products on it. I will only be linking Lil' Inker Designs product for today's post, but if you have questions about anything else that I used...please leave them in the comments & I will reply.
Lil' Inker Designs January 2016 Product Release
As is the case every month, this is a blog hop. Here is today's order so you don't miss a thing!
LID Blog http://www.shoplilinker.blogspot.com/
Sarah Jay http://www.criminalgrace.com/
Jennifer Carter http://jensinkspot.blogspot.com/
Lea Lawson http://www.lealawsoncreates.com/
Lisa Henke http://mylittlecreativeescape.blogspot.com/
Heather Hoffman http://housesbuiltofcards.blogspot.com
Chrissy Larson http://chrissycards.blogspot.com/
Karen Baker http://thebalddragonfly.blogspot.com/
Maureen Merritt http://www.mamamostamps.com/
Amy Kolling http://stamp-n-paradise.blogspot.com/
Link to Store http://lilinkerdesigns.com/
I will be back tomorrow with our final day of projects for the January release.
Until later,
~L.

I am always really drawn to the colors I used on this card. They were the main colors of the nursery I planned for Ellie, and what I gravitated to in her wardrobe. They are also really pretty for a love themed card. I used the new Valentine Word Tags to create the sentiment, and the Dual Dotted Hearts as accents.
Card Challenges:
- The Paper Players #279 - sketch
- Cupcake Inspirations #244 - color story
- Simon Says challenge - anything goes
It's still winter in my neck of the woods, and my next card is a fun shaker card using the new Coffee Cozy stamps & dies. I also used the previously released Dual Dotted Tags to help create the shaker accent.

For your shopping convenience, I have provided a link list with all of the newly released products on it. I will only be linking Lil' Inker Designs product for today's post, but if you have questions about anything else that I used...please leave them in the comments & I will reply.
Lil' Inker Designs January 2016 Product Release
As is the case every month, this is a blog hop. Here is today's order so you don't miss a thing!
LID Blog http://www.shoplilinker.blogspot.com/
Sarah Jay http://www.criminalgrace.com/
Jennifer Carter http://jensinkspot.blogspot.com/
Lea Lawson http://www.lealawsoncreates.com/
Lisa Henke http://mylittlecreativeescape.blogspot.com/
Heather Hoffman http://housesbuiltofcards.blogspot.com
Chrissy Larson http://chrissycards.blogspot.com/
Karen Baker http://thebalddragonfly.blogspot.com/
Maureen Merritt http://www.mamamostamps.com/
Amy Kolling http://stamp-n-paradise.blogspot.com/
Link to Store http://lilinkerdesigns.com/
I will be back tomorrow with our final day of projects for the January release.
Until later,
~L.


For the first time in a long time, I am joining in on this month's full release of new Lil' Inker Designs product. Laura has been wonderfully supportive, and kept me part of the team while I stepped back & took the time that I needed.
I've got two cards to share with you today using some of the brand new products. A friendship card seemed fitting to share as my first one, in honor of so many people, Laura especially, in this industry that have reached out to me in some way. I may not have responded back, but know that I have read every comment, private message & email...and I have appreciated them.
I thought that watercoloring inside of the stitched circles would make it look a little bit like the sun, which seemed fitting for the sentiment. You will also see in the instructions that I misted the entire watercolor block with Heidi Swapp Color Shine in white. It is impossible to photograph, but because this mist isn't opaque, it just leaves a nice shimmer to the entire card. It is a quick & easy way to add the shimmer, and dries fast.
 How to create:
For my next card, I made a kid-friendly valentine using lots of the little critters in the Lovie Friends stamp set. I don't have the supplies nor skills to color in these adorable critters, but I really wanted to use them. So, I did the next best thing and watercolored them in a rainbow gradient. I thought about how much Ellie probably would have loved getting this card when she was a bit older, and how I hope she would have my same affinity for rainbows.
 How to create:
For your shopping convenience, I have provided a link list with all of the newly released products on it. I will only be linking Lil' Inker Designs product for today's post, but if you have questions about anything else that I used...please leave them in the comments & I will reply.
Lil' Inker Designs January 2016 Product Release
As is the case every month, this is a blog hop. Here is today's order so you don't miss a thing!
LID Blog http://www.shoplilinker.blogspot.com/
Karen Baker http://thebalddragonfly.blogspot.com/
Heather Hoffman http://housesbuiltofcards.blogspot.com
Lea Lawson http://www.lealawsoncreates.com/
Sarah Jay http://www.criminalgrace.com/
Chrissy Larson http://chrissycards.blogspot.com/
Amy Kolling http://stamp-n-paradise.blogspot.com/
Lisa Henke http://mylittlecreativeescape.blogspot.com/
Jennifer Carter http://jensinkspot.blogspot.com/
Maureen Merritt http://www.mamamostamps.com/
Link to Store http://lilinkerdesigns.com/
I will be back tomorrow for Day 2 of the release!
Until later,
~L.

I've got two cards to share with you today using some of the brand new products. A friendship card seemed fitting to share as my first one, in honor of so many people, Laura especially, in this industry that have reached out to me in some way. I may not have responded back, but know that I have read every comment, private message & email...and I have appreciated them.
I thought that watercoloring inside of the stitched circles would make it look a little bit like the sun, which seemed fitting for the sentiment. You will also see in the instructions that I misted the entire watercolor block with Heidi Swapp Color Shine in white. It is impossible to photograph, but because this mist isn't opaque, it just leaves a nice shimmer to the entire card. It is a quick & easy way to add the shimmer, and dries fast.
- Trim & fold A2 card from black cardstock, then set aside.
- Add the stitched edges & circle stitching to the middle of a watercolor block.
- Watercolor the inside of the stitched circles with distress inks in yellows & oranges.
- Dry with a heat gun, then sprinkle water droplets to the watercolor paint.
- Let sit for a moment, then pick them up using a paper towel.
- Flick droplets of orange, yellow & black paint to the front.
- Stamp the sentiment to top of the watercolor circle.
- Mist the entire front of the watercolor block with white Heidi Swapp color shine.
- Adhere the watercolor block to the black cardbase,
- Accent with a gold bow, black enamel dot & sequins to finish.
For my next card, I made a kid-friendly valentine using lots of the little critters in the Lovie Friends stamp set. I don't have the supplies nor skills to color in these adorable critters, but I really wanted to use them. So, I did the next best thing and watercolored them in a rainbow gradient. I thought about how much Ellie probably would have loved getting this card when she was a bit older, and how I hope she would have my same affinity for rainbows.
- Trim & fold A2 card from black cardstock, then set aside.
- Stamp & heat emboss the critters to a watercolor paper block.
- Tape the block to a hard surface, then wet the critters down with clean water.
- Paint the critters in a gradient rainbow using distress inks.
- Once dry, trim the top & bottom edges of the watercolor block & adhere to the black cardbase.
- Stamp & heat emboss the sentiment to black cardstock, then trim.
- Cut a banner edge to the left side, & adhere to the right corner of the card with foam dots.
- Accent with clear jewels to finish.
For your shopping convenience, I have provided a link list with all of the newly released products on it. I will only be linking Lil' Inker Designs product for today's post, but if you have questions about anything else that I used...please leave them in the comments & I will reply.
Lil' Inker Designs January 2016 Product Release
As is the case every month, this is a blog hop. Here is today's order so you don't miss a thing!
LID Blog http://www.shoplilinker.blogspot.com/
Karen Baker http://thebalddragonfly.blogspot.com/
Heather Hoffman http://housesbuiltofcards.blogspot.com
Lea Lawson http://www.lealawsoncreates.com/
Sarah Jay http://www.criminalgrace.com/
Chrissy Larson http://chrissycards.blogspot.com/
Amy Kolling http://stamp-n-paradise.blogspot.com/
Lisa Henke http://mylittlecreativeescape.blogspot.com/
Jennifer Carter http://jensinkspot.blogspot.com/
Maureen Merritt http://www.mamamostamps.com/
Link to Store http://lilinkerdesigns.com/
I will be back tomorrow for Day 2 of the release!
Until later,
~L.


I tried to start up cardmaking again in December, and it just wasn't the right time. The holidays weren't easy for me, and I was going through too many firsts without Ellie. It was overwhelming & I just didn't want to sit at my crafting area. So I did the right thing, and closed it up again. I chose to just focus on surviving the holidays without any additional stress. January has also had some firsts that I needed to deal with....moving into a new year without her & turning 36. I was supposed to have an almost 4 month old when my birthday came around this year. In some really illogical ways, I just felt like a failure. We did some small things to celebrate my birthday, but for the most part...I just needed to let it pass by. The good news is I've come out on the other side mostly unscathed, and feeling a bit more inspired to pick up my crafting supplies again.
I've actually got a card to share with you today...and I actually like how it turned out. (Falling on the floor fainting over here.) It's pretty simple in design, but uses one of my favorite things....rainbow colored watercolor.
How to create:
**Supplies will be linked below for your shopping convenience.**
Here are a few more detail shots of the card:


Well, that is my first card of 2016. It took 25 days to get it done, but it is coming a bit easier to me now. And that is a good thing! I am sure my creativity will ebb & flow as I continue down this road of firsts, and learning how to live and grieve my daughter. As I was making this card, I kept thinking about how true the sentiment is in regards to Ellie. Though her death & absence has left me heartbroken, my world truly is better because of her existence.
Supplies:
Until later,
~L.
Challenges:
“For we are His workmanship, created in Christ Jesus for good works, which God prepared beforehand so that we would walk in them” (Ephesians 2:10). When we think of this verse, we usually think about “good works” as ways we can help others, and that’s true. Remember though: In the beginning when God was getting creative and bringing everything into existence, He evaluated His creation and decided it was “good.” Creativity can minister to a person’s heart the same way a meal or a hug might.
SOURCE
I've actually got a card to share with you today...and I actually like how it turned out. (Falling on the floor fainting over here.) It's pretty simple in design, but uses one of my favorite things....rainbow colored watercolor.
**Supplies will be linked below for your shopping convenience.**
- Trim & fold an A2 card from Cupid's Bow cardstock, set aside.
- Stamp & heat emboss the Origami Map to a piece of watercolor paper.
- Tape the paper block to a hard surface, then wet down the inside of the embossed map.
- Paint the inside of the map in a gradient rainbow using distress inks.
- Dry completely with a heat tool, then sprinkle some water droplets to the front.
- Let the droplets sit for a moment, then pick them up using a paper towel.
- Adhere the watercolor block to the Cupid's Bow card front.
- Diecut the word 'hello' from aqua glitter paper & adhere to the front with foam dots.
- Stamp & heat emboss the rest of the sentiment to black cardstock, and cut into a thin strip.
- Adhere the strip to the top of the 'hello' diecut word with foam dots.
- Accent with colored jewels to finish.
Here are a few more detail shots of the card:
Well, that is my first card of 2016. It took 25 days to get it done, but it is coming a bit easier to me now. And that is a good thing! I am sure my creativity will ebb & flow as I continue down this road of firsts, and learning how to live and grieve my daughter. As I was making this card, I kept thinking about how true the sentiment is in regards to Ellie. Though her death & absence has left me heartbroken, my world truly is better because of her existence.
Supplies:
Until later,
~L.
Challenges:
- Little Tangles #64 - Hello
- House of Cards January - Embossing
- Word Art Wednesday #218 - Anything Goes
“For we are His workmanship, created in Christ Jesus for good works, which God prepared beforehand so that we would walk in them” (Ephesians 2:10). When we think of this verse, we usually think about “good works” as ways we can help others, and that’s true. Remember though: In the beginning when God was getting creative and bringing everything into existence, He evaluated His creation and decided it was “good.” Creativity can minister to a person’s heart the same way a meal or a hug might.
SOURCE
Subscribe to:
Posts (Atom)


Social Icons