

This card features the Lost in the City die, which is a background die that coordinates with the stamp set. I did not use the background stamp, but I did use a sentiment from the Lost in the City stamp set. The letters were cut using the Adore Alpha die set, leaving off the thin outline that it also cuts. Finally, the background was painted in an ombre fashion using our liquid watercolor. This is super easy to do, you just have to be sure to hit each stroke with a heat gun before moving on to the next shade or color, as it will bleed if you don't.

1. Tape a piece of distress watercolor paper down to a water media mat.
2. Paint the strips in ombre fashion, going from Sky Blue to Aquamarine, and finishing with Sapphire.
3. Dry it with a heat gun, then splatter with gold paint.
4. Let those air dry, then cut the watercolor panel with the background die.
5. Diecut the letters 3 times: once from gold glitter paper and twice from white cardstock.
6. Stack & glue the letters together with a Zig glue pen.
7. Stamp the sentiment to white cardstock using onyx black Versafine, then trim into a thin strip.
8. Mount the background to an A2 white card base with foam tape.
9. Add the letters to the middle with foam dots.
10. Add the sentiment strip to the middle of the letters with mixed media adhesive.


Tomorrow is actually the final day to pick up our full set of liquid watercolor at 20% off, as it is the October Featured Product. The savings is already reflected, so no need to use a code. I can't say enough about how much I love using these watercolors. They are so vibrant & vivid, but very easy to tone down. If you struggle with other watercolors, I highly suggest giving these a try. I think you will enjoy using them so much!


That is everything I have for you today! If you have any questions about my card, feel free to leave them in the comments and I will be sure to reply!

Before you move along with your day, I wanted to invite you to follow me on social media. I would love to be crafty friends!
Have a wonderful Wednesday!
SUPPLY LIST

Happy Tuesday, crafty friends! I hope that you had a great weekend and start to your week! I was able to create one card over the weekend...I started it on Friday and didn't finish it until Sunday. Not the most productive weekend, but it sure is cute!
I grabbed this Sweater Weather in the Woods stamp set and coordinating dies from MFT Stamps the minute it released, because it has my hubby's favorite animal (the moose) and my favorite animal (the bear), and a sentiment about pumpkin spice lattes. My life was complete...lol! The card is super simple, and I kept the focus on those cutie critters...in cream sweaters! I LOVE cream colored sweaters during fall - so cozy. I've used the MFT Wednesday Sketch 460 as the jumping off point for my card design.
The coffee toting critters were colored in using Zig Clean Color Real Brush markers. Then I used some dies in my stash to create the background. I've had this Perfectly Plaid Chill 6x6 paper pad from Lawn Fawn for a few years now, and I break it out at least once every fall. I LOVE the colors and the patterns. Finally, I stamped the sentiment to the diecut speech bubble in Gathered Twigs ink from Pinkfresh Studio.

1. Stamp the moose in onyx black Versafine to Strathmore Bristol paper.
2. Color them in with Zig Clean Color Real Brush markers, then diecut.
3. Diecut a plaid panel & white cardstock panel with the largest Essentials Stitched Rectangle.
4. Diecut the stitched white panel with the speech bubble die.
5. Stamp the sentiment to speech bubble layer in Gathered Twigs ink.
6. Stamp the coffee steam to the plaid background in the same ink.
7. Adhere the speech bubble layer to the plaid background.
8. Mount that panel to an A2 card base with a full sheet of foam adhesive.
9. Adhere the critters to the lower left corner, popping the moose up with foam dots.
10. Accent with the Essentials: Jewels Mix in light blue, gold and metallic gold to finish.


As I mentioned, I colored all the stamping in with Zig Clean Color Real Brush markers. Rather than using water, I typically blend the colors with the Zig blender brush. Here is a list of all the colors I've used. At the end you will see some different set options, but I think the only set that will have all of the colors is the 90 set. This Zig Line Up link is one of the best ways to know what colors are offered in each set!


Finally, I did want to mention that I did end up cutting the sentiment apart in order to fit it to my card. I know that is not everyone's cup of tea, so you could mask it if you prefer. If you have any questions about my card, feel free to leave them in the comments and I will be sure to reply!

Before you move along with your day, I wanted to invite you to follow me on social media. I would love to be crafty friends!
Have a wonderful Tuesday!
SUPPLY LIST

Happy Friday, crafty friends! I hope you've had a wonderful week! I just wanted to remind you that Layton's Legacy Fundraiser still has a couple weeks left for donating. Even if you can't donate, I would love if you continued to share it! And don't forget about the Card Drive, which has a theme of Sensitive Sympathy. You don't have to send the cards to me to link them up, that is just an option! :)
I wanted to pop in and share Pinkfresh Studio's weekend promo. We are offering 30% off the Cityscape die and its matching stamp sets with the code 30CITY. This code is valid through Sunday night, or while supplies last. And you must use the code upon checkout in order to get the discount.

I've used the Home for the Holidays stamp set and the Cityscape die (just trimming the top off), along with the Skiing By die set. The background was created with our liquid watercolor, and I also did a little ink blending with our premium dye inks in Metropolis & Rocky Slope on the mountain, and Ocean Breeze for the snow drifts. This is an unusual color palette for me, but I love how it turned out!

1. Tape down Strathmore Bristol paper to a craft mat, then give it a light water wash.
2. Drop liquid watercolor to it in bubblegum, aquamarine, sapphire and licorice. Swirl around until it looks right.
3. Once dry, splatter the front with titanium white & gold paint splatters.
4. Diecut the mountains, snow caps, cityscape and snow drift from Bristol paper & white cardstock.
5. Cover the snow caps in glitter, then adhered to the mountain tops.
6. Lightly ink blend the bottom of the mountains with 2 shades of gray.
7. Stamp the village & snowman to the cityscape die, then trim off the top half.
8. Stamp the trees to that trimmed off portion.
9. Color the village and trees with Zig Clean Color Real Brush markers, then fussy cut the trees.
10. Stamp & heat emboss the sentiment in Gilded to the snow drift.
11. Ink blend the snow drift and around the village with ocean breeze ink.
12. Adhere the watercolor background to an A2 card base with a full panel of foam adhesive.
13. Mount the remaining layers to the front, popping just the tops up with foam tape.
14. Cover the trees in glitter, then adhere to the card front.
15. Add a red jewel to the middle of the wreath to finish.


As I mentioned, I colored all the stamping in with Zig Clean Color Real Brush markers. Rather than using water, I typically blend the colors with the Zig blender brush. Here is a list of all the colors I've used. At the end you will see some different set options, but the only set that will have all of the colors is the 90 set. This Zig Line Up link is one of the best ways to know what colors are offered in each set!


That is all I have for you today! If you have any questions about my card, feel free to leave them in the comments and I will be sure to reply.

Before you move along with your day, I wanted to invite you to follow me on social media. I would love to be crafty friends!
Have a wonderful Friday!
SUPPLY LIST

Happy Monday, crafty friends! I hope this post finds you refreshed, and ready for the new week. Before I get to my video today, I wanted to just give a quick update on my 2nd annual Layton's Card Drive & Fundraiser. With the fundraising efforts, and sales of my benefit stamp set, I am really close to meeting my main goal of $2500. This amount allows me to purchase (50) $50 Starbucks gift cards - one for every bed in the level 4 NICU that Layton lived his entire life. Fundraising continues through November 10th, and anything raised in excess of $2500 will be donated to the Upper Midwest Ronald McDonald house in both Ellie & Layton's memory.
Thank you so much for your support! I appreciate it so much! Below I am going to share a direct link to Layton's Legacy GoFundMe page, and I would love for you to continue sharing it. It's been proven that a shared fundraiser raises more funds.
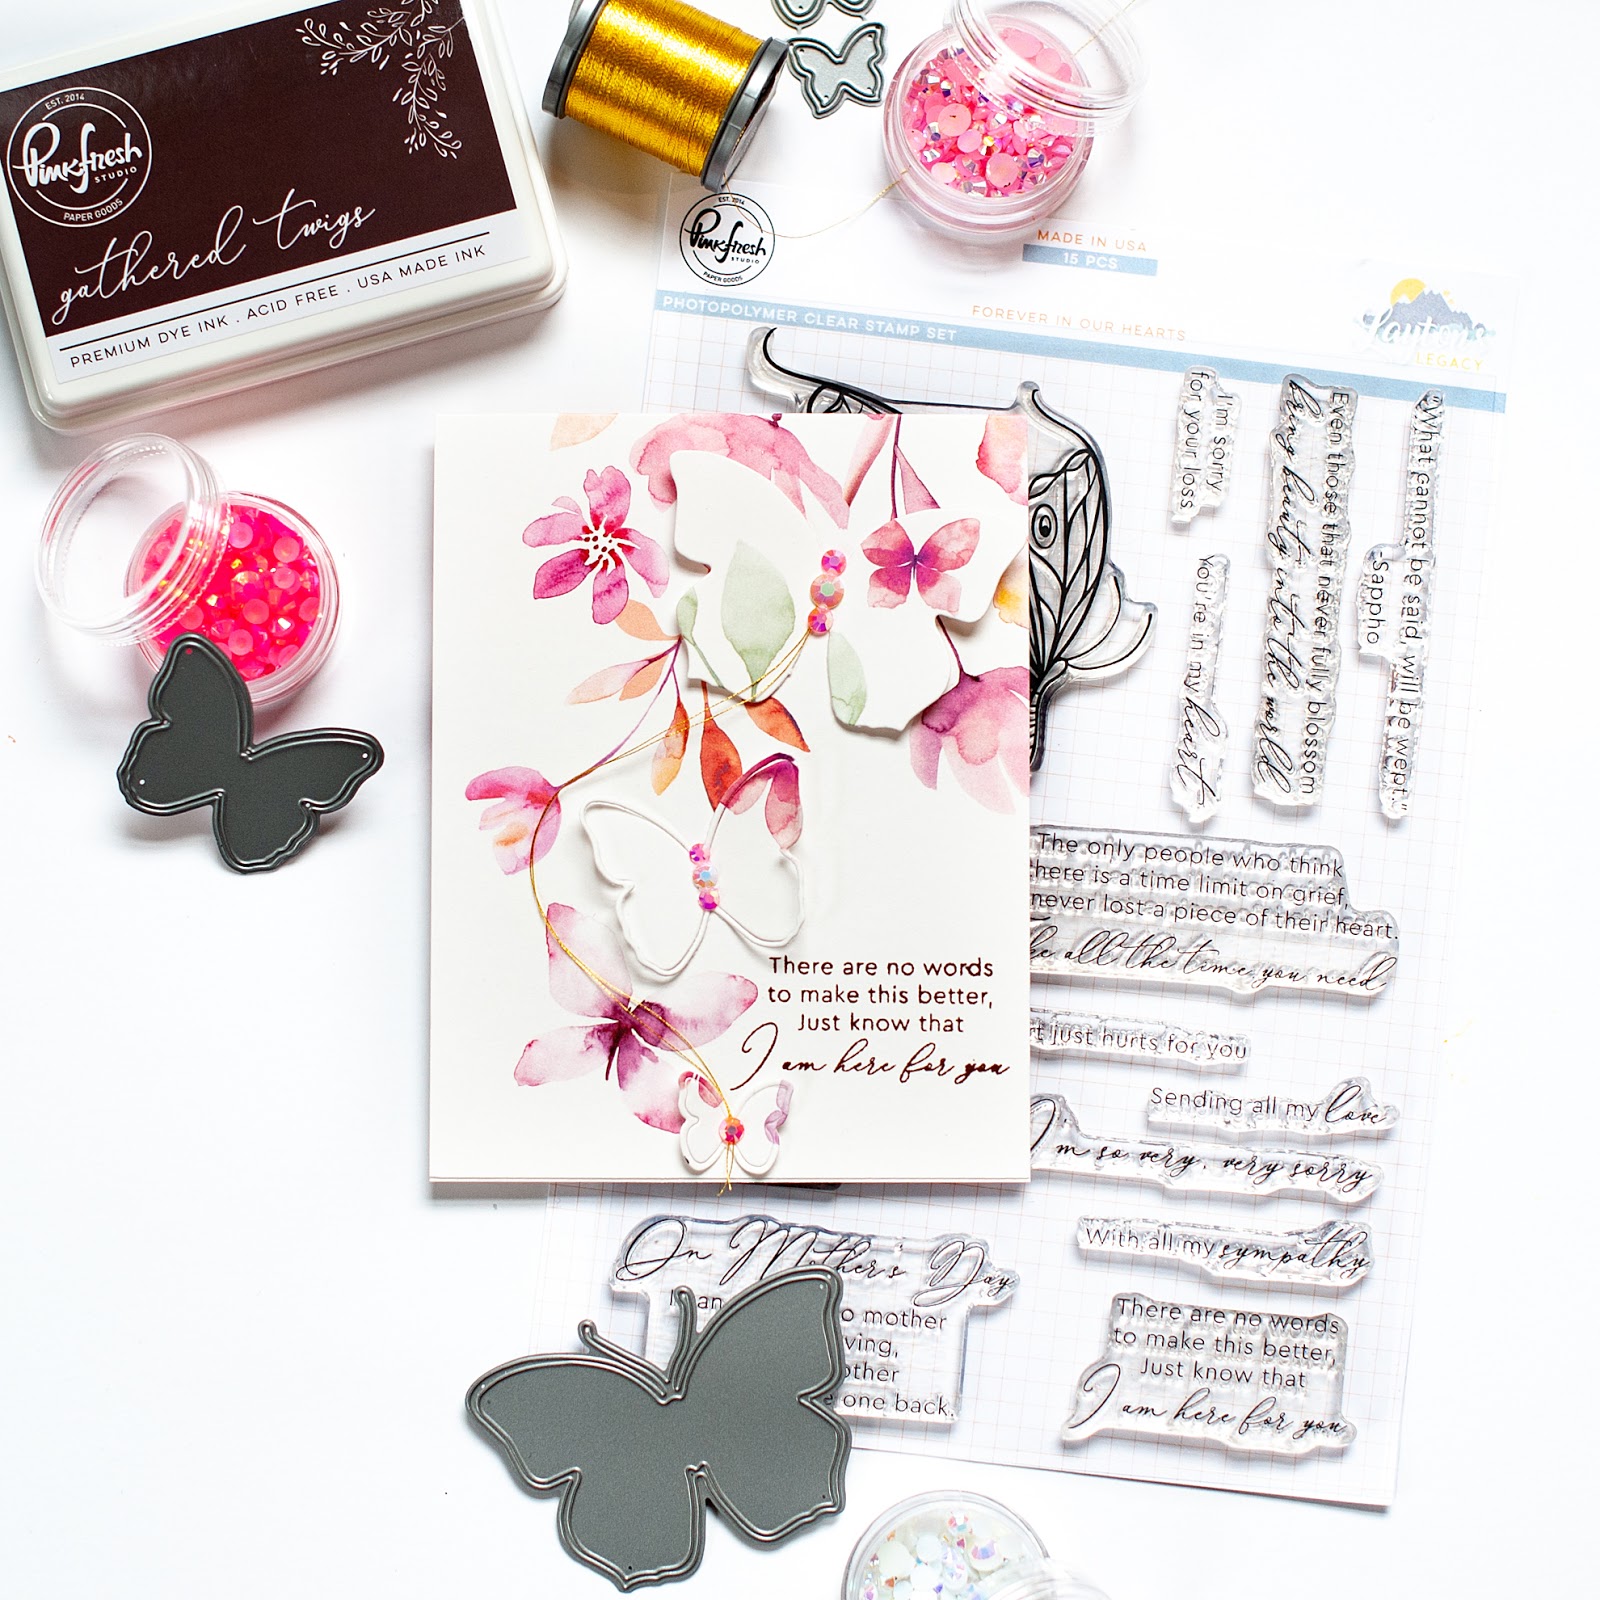
For my video today, I've paired the beautiful Forever in our Hearts stamp set (which is Layton's Legacy benefit stamp set) with the beautiful Butterfly paper collection that Alexandra Renke released this past summer. I've created 6 simply designed cards that are easy to recreate, and I would love for you to watch them come together. You can view my video below, or HERE in HD.
Here is a look at all of the cards in the set. This section will be a bit photo heavy, but I wanted to be sure you were able to see each card in full. On this first one, I've added a doubled over string of gold thread to the middle of the top butterfly, and tacked it down with jewels & Gina K Connect glue. I didn't show it in the video, but it's super simple to do!


This card features one of my FAVE butterfly dies from Alexandra Renke, and I can't get over how gorgeous these papers are as card bases.


I'm so happy that I chose to use the Gathered Twigs ink for stamping the sentiments, instead of black. It makes the cards feel softer for such a sensitive topic.

DIES USED:


I've also added some gold thread to this one, and adhered down the same as mentioned above. I love the colors on this one!
DIES USED:


While they are all beautiful & elegant, this one just seems extra elegant. It reminds me of my grandmother.

DIES USED:


I created a set of three cards with the blue papers in this collection while taking Alexandra's class at {stamp} JunkieFest 2019 this past summer. She actually created this collection exclusively for the retreat, then opened it up to all a few weeks later. You can see those cards HERE.


I thought the sentiment already printed on the paper coordinated perfectly with this larger sentiment from the Forever in our Hearts stamp set. So, I stamped it on the inside. I really love how it turned out!

I really hope you like this card set that I've created for you today! As always, if you have any questions at all...feel free to leave them in the comments and I will be sure to reply.

Have a wonderful Monday!
SUPPLY LIST

Happy Sunday, crafty friends! I hope you've had a wonderful weekend so far! We had a fantastic party at our home last night and even made some new friends. It felt like "old times" when our weekends were packed with friends, food and fun. It's interesting how much loss affects your entire life. We find ourselves in a city that we love, but with few people that we know. Grief & loss makes it that much harder to meet people, especially for me. But I saw a semblance of my old self surface last night. I will never be the same. I will always have the pebble in my pocket that is loss. My little ones will never be far from my thoughts. I will never be the woman I was before loss, trauma and grief. But it was nice to see the gracious hostess, the witty comebacks and the laughter that came with ease.
On Friday night, I got in a little bit of crafting time with some new papers from Alexandra Renke. This is her new Autumn Color collection, and friends...she released this one in 12x12 AND 6x6!! I can't even tell you how excited I am about that! I LOVE Alexandra's designs, and I have found ways to use the 12x12 papers on cards and I will continue to do so. But, I am head over heels that she is also starting to introduce 6x6 because it makes some of the designs easier to use.
Alexandra Renke products are slowly but surely becoming more readily available here in the U.S., and I linked everything I could find that I used today in the link list at the end of my post. Not everything is available here, and I will link those items to Alexandra's online shop, but keep in mind that she is in Germany.
I created these cards on card bases made from Alexandra's House Collection "Cream White" cardstock. This is cardstock that matches her patterned papers perfectly. You can use any cardstock you have on hand, but I do love the option of matching the whites, so I wanted to be sure to mention what I used.

This first card is actually the last card I created when making this set, but it is probably my favorite! I used Alexandra's Hexagon dies with the Autumn Insect Dance 12x12 paper, which you can get in the Insects collection from Ellen Hutson. This is one of those papers that you might not see all the possibilities it has for cardmakers, so I wanted to be sure and showcase how these cutaways can be used in a fun & unique way! The sentiment was created with the You Are Sweet die.

1. Diecut the hexagons from patterned paper & cardstock multiple times.
2. Arrange the hexagons to the front of an A2 card base, then adhere once you like the design.
3. Layer each hexagon outline with 2 cardstock cuts using a Zig glue pen.
4. Adhere the hexagon outlines to the front, using a different design from the inside hexagon.
5. Trim the pieces hanging over the edge of the card, then splatter the front with gold paint.
6. Diecut the sentiment 4 times: once from gold glitter paper and three times from cardstock. Stack & adhere.
7. Diecut the botanicals & the heart from patterned papers, then layer them with the sentiment to the front.
8. Accent with jewels to finish.


This next card is super simple, and uses one of my favorite dies from Alexandra called Frame with Leaves. I've used the Koi and Dragonfly 6x6 paper on this card. The sentiment comes from the Welcome Butterflies stamp set.

1. Diecut the frame 5 times: once from patterned paper and four times from cardstock.
2. Stack & adhere the inside cut with three layers.
3. Stack & adhere the outside frame cut with all 5 layers.
4. Diecut the botanicals twice from aqua patterened paper.
5. Stamp the sentiment to the inside cut with onyx black Versafine.
6. Adhere all the diecut layers to an A2 card base.
7. Protecting the sentiment & bird's heads, splatter the front with gold paint.
8. Accent with jewels to finish.


This images on this card are fussy cut from a sheet from the Birds and Bugs 6x6 paper. The sentiment was created using the Beautiful die.

1. Fussy cut the different elements from the 6x6 paper sheet.
2. Adhere all fussy cut pieces to an A2 card base, popping the bird layer up with foam tape.
3. Protecting the bird's eyes, splatter the front with gold paint.
4. Diecut the word 4 times: once from gold glitter paper and three times from cardstock.
5. Stack & adhere the layers, then mount to the card front.
6. Accent with jewels to finish.


I really hope you like this card trio that I've created for you today! As always, if you have any questions at all...feel free to leave them in the comments and I will be sure to reply. I would also love to hear your thoughts on these GORGEOUS Alexandra Renke papers!!


Before you move along with your day, I wanted to invite you to follow me on social media. I would love to be crafty friends!
Have a wonderful rest of our weekend!
SUPPLY LIST
Subscribe to:
Posts (Atom)


Social Icons