
Showing posts with label Cuttlebug Embossing. Show all posts
Showing posts with label Cuttlebug Embossing. Show all posts

Two posts in one day?! I know, right? I have a special post to share with you tomorrow, but I wanted to share these couple of cards before the weekend. Thus...two posts today. So, let's just get right to it!
My first card uses Get Sketchy #69, and the colors from OTWC Challenge #40 {burgundy, tan & white}. I was just waiting and waiting for my PTI order to come in for this sketch, and thankfully they came today! So, I was able to participate! Here is my card:


My first card uses Get Sketchy #69, and the colors from OTWC Challenge #40 {burgundy, tan & white}. I was just waiting and waiting for my PTI order to come in for this sketch, and thankfully they came today! So, I was able to participate! Here is my card:
"My Home is Wherever You Are" supplies:
Cardstock: Bazzill Basics
Stamps/Dies: Papertrey Ink (Love Lives Here set & dies, Fillable Frames #4 set & die)
Ink: Clearsnap (Pigment: dune, merlot, frost white)
Ribbon: Renaissance by Design
Pearls: Kaiser Craft
Corner Rounder: EK Success
Embossing Folder: Love Language by Provo Craft
Diecut/Embossing Machine: Cuttlebug by Provo Craft
Instructions: Fold burgundy cardstock in half to make card base. Round the korners of a kraft cardstock block, and cut the frame opening. Dry emboss the hearts to it using the Cuttlebug & Love Language embossing folder. Lay the kraft block on the front of the card, and trace the frame opening lightly with pencil. Remove the cardstock block, and stamp the frame image & sentiment inside the tracing. Tie ribbon around the bottom of the kraft cardstock and then adhere the entire block to the front of the card using foam adhesive. Diecut the house shape from white cardstock, and then stamp the house design inside it. Cover in glitter and accent with three pearls. Adhere the entire house accent to the front of the card, tucked in slightly behind the bow.
Here is the sketch and color challenge inspiration photo for the challenges used above:

And while I am trying to only have one card per post these days, I am going to put both in this post so I don't have three posts for the day. Tee hee! Up next is my card for CPS Sketch 200.
"Enjoy your Birthday" supplies:
Cardstock: Bazzill Basics
Paper/Stickers/Transparency: Glitz Design
Vellum: The Paper Company
Rub-ons: Glitz Design & Autumn Leaves
Corner Rounder: EK Success
Instructions: Fold aqua cardstock in half to make your card base. Trim the bingo card paper layer and adhere to the front. Round the right corners of a vellum block and adhere to the left side of the card. Adhere the decorative transparency to the front of the card, and add a sticker banner to the left side, overlapping it a bit. Adhere the rub-on people to white cardstock and cut out. Adhere them to the front of the card, and add a jeweled balloon sticker to the right side of them. Finish the sentiment with rub-ons underneath the "enjoy" part of the decorative transparency.
Be sure to come back tomorrow, as I have a super fun post for you! There will be a giveaway too! ♥♥♥
Until later,
~Lea L.

...and I am finally sharing the July 4th cards that I made with you! Sheesh! It has been a long 5 days for me....and I just didn't get it done.
But first up...is my card for CPS Sketch 174 this week. We were sponsored by Gina K Designs this week, and I picked Nina's fabulous Fine Furnishings set!! Love it! I have a lot more ideas for this stamp set...can't wait to share them with you!! Hopefully soon!


But first up...is my card for CPS Sketch 174 this week. We were sponsored by Gina K Designs this week, and I picked Nina's fabulous Fine Furnishings set!! Love it! I have a lot more ideas for this stamp set...can't wait to share them with you!! Hopefully soon!

"Sitting Here Missing You" supplies:
Stamps: Gina K Designs (Fine Furnishings set)
Ink: Tsukineko (Versafine: onyx black) & Clearsnap (pigment: black & chalk: rouge)
Cardstock: Bazzill Basics
Paper/Jewels: Glitz Designs
Tulle: Prima (flower) & craft supply
Stickers: Making Memories
Ink: Tsukineko (Versafine: onyx black) & Clearsnap (pigment: black & chalk: rouge)
Cardstock: Bazzill Basics
Paper/Jewels: Glitz Designs
Tulle: Prima (flower) & craft supply
Stickers: Making Memories
White Pen: Uniball Signo
Instructions: Fold zebra print paper in half to make card base, and adhere a white cardstock block to the middle. Adhere tulle to the left side of the card in the shape of a curtain. Add the tulle flower to the middle of the curtain, and top with a pink jewels. Stamp the couch to pink patterned paper and cut out. Adhere the couch to the front of the card. Stamp the end table, teapot and chandelier to the front of the card. Stamp the pillows to patterned paper and cut out. Adhere the stamped pillows to the couch, and color in the edges with white pen. Accent the couch, pillows, end table, and chandelier with pink jewels. Add the sentiment underneath the living room scene using teeny black alpha stickers.
This next card could definitely be used for the 4th of July...but I actually just made it today. I thought that it would also be a great birthday card....maybe for someone who celebrates in July, is in the military, or is just super patriotic!! It was inspired by 365 Cards: Sunday Sketch this week, and by 365 Cards: old, new, borrowed, blue challenge.
"Celebrate Today & Every Day" supplies:
Cardstock: Bazzill Basics
Ink: Clearsnap (Pigment: scarlet, frost white, midnight, raven black )
Jewels: Westrim Crafts
White Pen: Uniball Signo
Instructions: Fold kraft cardstock in half to make card base. Stamp the three dots and the star trails to the front of the card. Stamp the sentiment in the upper right corner. Accent the three dots with star jewels. Add three jewels to the upper right corner of the card, and draw a white penned line around it.
And since I was totally lame...and forgot to share the July 4th cards with you BEFORE the actual holiday...here they are. I am not going to do supply lists or instructions...so just enjoy the next few photos!! The first one is in a summer issue of Cards Magazine...either June or July (I can't remember which!). And the other two I submitted to the Cards Blog Challenge gallery, and both were featured in THIS post.


So- do you want to know my deal, lately? Friday evening...my right arm started throbbing for some reason. I wasn't really sure why...the only thing I can think is that I did a combination of things to it, including a kick-boxing workout, sleeping on it funny, and possibly tweaking it wrong. So, Friday night I took 2 Advil PM's. Had never taken them before...will never take them again. Apparently ibuprofen doesn't work on whatever I did to my arm....and the PM part made me feel like I was conscious, but couldn't open my eyes or focus on anything if I did open them. So basically...not a good nights sleep, just forced eye shutting. Yuck. My arm throbbed all day and night on Saturday...and I slept horribly. Tossed, turned, and couldn't get comfortable at all- but didn't know of anything to take to help. My arm still hurt on Sunday, and I was completely exhausted. We went to a BBQ that evening, and I did notice that the throbbing lessened while we were there. I knew that I really needed some sleep that night...so I broke out the trusty Nyquil, and slept completely sound until 9:30am. I woke up yesterday to zero throbbing, and just a bit of a sore shoulder. I am keeping my eye on it, but I think I will be okay. If you would have asked me on Saturday...I thought I was for sure going to have to see a specialist because it hurt SO bad. Needless to say....I was REALLY glad we didn't go camping and I was just able to be miserable at home. Being miserable while camping would have made it even worse. We are planning a camping trip sometime soon though, and I can't wait! The weather is finally going to get summer like here...and I am definitely ready!
Well, that is all I have for now. Look for a post at 1:00am on my blog!! ♥♥♥
Until later,
~Lea

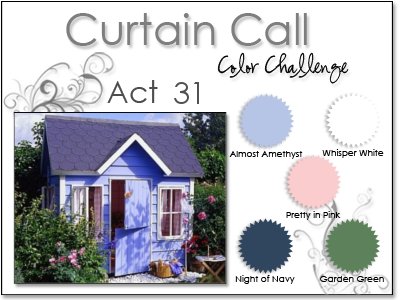
Happy Sunday everyone!! I hope this post is finding you well! Today means a new Curtain Call Color challenge, courtesy of Stacey's Stamping Stage blog. So, without further ado....here are the colors this week:
Loving the soft colors of this week...although, they definitely challenged me by using them all together. I did use sketch 91 from the Clean & Simple blog this week....I always love the sketches they come up with! I did omit the scallop edge, because I just wasn't feeling it for this card.



"When I think of You..." supplies:
Cardstock: Bazzill Basics
Paper: Glitz Designs
Stamps/Ribbon: Renaissance by Design (Strictly Sentiments set)
Ink: Clearsnap (Pigment: peacock gold)
Felt Flower: Provo Craft
Jewels: Zva Creative
Button: Doodlebug Designs
Corner Rounder: EK Success
Embossing Machine: Cuttlebug by Provo Craft
Embossing Border Folder: With Love by Provo Craft
Instructions: Fold light purple cardstock in half to make card base, and round the bottom corners. Round the bottom corners of a white cardstock block, and cover the bottom with floral patterned paper. Emboss a flower border right above the patterned paper strip using a Cuttlebug & a "With Love" border folder. Tie ribbon around the seam, and adhere the entire block to the front of the purple card base. Adhere the felt flower and leaves to the right side of the seam, and top with a bow & pink button. Stamp the sentiment to the middle of the white cardstock. Adhere three jewels over top of the sentiment, and accent the felt flower with jewel flourishes.
Be sure to check out what the other Curtain Call ladies did for this week...it is sure to be lovely! ♥♥♥

Casey had a FANTASTIC divisional track meet this weekend! He took 2nd place in the 100m dash & 400m relay, 3rd place in the 200m dash & 300m hurdles, and 4th place in the 1600 relay. This means he will be going to the state track tournament next weekend in every single event he started out with in divisionals...first time he has ever done that in track! Awesome job, brother! So, next weekend is the state track meet on Friday and Saturday....and then he graduates on Sunday. Craziness!!
Well, better get going for now!
Until later,
~Lea
~Lea

....it is me, your long lost friend, Lea. I feel like I haven't participated in any challenges lately, other than the ones I have commitments to. Life has just been so busy lately! I had some time to sit down and get a couple done today, and I also have my CPS card to share.
This first card is for Jacksonbelle Tuesday Challenge: CAS, and for the Etsy Inpsired Challenge #87. The featured Etsy Shop is Lindsay Brackeen, whose shop is filled with sweet and whimsical prints. I was inspired by this fabulous rainbow print of hers. Here is my card for the challenge!

This first card is for Jacksonbelle Tuesday Challenge: CAS, and for the Etsy Inpsired Challenge #87. The featured Etsy Shop is Lindsay Brackeen, whose shop is filled with sweet and whimsical prints. I was inspired by this fabulous rainbow print of hers. Here is my card for the challenge!

"You've Been So Sweet" supplies:
Cardstock: Bazzill Basics
Stamps: Papertrey Ink (Year of the Flower: sweet peas)
Ink: Clearsnap (Pigment: aqua)
Rub-ons: Creative Imaginations
Jewels: Doodlebug Designs
Glitter: DecoArt
Corner Rounder: EK Success
Diecut Machine: Cricut Expression by Provo Craft
Diecut Cartridge: Create A Critter by Provo Craft
Instructions: Fold white cardstock in half to make card base, and round the bottom corners. Cut the heart rainbow and its layers from colored cardstocks at 3" using the Cricut Expression and Create A Critter cartridge. Glitter the dark pink and yellow layers, and adhere them all together. Cut the cloud from white cardstock at 2" and coat with glitter. Adhere the cloud to the card, and then layer the rainbow cut to the top. Accent the rainbow with jewels. Adhere three thin strips of cardstock to the inside bottom of the card and accent with jewels. Stamp the first part of the sentiment to the middle. Finish the sentiment with rub-ons in the lower right corner.
This next card is based on the Moxie Fab Tuesday Trigger, and on Kazan's Sketch 52 at 2 Sketches 4 U. Isn't this bird nest freaking adorable?! I'll get a better photo tomorrow in the natural light...this was all I could do with the flash this time around.


"Look Who's New" supplies:
Cardstock: Bazzill Basics
Paper: My Mind's Eye
Ink: Clearsnap (Pigment: seaglass, dusty plum) & Ranger Distress Ink (antique linen)
Lace: Making Memories
Jewels: Kaiser Craft
Electronic Diecut Machine: Cricut Expression by Provo Craft
Diecut Cartridge: Give A Hoot by Provo Craft
Diecut Machine: Cuttlebug by Provo Craft
Steel Die: Papertrey Ink (large scallop)
Instructions: Fold cream cardstock in half to make card base. Cut a block of pink dotted paper and cut a scalloped edge to the bottom using the Cuttlebug and large scallop steel die. Cut scalloped strips from blue and pink houndstooth paper. Stain white eyelet lace with antique linen distress ink. Layer the blue scallop, the stained lace, and the pink strip to the top of the card. Stamp the sentiment to a cream paper block, and adhere to the top of the entire block. Cut the bird nest and its layers at 2" using the Cricut Expression and Give A Hoot cartridge. Glitter the bottom layer and the eggs, and adhere them together. Accent the middle of the eggs with jewels, and adhere the entire cut directly below the sentiment. Adhere this entire pink block to the front of the card using dimensional adhesive.
And last, but definitely not least, is my card using this week's sketch at CPS! Had some fun with this cute Prima line!

"Get Wellie Soon" supplies:
Cardstock: Bazzill Basics
Paper/Chiboard: Prima
Paper Frill: Doodlebug Designs
Ribbon: Papertrey Ink
Stickers: Making Memories
Jewels: Darice Inc.
Corner Rounder: EK Success
Embossing Machine: Cuttlebug by Provo Craft
Impression Plate: Papertrey Ink
Cardstock: Bazzill Basics
Paper/Chiboard: Prima
Paper Frill: Doodlebug Designs
Ribbon: Papertrey Ink
Stickers: Making Memories
Jewels: Darice Inc.
Corner Rounder: EK Success
Embossing Machine: Cuttlebug by Provo Craft
Impression Plate: Papertrey Ink
Instructions: Fold white cardstock in half and round the right hand corners. Emboss the front of the card using the Cuttlebug machine and the polka dot impression plate. Attach red paper frill to the left side of a strip of ribbon, and adhere to the right side of the card. Adhere the chipboard tag to the lower right corner, and top with a matching bow. Cut a rainbow from patterned paper, and adhere so it overlaps the chipboard tag just slightly. Add the sentiment to the tag using letter stickers, and accent with three jewels.
It felt nice to break out my Cricut Expression again. Honestly...I can admit that I was a little more heartbroken about not continuing on with Provo Craft than I thought. I haven't had any inclination to use my machine since I got the news. But, I did treat myself, and used my last royalty check from them to purchase some of the newest cartridges. They all came while we were on vacation...and then I got sick. I did look through the booklets while I was sick, and those two cuts used above were the first ones that caught my eye. There are a lot of other cuts I want to use too...so I foresee myself using my Expression again....the way I used to.
Well, I better get going for now. Hope you are having a wonderful week so far! ♥♥♥
Until later,
~Lea

....than never.) Sorry I am so late getting this posted. I caught a nasty head cold that reared its ugly head on our last night of vacation, and it has since turned into a bronchial problem. Today is the first day that I have had at least a little bit of energy to get some things done. So, I finally had a chance to sit at my desk and get my card done. Without further ado, here are the colors for this week's challenge, courtesy of Stacey's Stamping Stage blog.
This is what I came up with. This stamp is from one of the latest PTI releases..."For The Graduate". And while this could be a graduation card, the sentiment could be used for so many other things. Congratulations for pretty much anything, encouragement, birthday....I like that it is so versatile! I also used sketch 88 from the Clean & Simple Stamping blog on this one...LOVE this sketch. It screamed "Lea"....tee hee!


"Wishing You..." supplies:
Cardstock: Bazzill Basics
Paper: GCD Studios
Stamps: Papertrey Ink (For the Graduate set)
Ink: Clearsnap (Pigment: midnight)
Ribbon: Renaissance by Design
Twine: Darice Inc.
Button: Doodlebug Designs
Jewels: Glitz Designs
Corner Rounder: EK Success
Embossing Machine: Cuttlebug by Provo Craft
Embossing Border Folder: Pop Culture set by Provo Craft
Instructions: Fold kraft dotted paper in half to make card base, and round the bottom corners. Round the bottom corners of a floral strip and adhere to the bottom of the card. Emboss a diamond border to the bottom of a white cardstock strip, and round the tip corners. Stamp the sentiment above the embossed border, and adhere the white cardstock block to the front of the card. Tie ribbon around the seam, and adhere a button to the bow with twine. Accent the sentiment with red square jewels.
Be sure to check out all the other lovely ladies' cards....it will be a little bit of delight in your day! ♥♥♥
Until later,
~Lea
PS- want to hear something crazy?! Casey graduates in less than 30 days. I can't believe how quickly this year has flown by already. Holy wow. :)
PS- want to hear something crazy?! Casey graduates in less than 30 days. I can't believe how quickly this year has flown by already. Holy wow. :)
Subscribe to:
Posts (Atom)


Social Icons