
Showing posts with label July 4th. Show all posts
Showing posts with label July 4th. Show all posts

Happy Friday, friends! I hope you all had a wonderful 4th of July! We hung out with our neighbors for most of the day, but we all had to work today. So, we didn't make it to see any fireworks, but I did hear them when they woke me up from my slumber. I was the only one - the husband & two dogs didn't even move. Lol!
I wanted to let my blog friends know that we are having a July 4th holiday weekend sale over at Pinkfresh Studio.

Almost the entire store is eligible for the 15% off code - the only items excluded are the June washi release (NEW), Featured/Sale, and the Mail Delivery stamp set (charity). But, the Featured products are already 50% off, so that is still a really great sale in itself. You can absolutely grab regular priced items with the Featured items, and when you use the code 15OFFJULY4TH, it will take the 15% discount off the eligible items.
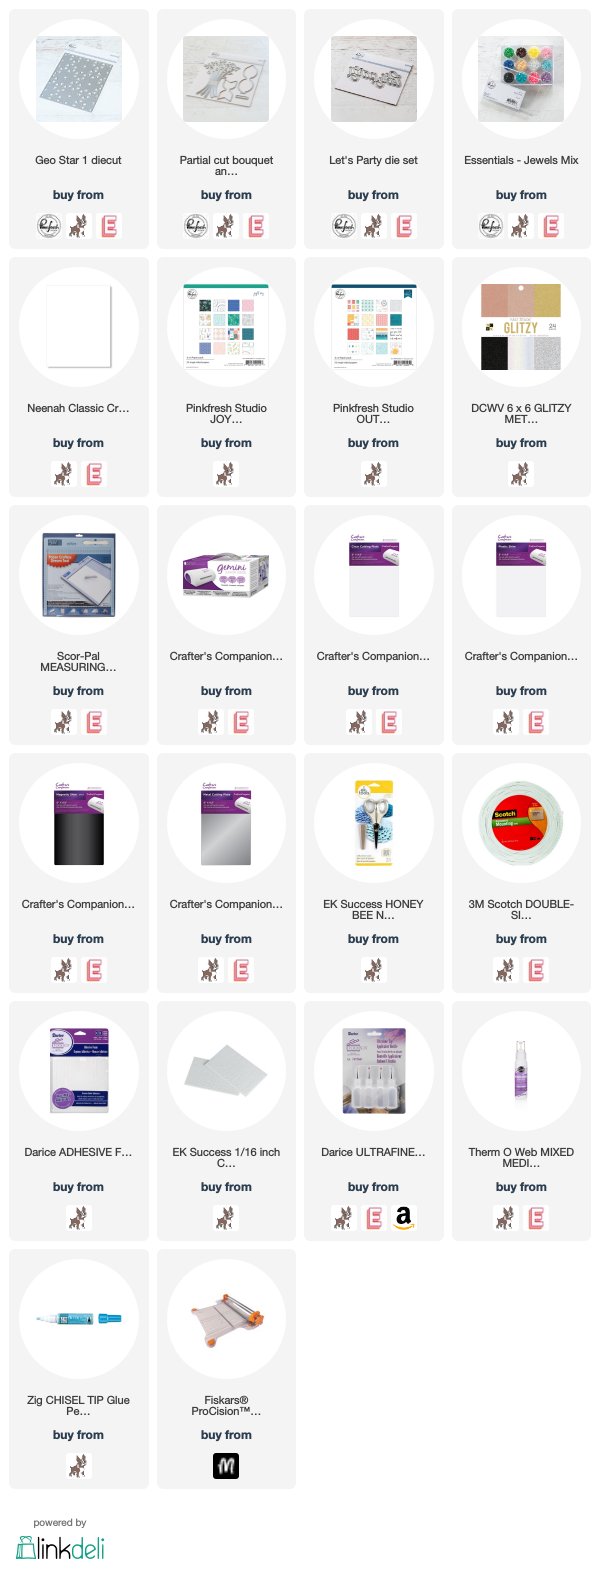
I didn't want the bows that I created for the ad above to go to waste, so I quickly made them into this fun, patriotic themed card. I'm not one to send cards for July 4th, but I do love the colors of our country, and I think this is a perfect birthday card or party invite! I started by diecutting everything with my Gemini Jr. First I diecut the bows twice from the Joyful Day, Out & About and gold glitter papers using the Partial Cut Bouquet & Bow die set. Once all the pieces were diecut, I put the bows together. (Then I took the photo of the ad. Lol!)

Next I diecut the Geo Star 1 background from heavyweight white cardstock. Then I cut the Let's Party word die three times: once from gold glitter paper, and twice from heavyweight white cardstock. I use a metal shim when cutting this die from glitter paper because it is so intricate & thin. This gives it better pressure, and the cut pops right from the glitter sheet.

Finally, I adhered everything to the front of an A2 card base, popping the Geo Star 1 background up with foam dots. Then I accented with our Essentials: Jewel Mix in white & blue. The teeny red jewels are from Michael's.

That's everything I have to share with you today! This card was super easy to put together, and it just took a little time diecutting. It would be super cute for a BBQ or party, but I will probably use it for a birthday card.
Our 15% off sale is valid through this Sunday, and it will work on every Pinkfresh Studio product I used if you want to recreate it! I think it would be a really fun Christmas card as well, if you just changed out the sentiment.
That is all I have for you today! I wanted to invite you to follow me on social media if you'd like. I would love to be crafty friends!
Have a great rest of your holiday weekend!
SUPPLY LIST
For your shopping convenience, all products are linked below. {Includes affiliate linking where possible - this allows small compensation for me at no cost to you. Never fear - I will only ever link to products that I truly love & use!}


Happy 4th of July, blog friends! I hope that my US friends are having an awesome holiday so far! It looks like ours is going to be rained out...a bit of a bummer, but I have SO much Pinkfresh work to do getting ready for our new release on Monday that I'm not going to worry about it!
Before I get to my card, I just wanted to mention a few sales that are ending today! It's a great time to shop and get some amazing savings! Just click on the banners below to take you to the stores!


Hey there, everyone!! So, I am finally coming up for air from all the projects that I have had to create in the past two weeks!! Tee hee! Everything made it to CHA safe and sound, and I have seen some of them in the booth photos that are circulating the internet right now. That is always fun!!
I have been so busy this month, that I never got to share something fun with you! Kimber sent me an email awhile back, asking if I would like to guest design in July for the Jillibean Soup Card Kitchen Kit Club. Of course I said yes...Jillibean Soup is so fun to work with, and the kits always have such cute embellishments and such in them. I created nine cards with the kit, and today I finally have a moment to actually share them with you! Check them out!


 Card Challenges:
-Clearly Inspired #55- some like it hot
-Raise the Bar #108- red, white & blue (first two cards)
-Divas by Design #44- anything goes
I know that I typically don't share this many cards in one post, but I wanted to get them all out for you to see!! If love Jillibean Soup and haven't checked out their card kit, I highly suggest it! The kit is only $22.99 + shipping, and you can create a TON of cards from it. It comes with 8 card bases, but I had plenty paper, stickers and diecuts left over to create some more! As you can see, I created 9 cards (because I got an extra card base) and I would bet that I could have created at least 4-5 more cards with the leftover product I had. Maybe more if you went with a simpler design.
Well, that is everything I have for you today! I hope you have an awesome day! ♥♥♥
Until later,
~Lea L.


Jillibean Soup Card Kitchen Kit - July
I have been so busy this month, that I never got to share something fun with you! Kimber sent me an email awhile back, asking if I would like to guest design in July for the Jillibean Soup Card Kitchen Kit Club. Of course I said yes...Jillibean Soup is so fun to work with, and the kits always have such cute embellishments and such in them. I created nine cards with the kit, and today I finally have a moment to actually share them with you! Check them out!
-Clearly Inspired #55- some like it hot
-Raise the Bar #108- red, white & blue (first two cards)
-Divas by Design #44- anything goes
I know that I typically don't share this many cards in one post, but I wanted to get them all out for you to see!! If love Jillibean Soup and haven't checked out their card kit, I highly suggest it! The kit is only $22.99 + shipping, and you can create a TON of cards from it. It comes with 8 card bases, but I had plenty paper, stickers and diecuts left over to create some more! As you can see, I created 9 cards (because I got an extra card base) and I would bet that I could have created at least 4-5 more cards with the leftover product I had. Maybe more if you went with a simpler design.
Well, that is everything I have for you today! I hope you have an awesome day! ♥♥♥
Until later,
~Lea L.

Jillibean Soup Card Kitchen Kit - July

Happy Tuesday, everyone!! I hope this posts finds you having had a wonderful July 4th and a great start to your week!! I have a patriotic card to share with you today, and I am just LOVING how it turned out!! It combines so many of my favorite elements, and is perfectly shabby!!
It is one of my card for Stamper's Dream this month...using an older JustRite stamp set from the store. This stamp set is perfect to have on hand for all the different holidays during the year!
It is also my card for CPS Sketch #225 this week....which is a fun one!! As you can see...I changed out the middle rectangle layers with a doily cut in half. I think it is important to showcase that you don't have to use all the exact shapes, etc...when using a CPS sketch!! You can really turn them into your own, while still creating something that resembles the sketch well!
I also created this card for The Shabby Tea Room #69 {July 4th & Red/White/Blue}, and for OTWC #56 {red, white, any shade of blue}. The inspiration photos for both of these challenges is located below the instructions, if you would like to see them! As you can see...I used a couple different shades of blue on this one...and I just love it!! The country blue and traditonal navy blue just go so well together!! Here is what I created!
It is one of my card for Stamper's Dream this month...using an older JustRite stamp set from the store. This stamp set is perfect to have on hand for all the different holidays during the year!
It is also my card for CPS Sketch #225 this week....which is a fun one!! As you can see...I changed out the middle rectangle layers with a doily cut in half. I think it is important to showcase that you don't have to use all the exact shapes, etc...when using a CPS sketch!! You can really turn them into your own, while still creating something that resembles the sketch well!
I also created this card for The Shabby Tea Room #69 {July 4th & Red/White/Blue}, and for OTWC #56 {red, white, any shade of blue}. The inspiration photos for both of these challenges is located below the instructions, if you would like to see them! As you can see...I used a couple different shades of blue on this one...and I just love it!! The country blue and traditonal navy blue just go so well together!! Here is what I created!
"Land that We Love" supplies:
Cardstock: Bazzill Basics (red)
Paper/Diecuts: My Mind's Eye (American Made: Words of Devotion, Accessory Sheet)
Stamps: JustRite Stampers (Happy Everything set)
Ink: Clearsnap (Pigment: cranberry) & Tim Holtz (Distress Ink: antique linen)
Ink Blending Tool: Tim Holtz
Ink Blending Tool: Tim Holtz
Doily: Wilton
Vintage Image: Crafty Secrets
Chipboard: Tattered Angels
Ribbon: Michael's brand
Buttons: Papertrey Ink
Twine: Darice Inc.
Glitter: DecoArt
Sandpaper
Instructions: Make card from red cardstock. Sand and distress ink the edges of a blue paper block, and adhere to the front. Cut a doily in half, distress ink, and adhere to the front. Tie ribbon around the bottom of the card, and stitch a button around the center of the bow using twine. Glitter a chipboard frame, adhere to the top of a July 4th vintage image, and adhere to the card front. Distress ink and stamp the sentiment to a diecut tag, and adhere to the right side of the bow. Accent the sentiment tag & chipboard frame corner with a diecut circle and stars, and then add two small buttons with twine to finish.

Inspiration Photos
We had a very laid back but fun BBQ with friends yesterday. They came over to our house, and we hung out on the back deck, and ate tons of food! It was yummy! The guys lit off some small fireworks in our street, and that was the extent of our day. My hubby, and some of our other friends had to work very early this morning...so going to a fireworks show just wasn't in the cards. Which is okay- I have seen the show here many, many times...and hope that my next show will be in some place new that I can photograph! Tee hee!
Well, I better get going for now! I hope that you have a wonderful rest of your day!! ♥♥♥
Until later,
~Lea L.

The month of July is when America celebrates its independence. But, we wouldn't have that independence without the sacrifice of our armed forces, and their families. For this month's technique post, I chose to focus on cards that honor those in our military.
The technique that I am sharing with you is by no means a new one, but one that maybe you haven't visited in awhile. I seem to forget how much texture and detail sanding can add to a project, and paired with the beautiful texture of GCD Studios papers....it is a sure winner.
The supply list is pretty basic. All you need is some sandpaper, your patterned paper block, and an old surface that you don't mind getting scratched up.
When I sand paper block, I start by sanding the edges first. It brings out that nice white core to the paper, and adds a great border to the paper block.
 I don't normally sand inside of the paper block....but GCD Studios paper just screams for it to be done. Check out how much texture and detail the sanding brings out of the paper block:
 And here is a little side by side comparison to some unsanded GCD Studios paper. They are both gorgeous....
 And here are the two cards that I came up with. My first card was meant for sending to wherever your soldier might be located. I read somewhere online that you don't want to ever send cards that have glitter on them to a soldier, because glitter makes them visible at night if it gets on them at all. So, I made sure that I didn't use any type of paper with glitter on it. I also made the card very flat, so it would be easier to send, and wouldn't possibly cause any mail problems. Look at how much texture the sanding gives the card, even with the card being so flat in nature.
 This next card is meant to give to your soldier once they get home. This one is chalk full of glittery paper, jewels, dimension, sanding, texture....you name it. Soldiers coming home deserve all the decoration in the world....so why shouldn't their welcome home card be the same?
 All of the papers on these cards are from the Independence collection by GCD Studios. This is a completely fabulous paper set, and works with so many different themes....but especially patriotic themes. They are a perfect addition to your scrapbooking paper collection!
Thanks for honoring our soldiers with me this month!
Until later,
~Lea
The technique that I am sharing with you is by no means a new one, but one that maybe you haven't visited in awhile. I seem to forget how much texture and detail sanding can add to a project, and paired with the beautiful texture of GCD Studios papers....it is a sure winner.
The supply list is pretty basic. All you need is some sandpaper, your patterned paper block, and an old surface that you don't mind getting scratched up.


Thanks for honoring our soldiers with me this month!
Until later,
~Lea

...and I am finally sharing the July 4th cards that I made with you! Sheesh! It has been a long 5 days for me....and I just didn't get it done.
But first up...is my card for CPS Sketch 174 this week. We were sponsored by Gina K Designs this week, and I picked Nina's fabulous Fine Furnishings set!! Love it! I have a lot more ideas for this stamp set...can't wait to share them with you!! Hopefully soon!


But first up...is my card for CPS Sketch 174 this week. We were sponsored by Gina K Designs this week, and I picked Nina's fabulous Fine Furnishings set!! Love it! I have a lot more ideas for this stamp set...can't wait to share them with you!! Hopefully soon!

"Sitting Here Missing You" supplies:
Stamps: Gina K Designs (Fine Furnishings set)
Ink: Tsukineko (Versafine: onyx black) & Clearsnap (pigment: black & chalk: rouge)
Cardstock: Bazzill Basics
Paper/Jewels: Glitz Designs
Tulle: Prima (flower) & craft supply
Stickers: Making Memories
Ink: Tsukineko (Versafine: onyx black) & Clearsnap (pigment: black & chalk: rouge)
Cardstock: Bazzill Basics
Paper/Jewels: Glitz Designs
Tulle: Prima (flower) & craft supply
Stickers: Making Memories
White Pen: Uniball Signo
Instructions: Fold zebra print paper in half to make card base, and adhere a white cardstock block to the middle. Adhere tulle to the left side of the card in the shape of a curtain. Add the tulle flower to the middle of the curtain, and top with a pink jewels. Stamp the couch to pink patterned paper and cut out. Adhere the couch to the front of the card. Stamp the end table, teapot and chandelier to the front of the card. Stamp the pillows to patterned paper and cut out. Adhere the stamped pillows to the couch, and color in the edges with white pen. Accent the couch, pillows, end table, and chandelier with pink jewels. Add the sentiment underneath the living room scene using teeny black alpha stickers.
This next card could definitely be used for the 4th of July...but I actually just made it today. I thought that it would also be a great birthday card....maybe for someone who celebrates in July, is in the military, or is just super patriotic!! It was inspired by 365 Cards: Sunday Sketch this week, and by 365 Cards: old, new, borrowed, blue challenge.
"Celebrate Today & Every Day" supplies:
Cardstock: Bazzill Basics
Ink: Clearsnap (Pigment: scarlet, frost white, midnight, raven black )
Jewels: Westrim Crafts
White Pen: Uniball Signo
Instructions: Fold kraft cardstock in half to make card base. Stamp the three dots and the star trails to the front of the card. Stamp the sentiment in the upper right corner. Accent the three dots with star jewels. Add three jewels to the upper right corner of the card, and draw a white penned line around it.
And since I was totally lame...and forgot to share the July 4th cards with you BEFORE the actual holiday...here they are. I am not going to do supply lists or instructions...so just enjoy the next few photos!! The first one is in a summer issue of Cards Magazine...either June or July (I can't remember which!). And the other two I submitted to the Cards Blog Challenge gallery, and both were featured in THIS post.


So- do you want to know my deal, lately? Friday evening...my right arm started throbbing for some reason. I wasn't really sure why...the only thing I can think is that I did a combination of things to it, including a kick-boxing workout, sleeping on it funny, and possibly tweaking it wrong. So, Friday night I took 2 Advil PM's. Had never taken them before...will never take them again. Apparently ibuprofen doesn't work on whatever I did to my arm....and the PM part made me feel like I was conscious, but couldn't open my eyes or focus on anything if I did open them. So basically...not a good nights sleep, just forced eye shutting. Yuck. My arm throbbed all day and night on Saturday...and I slept horribly. Tossed, turned, and couldn't get comfortable at all- but didn't know of anything to take to help. My arm still hurt on Sunday, and I was completely exhausted. We went to a BBQ that evening, and I did notice that the throbbing lessened while we were there. I knew that I really needed some sleep that night...so I broke out the trusty Nyquil, and slept completely sound until 9:30am. I woke up yesterday to zero throbbing, and just a bit of a sore shoulder. I am keeping my eye on it, but I think I will be okay. If you would have asked me on Saturday...I thought I was for sure going to have to see a specialist because it hurt SO bad. Needless to say....I was REALLY glad we didn't go camping and I was just able to be miserable at home. Being miserable while camping would have made it even worse. We are planning a camping trip sometime soon though, and I can't wait! The weather is finally going to get summer like here...and I am definitely ready!
Well, that is all I have for now. Look for a post at 1:00am on my blog!! ♥♥♥
Until later,
~Lea

Happy Sunday everyone!! It is time for another fabulous color challenge courtesy of Stacey's Stamping Stage blog!! Check out these fabulously patriotic colors for the week:
Perfect for a 4th of July card, which is what I made for my card this week. Here is what I came up with using these awesome colors!!


We have added a guest designer spot this month! Please help us give her a warm welcome to the Curtain Call!


"July 4th" supplies:
Cardstock: Bazzill Basics
Stamps: Kitchen Sink
Ink: Clearsnap (Pigment: cranberry, frost white, midnight)
Rub-ons: Creative Cafe
Jewels: Westrim Crafts
Corner Rounder: EK Success
Instructions: Fold swiss dot cardstock in half to make card base, and round the bottom corners. Round the bottom corners of a kraft cardstock block, ink the edges, and adhere to the middle of the card. Stamp the three lines of stars to the front of the card. Adhere the rub-on sentiment & frame directly below the stamped stars. Accent the top with three jewels.
Pretty quick and easy card this time around! But, I love it! Make sure to check out what all the other ladies have come up with this week...it will be awesome! ♥♥♥

We have added a guest designer spot this month! Please help us give her a warm welcome to the Curtain Call!

Until later,
~Lea
Subscribe to:
Posts (Atom)


Social Icons