
Showing posts with label Scraptastic Kit Club. Show all posts
Showing posts with label Scraptastic Kit Club. Show all posts

Hey there, blog friends!! Happy Wednesday to you! I hope that your week is going well so far! Since I was gone for most of July, I never really had a chance to share all of my Scraptastic Kit Club projects for the month, so I figured I would do a quick wrap-up today.
I used the Summer Nights kit & add-on this month, which was full of Simple Stories product that I just loved! Lots of woodgrain & rainbows included....perfect for summer themed cards. For all of my cards today, I've also added glittery gold peeking out from diecut windows. Check them out!


 The Scraptastic kits are always chalk full of amazing stickers & embellishments that let you create to your hearts content. For all of my cards I literally just started layering things....larger items first, and then adding smaller things here & there until I felt the cards were finished. I LOVE creating this way...it is my favorite process because it is so unplanned & free!!
Card Challenges:
-The Shabby Tea Room #230 - inspiration photo
-Simon Says Stamp Wednesday challenge - sparkle
Thanks for checking out my cards today....sorry for such a short post. I've gotta run for now!!
Until later,
~L.
I used the Summer Nights kit & add-on this month, which was full of Simple Stories product that I just loved! Lots of woodgrain & rainbows included....perfect for summer themed cards. For all of my cards today, I've also added glittery gold peeking out from diecut windows. Check them out!
Card Challenges:
-The Shabby Tea Room #230 - inspiration photo
-Simon Says Stamp Wednesday challenge - sparkle
Thanks for checking out my cards today....sorry for such a short post. I've gotta run for now!!
Until later,
~L.

Hey blog friends!! How are you doing today? I'm doing great....it is FINALLY starting to get sunshiney & warm here in Fargo. We have had days here & there that have been really nice, but more than anything...we've had rain (like, LOTS of it), wind & then humidity. I think we are finally supposed to be getting out of our rainy season, and into just a nice summer. Here is hoping, my friends....here is hoping. Lol.
Jocelyn & I are issuing the first Thursday challenge for July on the Scraptastic blog, and we decided to challenge you to create with natural elements!! Jocelyn chose to use burlap, and I went with woodgrain...you can see both of our projects HERE, and also link up a project if you want to participate!
I am using the Summer Nights kit & add-on this month, and and I had to jump right in with the rainbow goodness that is such a big part of this kit!! (If you have frequented my blog over the years...you know I love a good rainbow themed project!!) All of those colors are amazing, but they definitely need something to help ground them....which is where the deep brown woodgrain paper came in. It is the perfect neutral to compliment this smattering of bold colors on the rest of the card.


 Instructions:
1. Make A2 card from mint cardstock.
2. Cut woodgrain paper slightly smaller, distress the edges & adhere.
3. Round the bottom corners of a 3x4 card, distress the edges & adhere to the middle.
4. Distress the edges of the stickers, and layer to the upper left corner of the card.
5. Add a piece of flair in the same area.
6. Adhere a sunburst wood veneer to the lower right corner of the card.
7. Distress the edges of the diecut strips & sticker, and adhere together with a heart brad.
8. Adhere the entire sentiment piece to the top of the wood veneer sunburst to finish.
Card Challenges:
-My Favorite Things sketch #183
-Little Red Wagon #244 - summer
-Word Art Wednesday #139 - anything goes

I hope that you will participate with us at the Scraptastic blog in our challenge to use natural elements! You can use any product that you want to participate! Have a happy Thursday!
Until later,
~L.
Jocelyn & I are issuing the first Thursday challenge for July on the Scraptastic blog, and we decided to challenge you to create with natural elements!! Jocelyn chose to use burlap, and I went with woodgrain...you can see both of our projects HERE, and also link up a project if you want to participate!
I am using the Summer Nights kit & add-on this month, and and I had to jump right in with the rainbow goodness that is such a big part of this kit!! (If you have frequented my blog over the years...you know I love a good rainbow themed project!!) All of those colors are amazing, but they definitely need something to help ground them....which is where the deep brown woodgrain paper came in. It is the perfect neutral to compliment this smattering of bold colors on the rest of the card.
1. Make A2 card from mint cardstock.
2. Cut woodgrain paper slightly smaller, distress the edges & adhere.
3. Round the bottom corners of a 3x4 card, distress the edges & adhere to the middle.
4. Distress the edges of the stickers, and layer to the upper left corner of the card.
5. Add a piece of flair in the same area.
6. Adhere a sunburst wood veneer to the lower right corner of the card.
7. Distress the edges of the diecut strips & sticker, and adhere together with a heart brad.
8. Adhere the entire sentiment piece to the top of the wood veneer sunburst to finish.
Card Challenges:
-My Favorite Things sketch #183
-Little Red Wagon #244 - summer
-Word Art Wednesday #139 - anything goes


I hope that you will participate with us at the Scraptastic blog in our challenge to use natural elements! You can use any product that you want to participate! Have a happy Thursday!
Until later,
~L.

Hey there, blog friends! Today I just wanted to share some of my last few cards using the June kits from Scraptastic Club!! I have worked with the Best Day of my Life kit & add-on, plus the matching stamp set this month.
My cards today are inspired by the bokeh & city elements in both kits & stamp set! Here is a little peek at all three of them!
So, shaker cards have been all the rage these days, and I wanted to do one without all the extra bulk that tends to come along with them. I also used Retro Sketches #151 to help with the layout design of my card. Here is what I came up with for my first card!

 Instructions to Recreate:
1. Make A2 card from bokeh patterned paper.
2. Adhere a block of vellum to the middle, and stitch along three of the edges.
3. Pour the sequins & vellum hearts into the open side of the vellum, then stitch it closed.
4. Shake the contents so they evenly distribute through the vellum pocket.
5. Add the banner stickers to the upper left corner, popping the top one with foam adhesive.
6. Add the circle sticker to the lower right corner with foam adhesive.
7. Accent with enamel dots to finish.
For the next card I to use the 3x4 bokeh card & some of the city themed elements to create this sweet love card that can be given at any time, rather than a specific occasion. I also used Sketch Saturday #316 to help inspired the layout design.

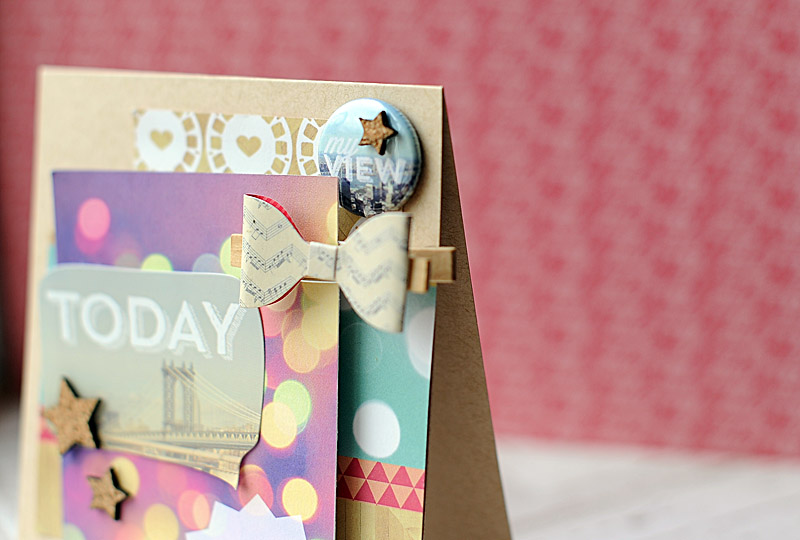 Instructions to Recreate:
1. Make A2 card from kraft cardstock, then lower the bottom left corner.
2. Layer to blocks of patterned paper to the front of the card.
3. Clip the clothespin to the bokeh card, then adhere to the front.
4. Add the speech bubble sticker to the top of the bokeh card.
5. Add the "my view" flair to the upper right corner.
6. Accent the bokeh card & flair with cork stars.
7. Finish the sentiment & card by adding glitter alphas below the bokeh card.
For the final card, I went bold & bright, but still used that awesome bokeh "thank you" tag that I just LOVE!! I used the My Favorite Things Sketch #182 to inspire the layout design of this card. Check it out!

 Instructions to Recreate:
1. Make A2 card from pink cardstock.
2. Cut yellow paper slightly smaller, then adhere.
3. Stamp "bright lights, big city" to the upper left side of the yellow paper.
4. Add the "thank you" tag to the other side.
5. Adhere the wood veneer cityscape across the middle of the card.
6. Stamp the top cityscape to white cardstock, then cut out.
7. Adhere the stamped cityscape over top of the wood veneer cityscape.
8. Add the wood veneer word to the top, then accent with cork stars.
9. Add the enamel dots to the bottom to finish.

I hope that you like my final few cards using the Best Day of my Life kits from Scraptastic Club!! I am sure these supplies will find themselves on more of my projects in the future...because they are awesome!! Lol! Have a great day!
Until later,
~L.
My cards today are inspired by the bokeh & city elements in both kits & stamp set! Here is a little peek at all three of them!
So, shaker cards have been all the rage these days, and I wanted to do one without all the extra bulk that tends to come along with them. I also used Retro Sketches #151 to help with the layout design of my card. Here is what I came up with for my first card!
1. Make A2 card from bokeh patterned paper.
2. Adhere a block of vellum to the middle, and stitch along three of the edges.
3. Pour the sequins & vellum hearts into the open side of the vellum, then stitch it closed.
4. Shake the contents so they evenly distribute through the vellum pocket.
5. Add the banner stickers to the upper left corner, popping the top one with foam adhesive.
6. Add the circle sticker to the lower right corner with foam adhesive.
7. Accent with enamel dots to finish.
For the next card I to use the 3x4 bokeh card & some of the city themed elements to create this sweet love card that can be given at any time, rather than a specific occasion. I also used Sketch Saturday #316 to help inspired the layout design.
1. Make A2 card from kraft cardstock, then lower the bottom left corner.
2. Layer to blocks of patterned paper to the front of the card.
3. Clip the clothespin to the bokeh card, then adhere to the front.
4. Add the speech bubble sticker to the top of the bokeh card.
5. Add the "my view" flair to the upper right corner.
6. Accent the bokeh card & flair with cork stars.
7. Finish the sentiment & card by adding glitter alphas below the bokeh card.
For the final card, I went bold & bright, but still used that awesome bokeh "thank you" tag that I just LOVE!! I used the My Favorite Things Sketch #182 to inspire the layout design of this card. Check it out!
1. Make A2 card from pink cardstock.
2. Cut yellow paper slightly smaller, then adhere.
3. Stamp "bright lights, big city" to the upper left side of the yellow paper.
4. Add the "thank you" tag to the other side.
5. Adhere the wood veneer cityscape across the middle of the card.
6. Stamp the top cityscape to white cardstock, then cut out.
7. Adhere the stamped cityscape over top of the wood veneer cityscape.
8. Add the wood veneer word to the top, then accent with cork stars.
9. Add the enamel dots to the bottom to finish.


I hope that you like my final few cards using the Best Day of my Life kits from Scraptastic Club!! I am sure these supplies will find themselves on more of my projects in the future...because they are awesome!! Lol! Have a great day!
Until later,
~L.

Happy Thursday, blog friends! Holy cow...I can't believe its been almost a week since I last posted!! My engagement session ended up being postponed until Tuesday due to all of the rain we've been getting here. (It's crazy, BTW. I've never lived anywhere with such dramatic weather.) Tuesday was finally a nice day (and then it started pouring again yesterday) & I had a great time with my clients and my very first engagement session in Fargo! The only bummer....I've counted 17 mosquito bites from that evening. And two of them are on my hip...which was completely covered in clothing. Fitted capris to be exact...I'm not even sure how that is possible. I wonder how my clients fared? Lol. :)
Since I haven't had a chance to post to my blog this week, I wanted to share two of the projects that I've made for this week. My first project is a card that was up on the Scraptastic Club blog this past Monday. We used a baby quote from Pinterest as our inspiration, and I'm actually in dire need of adding baby cards to my stash. (It seriously seems like everyone around me is having a kid!) So, this was perfect timing for me! I've combined the Best Day of my Life kit & add-on from Scraptastic this month to create this sweet baby girl card.


 Instructions to recreate:
1. Make A2 card from white cardstock.
2. Cut a blue bow paper block & a striped paper strip.
3. Layer them together, and tuck an orange tab & heart transparency underneath the top of the striped paper.
4. Zig-zag stitch along each seam, then adhere the entire stitched paper block to the front.
5. Stamp the sentiment to the top of the striped paper in black ink.
6. Adhere the vellum banner through the sticker frame, & add the glitter letters spelling "baby".
7. Add the bow topped clothespin to the right side of the frame, then adhere the entire piece to the front.
8. Tuck the diecut "sweet" under the top of the frame accent, and the vellum "girl" arrow under the bottom.
9. Accent with a pink jewel & enamel dots to finish.

Card Challenges:
-Sketch Saturday #314 - sketch
-The Pink Elephant #255 - photo inspiration
-Simon Says Stamp & Show Monday challenge - anything goes
Up next is a digital layout I created for the Glitz Design blog this week (I highly suggest checking out this week's Focus on Digital post....the layouts using 77 are AMAZING!!! Click on that link...I promise you will be inspired!). Apparently I was on a baby kick this week....because this is a photo of my sweet "niece" Emmalyn. She is the daughter of our closest friend's, but they consider me aunt Lea...which I love!! :) This is a photo from the first time I met her...when she was about 10 days old. I used the digital "77" collection, and a couple of random digital items from Studio Calico & Two Peas.
 I just love the orange watercolor card with that sweet quote on it...it seemed just perfect for this photo of her sleeping so sweetly. Isn't she the cutest?! (You should see her now...she is SO big & full of personality.)

That is all I have for you today! I hope that you enjoyed both of my baby themed projects....please let me know if you have any questions about them at all. I also love to hear what you think about my projects...so leave me a comment if you have the time!
Until later,
~L.
Since I haven't had a chance to post to my blog this week, I wanted to share two of the projects that I've made for this week. My first project is a card that was up on the Scraptastic Club blog this past Monday. We used a baby quote from Pinterest as our inspiration, and I'm actually in dire need of adding baby cards to my stash. (It seriously seems like everyone around me is having a kid!) So, this was perfect timing for me! I've combined the Best Day of my Life kit & add-on from Scraptastic this month to create this sweet baby girl card.
1. Make A2 card from white cardstock.
2. Cut a blue bow paper block & a striped paper strip.
3. Layer them together, and tuck an orange tab & heart transparency underneath the top of the striped paper.
4. Zig-zag stitch along each seam, then adhere the entire stitched paper block to the front.
5. Stamp the sentiment to the top of the striped paper in black ink.
6. Adhere the vellum banner through the sticker frame, & add the glitter letters spelling "baby".
7. Add the bow topped clothespin to the right side of the frame, then adhere the entire piece to the front.
8. Tuck the diecut "sweet" under the top of the frame accent, and the vellum "girl" arrow under the bottom.
9. Accent with a pink jewel & enamel dots to finish.


Card Challenges:
-Sketch Saturday #314 - sketch
-The Pink Elephant #255 - photo inspiration
-Simon Says Stamp & Show Monday challenge - anything goes
Up next is a digital layout I created for the Glitz Design blog this week (I highly suggest checking out this week's Focus on Digital post....the layouts using 77 are AMAZING!!! Click on that link...I promise you will be inspired!). Apparently I was on a baby kick this week....because this is a photo of my sweet "niece" Emmalyn. She is the daughter of our closest friend's, but they consider me aunt Lea...which I love!! :) This is a photo from the first time I met her...when she was about 10 days old. I used the digital "77" collection, and a couple of random digital items from Studio Calico & Two Peas.
I just love the orange watercolor card with that sweet quote on it...it seemed just perfect for this photo of her sleeping so sweetly. Isn't she the cutest?! (You should see her now...she is SO big & full of personality.) That is all I have for you today! I hope that you enjoyed both of my baby themed projects....please let me know if you have any questions about them at all. I also love to hear what you think about my projects...so leave me a comment if you have the time!


Until later,
~L.

Happy Friday, blog friends!! How are you doing today? I'm doing well. I have an engagement session this evening, which I'm excited for! It's been awhile since I've had a photo shoot, and I am ready to get back into the swing of things!
Before I share my card today, I just wanted to remind you that I have a giveaway on THIS POST. A Glitz Design "77" 12x12 collection pack is up for grabs...I will announce the winner this coming weekend! Check out that post & leave a comment for your chance to win!
Today I have a card to share with you using my Scraptastic Club June kits and some Winnie & Walter stamps. I received the Best Day of my Life kit & add-on from Scraptastic this month, and they are full Allison Kreft's Capture Life by Echo Park. I LOVE this collection, and am so excited to get to use it this month! The kits also paired so perfectly with some of my Winnie & Walter stamps, that I just had to do a post combing them! {This is also my first card as an official part of the Winnie & Walter talent!! How exciting!!}


 Instructions to recreate:
1. Cut an A2 card from bokeh patterned paper.
2. Adhere a tag & strip of patterned paper across it at an angle.
3. Tuck vellum scallops underneath the top of the paper strip.
4. Add a vellum strip to the bottom of the paper strip.
5. Stamp & heat emboss the word "Congrats!" along the top of the strip.
6. Add the glittered letter stickers below it to continue the sentiment.
7. Stamp & heat emboss the word "engagement" underneath the letter stickers to finish the sentiment.
8. Zig-zag stitch along the top & bottom of the angled paper strip.
9. Add sticker arrows to the top of the paper strip.
10. Accent with a heart sticker & enamel dots to finish.
Card Challenges:
-Freshly Made Sketches #140 - sketch
-Color Throwdown #296 - color challenge
-The Sisterhood of Crafters challenge - wedding
-Charisma Cardz #13 - glitter

Winnie & Walter also has it's own Playdate #2 challenge going on right now, which is a color challenge! My card mostly fits it, except that I used mint green instead of leaf green. There are still a couple of days left to enter, and the winner gets a guest design spot with us in July!! {Which means you get ALL of the stamps released that month & you get to participate with us for the release. Pretty awesome prize, don't you think.?!!} I would love for you to join us in the challenge, and see what you create!
That is everything that I have for you today! I hope that you enjoyed my card! Have a super great Friday and start to your weekend!
Until later,
~L.
Before I share my card today, I just wanted to remind you that I have a giveaway on THIS POST. A Glitz Design "77" 12x12 collection pack is up for grabs...I will announce the winner this coming weekend! Check out that post & leave a comment for your chance to win!
Today I have a card to share with you using my Scraptastic Club June kits and some Winnie & Walter stamps. I received the Best Day of my Life kit & add-on from Scraptastic this month, and they are full Allison Kreft's Capture Life by Echo Park. I LOVE this collection, and am so excited to get to use it this month! The kits also paired so perfectly with some of my Winnie & Walter stamps, that I just had to do a post combing them! {This is also my first card as an official part of the Winnie & Walter talent!! How exciting!!}
1. Cut an A2 card from bokeh patterned paper.
2. Adhere a tag & strip of patterned paper across it at an angle.
3. Tuck vellum scallops underneath the top of the paper strip.
4. Add a vellum strip to the bottom of the paper strip.
5. Stamp & heat emboss the word "Congrats!" along the top of the strip.
6. Add the glittered letter stickers below it to continue the sentiment.
7. Stamp & heat emboss the word "engagement" underneath the letter stickers to finish the sentiment.
8. Zig-zag stitch along the top & bottom of the angled paper strip.
9. Add sticker arrows to the top of the paper strip.
10. Accent with a heart sticker & enamel dots to finish.
Card Challenges:
-Freshly Made Sketches #140 - sketch
-Color Throwdown #296 - color challenge
-The Sisterhood of Crafters challenge - wedding
-Charisma Cardz #13 - glitter
Winnie & Walter also has it's own Playdate #2 challenge going on right now, which is a color challenge! My card mostly fits it, except that I used mint green instead of leaf green. There are still a couple of days left to enter, and the winner gets a guest design spot with us in July!! {Which means you get ALL of the stamps released that month & you get to participate with us for the release. Pretty awesome prize, don't you think.?!!} I would love for you to join us in the challenge, and see what you create!


That is everything that I have for you today! I hope that you enjoyed my card! Have a super great Friday and start to your weekend!
Until later,
~L.
Subscribe to:
Posts (Atom)


Social Icons