
Showing posts with label bokeh. Show all posts
Showing posts with label bokeh. Show all posts

I made a card this weekend. I don't know how I feel about it. Sitting at my crafting area, which has been closed & packed up for months now, felt vaguely familiar but so very different. As I sat at my desk uninterrupted, I grieved over the fact that Ellie wasn't here to pull me away from it when she needed me. This isn't how it's supposed to be.
I didn't know where to start. I perused the list of challenge sites on my blog, and checked out the blogs of some of my favorite stamp companies. Finally I pulled out some products to use, prompted by a challenge to use a specific stamp set from WPlus9. I'm thankful that it is a stamp set that makes me think of my Ellie...how I would have loved to watch her hang ornaments upon our Christmas tree each year.
And this is what came of it.

 Eh. It's okay. Not a masterpiece by any means, but...a start. Products used? Well, I have no desire to create a link list right now, so if you want to know something specific...ask in the comments & I will reply. :)
I know I probably sound a tad apathetic about this. In a way...that is the truth. I've become indifferent to a lot of things that once meant more to me. Some of that indifference is good, because those things that I thought meant something were really of little to no value. I know that isn't the case with creating. I know there is value in it. I don't want to be indifferent to it. So I am trying to find a way to make it feel safe...like I am not moving on or past my sweet baby girl. I am trying to make it instead, synonymous with Ellie. That I think of her while I create.
Things about this card that make me think of Ellie? Well...the cute little girl hanging the stars for one. And the gold. Her nursery was going to be blush pink, gold & white/cream. With hints of mint. It would have been a really pretty nursery. Soft & sweet....just like her.
Challenge info:
I didn't know where to start. I perused the list of challenge sites on my blog, and checked out the blogs of some of my favorite stamp companies. Finally I pulled out some products to use, prompted by a challenge to use a specific stamp set from WPlus9. I'm thankful that it is a stamp set that makes me think of my Ellie...how I would have loved to watch her hang ornaments upon our Christmas tree each year.
And this is what came of it.
I know I probably sound a tad apathetic about this. In a way...that is the truth. I've become indifferent to a lot of things that once meant more to me. Some of that indifference is good, because those things that I thought meant something were really of little to no value. I know that isn't the case with creating. I know there is value in it. I don't want to be indifferent to it. So I am trying to find a way to make it feel safe...like I am not moving on or past my sweet baby girl. I am trying to make it instead, synonymous with Ellie. That I think of her while I create.
Things about this card that make me think of Ellie? Well...the cute little girl hanging the stars for one. And the gold. Her nursery was going to be blush pink, gold & white/cream. With hints of mint. It would have been a really pretty nursery. Soft & sweet....just like her.
Challenge info:

Hey there, blog friends! Today I just wanted to share some of my last few cards using the June kits from Scraptastic Club!! I have worked with the Best Day of my Life kit & add-on, plus the matching stamp set this month.
My cards today are inspired by the bokeh & city elements in both kits & stamp set! Here is a little peek at all three of them!
So, shaker cards have been all the rage these days, and I wanted to do one without all the extra bulk that tends to come along with them. I also used Retro Sketches #151 to help with the layout design of my card. Here is what I came up with for my first card!

 Instructions to Recreate:
1. Make A2 card from bokeh patterned paper.
2. Adhere a block of vellum to the middle, and stitch along three of the edges.
3. Pour the sequins & vellum hearts into the open side of the vellum, then stitch it closed.
4. Shake the contents so they evenly distribute through the vellum pocket.
5. Add the banner stickers to the upper left corner, popping the top one with foam adhesive.
6. Add the circle sticker to the lower right corner with foam adhesive.
7. Accent with enamel dots to finish.
For the next card I to use the 3x4 bokeh card & some of the city themed elements to create this sweet love card that can be given at any time, rather than a specific occasion. I also used Sketch Saturday #316 to help inspired the layout design.

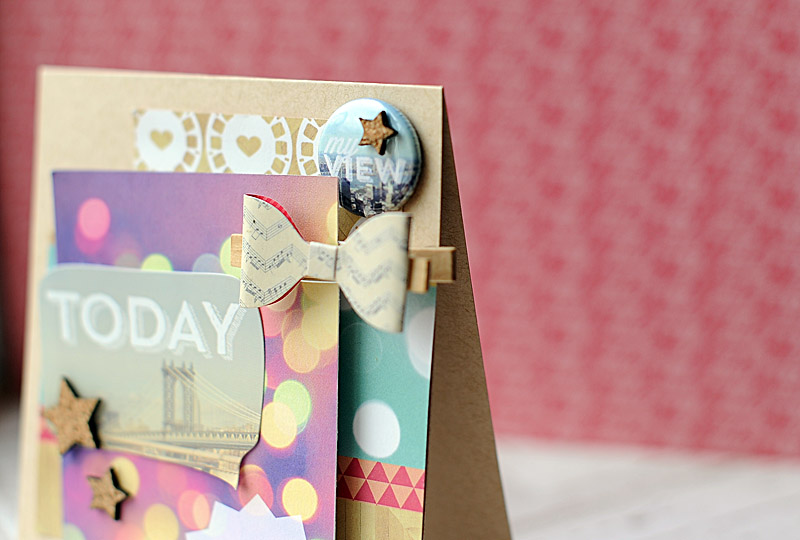 Instructions to Recreate:
1. Make A2 card from kraft cardstock, then lower the bottom left corner.
2. Layer to blocks of patterned paper to the front of the card.
3. Clip the clothespin to the bokeh card, then adhere to the front.
4. Add the speech bubble sticker to the top of the bokeh card.
5. Add the "my view" flair to the upper right corner.
6. Accent the bokeh card & flair with cork stars.
7. Finish the sentiment & card by adding glitter alphas below the bokeh card.
For the final card, I went bold & bright, but still used that awesome bokeh "thank you" tag that I just LOVE!! I used the My Favorite Things Sketch #182 to inspire the layout design of this card. Check it out!

 Instructions to Recreate:
1. Make A2 card from pink cardstock.
2. Cut yellow paper slightly smaller, then adhere.
3. Stamp "bright lights, big city" to the upper left side of the yellow paper.
4. Add the "thank you" tag to the other side.
5. Adhere the wood veneer cityscape across the middle of the card.
6. Stamp the top cityscape to white cardstock, then cut out.
7. Adhere the stamped cityscape over top of the wood veneer cityscape.
8. Add the wood veneer word to the top, then accent with cork stars.
9. Add the enamel dots to the bottom to finish.

I hope that you like my final few cards using the Best Day of my Life kits from Scraptastic Club!! I am sure these supplies will find themselves on more of my projects in the future...because they are awesome!! Lol! Have a great day!
Until later,
~L.
My cards today are inspired by the bokeh & city elements in both kits & stamp set! Here is a little peek at all three of them!
So, shaker cards have been all the rage these days, and I wanted to do one without all the extra bulk that tends to come along with them. I also used Retro Sketches #151 to help with the layout design of my card. Here is what I came up with for my first card!
1. Make A2 card from bokeh patterned paper.
2. Adhere a block of vellum to the middle, and stitch along three of the edges.
3. Pour the sequins & vellum hearts into the open side of the vellum, then stitch it closed.
4. Shake the contents so they evenly distribute through the vellum pocket.
5. Add the banner stickers to the upper left corner, popping the top one with foam adhesive.
6. Add the circle sticker to the lower right corner with foam adhesive.
7. Accent with enamel dots to finish.
For the next card I to use the 3x4 bokeh card & some of the city themed elements to create this sweet love card that can be given at any time, rather than a specific occasion. I also used Sketch Saturday #316 to help inspired the layout design.
1. Make A2 card from kraft cardstock, then lower the bottom left corner.
2. Layer to blocks of patterned paper to the front of the card.
3. Clip the clothespin to the bokeh card, then adhere to the front.
4. Add the speech bubble sticker to the top of the bokeh card.
5. Add the "my view" flair to the upper right corner.
6. Accent the bokeh card & flair with cork stars.
7. Finish the sentiment & card by adding glitter alphas below the bokeh card.
For the final card, I went bold & bright, but still used that awesome bokeh "thank you" tag that I just LOVE!! I used the My Favorite Things Sketch #182 to inspire the layout design of this card. Check it out!
1. Make A2 card from pink cardstock.
2. Cut yellow paper slightly smaller, then adhere.
3. Stamp "bright lights, big city" to the upper left side of the yellow paper.
4. Add the "thank you" tag to the other side.
5. Adhere the wood veneer cityscape across the middle of the card.
6. Stamp the top cityscape to white cardstock, then cut out.
7. Adhere the stamped cityscape over top of the wood veneer cityscape.
8. Add the wood veneer word to the top, then accent with cork stars.
9. Add the enamel dots to the bottom to finish.


I hope that you like my final few cards using the Best Day of my Life kits from Scraptastic Club!! I am sure these supplies will find themselves on more of my projects in the future...because they are awesome!! Lol! Have a great day!
Until later,
~L.
Subscribe to:
Posts (Atom)


Social Icons