

Happy Sunday everyone!! Of course, I have my card for Curtain Call Color Challenge 43 today, courtesy of Stacey's Stamping Stage blog!! Want to hear something funny....I totally had my card done for the actual reveal time of midnight last night (or eleven my time.) Well, I thought I did anyways. I had next week's card done, actually. Tee hee- I totally pulled up the wrong set of colors. Sigh- I was too tired to get another card done, so I waited until this morning to do my card with this week's actual colors! I guess at least I am now a week ahead of the game! Without further ado, here are the colors for THIS week! :)
And here is my card using these fabulous colors!! I also used Waltzingmouse sketch #10 for it....a great one that can be used so many times and will look so different each time!


"There is No One Like You" supplies:
Cardstock: Bazzill Basics
Paper: October Afternoon
Stamps: Papertrey Ink (YOF: Larkspurs)
Ink: Clearsnap (Pigment: royal blue) & Tsukineko (Versafine: onyx black)
Ribbon: Offray & Sons
Twine: Darice Inc.
Button/Jewels: Doodlebug Designs
Button/Jewels: Doodlebug Designs
Flowers: Recollections
Corner Rounder: EK Success
Diecut Machine: Cricut Expression by Provo Craft
Diecut Cartridge: Storybook by Provo Craft
Instructions: Round the corners of a floral paper block, and adhere to the front of a blue card base. Cut the scalloped circle at 4" from orange dot paper using the Cricut Expression and Storybook cartridge. Adhere the circle to the middle of the card. Cut the circle at 3.5" from white cardstock, and stamp the flowers & sentiment to the front of it. Adhere the circle to the middle of the card using foam adhesive. Tie a bow from blue dotted ribbon, and tie a button to the middle using twine. Adhere the bow accent to the upper left corner of the circles. Add three paper flowers to the lower right corner of the circle, and accent three of the stamped flowers with orange jewels.
Don't forget to check out what the other ladies have done with these colors...it will be pure eye candy!! ♥♥♥


I am in dire need of posting CPS cards from the past month. So, that is what my post is all about today! I'll start with this week's card for CPS Sketch 179. No sponsor this week....so I used the new Love Nest collection by Glitz!! Sigh- love this line!

Paper: Hambly Screen Prints
Paper Frill: Doodlebug Designs
Jewels: Doodlebug Designs & Westrim Crafts
Ribbon: Renaissance by Design
Twine: Darice Inc.
Button: Papertrey Ink

Paper: GCD Studios
Paper Frill: Doodlebug Designs
Stamps/Button: Papertrey Ink
Ink: Tsukineko (Versafine: onyx black) & Clearsnap (Pigment: razzberry)
Ribbon: Renaissance by Design
Twine: Darice Inc.


"Wish You Were Here" supplies:
Cardstock: The Paper Company
Paper/Sticker/Jewels: Glitz Designs
Ribbon: Renaissance by Design
Flowers: Recollections
Pins: Jenni Bowlin
Corner Rounder: EK Success
Ink: Clearsnap (Chalk: creamy brown)
Sandpaper
Paper/Sticker/Jewels: Glitz Designs
Ribbon: Renaissance by Design
Flowers: Recollections
Pins: Jenni Bowlin
Corner Rounder: EK Success
Ink: Clearsnap (Chalk: creamy brown)
Sandpaper
Instructions: Fold cream cardstock in half to make card base. Round the corners, then ink & sand the edges of the first paper layer, and adhere to the front of the card. Round the corners and then sand the edges of a pink damask paper block. Adhere to the right side of the card. Tie ribbon to the right side of the card. Sand the edges of the cardstock sticker, and adhere over top of the ribbon. Accent the bow with pins, flowers and jewels. Add a strip of pink jewels to the left side of the card.
Up next is my card for CPS Sketch 178. We were sponsored by EAD Designs that week, and I used some of their vinyl rub-ons. The rub-ons are very cool, and I think you would have to work pretty hard to ruin them! They transfer to your card the same way you would transfer vinyl onto something like a wall....it doesn't take much pressure when rubbing and the backing needs to be pulled off slowly and at an angle. Here is my card:

"Thanks" supplies:
Vinyl Rub-ons: courtesy of EAD Designs (Retro Thank You)
Cardstock: Bazzill BasicsPaper: Hambly Screen Prints
Paper Frill: Doodlebug Designs
Jewels: Doodlebug Designs & Westrim Crafts
Ribbon: Renaissance by Design
Twine: Darice Inc.
Button: Papertrey Ink
Instructions: Cover the front of a cream card base with kraft dotted paper. Adhere the background tree rub-on to a cream cardstock block, and trim off the edges. Adhere the cardstock block to the front of the card. Add a patterned paper strip to the top of the block, and cover the seam with paper frill. Cut the top off of the front tree, and adhere just the tree trunk to the cardstock block, then add the sentiment rub-on. Adhere the tree top to a separate piece of cardstock, cut it out, and adhere it to the front using dimensional adhesive. Accent the popped tree top with three jewels. Tie ribbon around the bottom seam, and add a button to the bow using twine.
Up next is my card for CPS 177. That week we were sponsored by Flower Soft. They make these cute little pots of different colored sprinkles that you can use on your projects. It is a bit like flocking, but I feel like it has more texture and substance than other flocking powders out there. Here is what I came up:

"Wishing You Well" supplies:
Flocking Sprinkles: Flower Soft (Polar White)
Cardstoc: Bazzill BasicsPaper: GCD Studios
Paper Frill: Doodlebug Designs
Stamps/Button: Papertrey Ink
Ink: Tsukineko (Versafine: onyx black) & Clearsnap (Pigment: razzberry)
Ribbon: Renaissance by Design
Twine: Darice Inc.
Colored Pencil: Heidi Swapp
Instructions: Cover the front of a white card base with glittered patterned paper. Stamp the flowers and sentiment to a kraft cardstock block, and color in the flower leaves with a green colored pencil. Add glue to each flower and cover in the flocking sprinkles. Let sit for a moment, shake off the excess, and do any touch-up that is necessary. Adhere a pink scalloped frill to the bottom of the cardstock block, and adhere to the front of the card. Tie ribbon around the top seam, and add a button to the bow using twine.
And last, but definitely not least is my card for CPS Sketch 176. We were sponsored by Kitchen Sink Stamps that week, and I used a few different sets from the company. If you frequent my blog in any type of fashion, you will know that I use the Plaid Plus stamp set all the time....the heart and star strips are a great addition to any stamp collection because they can be used so much! Here is what I came up with!

"Hugs and Kisses" supplies:
Stamps: courtesy of Kitchen Sink Stamps (Plaid Plus, Backgrounds & Borders, Never A Loss 4 Words)
Ink: Clearsnap (Pigment: turquoise, cranberry, pink, raven black)
Cardstock: Bazzill Basics
Paper: We R Memory Keepers & Doodlebug Designs
Ribbon: Renaissance by Design
Twine: Darice Inc.
Jewels: Kaiser Craft
Felt/Steel Die/Button: Papertrey Ink
Glitter: DecoArt
Diecut Machine: Cuttlebug by Provo Craft, Cricut Expression by Provo Craft
Ink: Clearsnap (Pigment: turquoise, cranberry, pink, raven black)
Cardstock: Bazzill Basics
Paper: We R Memory Keepers & Doodlebug Designs
Ribbon: Renaissance by Design
Twine: Darice Inc.
Jewels: Kaiser Craft
Felt/Steel Die/Button: Papertrey Ink
Glitter: DecoArt
Diecut Machine: Cuttlebug by Provo Craft, Cricut Expression by Provo Craft
Diecut Cartridge: Storybook by Provo Craft
Instructions: Ink the edges of a heart paper block, and cover the front of a white card base with it. Stamp the middle of a kraft cardstock block with a dotted border, and adhere to the front of the card. Cut a scalloped square from dotted paper using the Cricut Expression and Storybook cartridge. Adhere to the middle of the card. Tie ribbon around the middle, and add a button to the bow using twime. Stamp the hearts and sentiment to a white cardstock block, and adhere to the middle using dimensional adhesive. Diecut the cloud from felt using the Cuttlebug. Glitter the cloud, and adhere to the upper left corner of the sentiment block. Accent the cloud, sentiment, and dotted border with jewels.
Phew!! Finally caught up, and don't feel so guilty that they aren't posted! We haven't watched many new movies lately because we have been so busy...so I don't really have a movie post to share with you. I did put the television on a channel playing the movie "The Skulls" the other day while I was doing some stuff in the kitchen. I totally forgot how much I liked the love song from that movie, so I downloaded it after hearing it again. Here is the song if you want to listen to it! It is called "Taste" by Lorna Vallings.
Well, that is everything I have for now. Casey moved into his dorm yesterday, and is starting football practice today! Can't wait to hear how everything is going!! ♥♥♥
Until later,
~Lea L.

Happy Sunday everyone! Wow...I feel like I have been completely MIA lately! And I actually pretty much have been. The past two weeks all of my posts have been scheduled, and they were scheduled about 3 weeks ago. I was gone for our fun "Hocker Girls Week" the week before last, and this past week I have just been busy with some other projects. I haven't been able to visit my favorite blogs, and didn't even really see any posts from CHA...so I feel a little out of the loop! I will catch up though...I always do!
Well, after a needed week off....this Sunday gets back on schedule with Curtain Call Color Challenge 42 courtesy of Stacey's Stamping Stage blog! Here are the colors for the week!
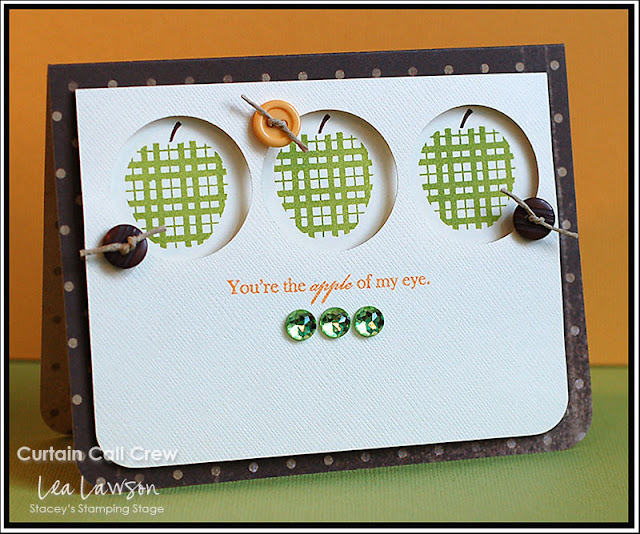
Along with using these fabulous colors, I also used Clean & Simple: 102 for it. Love this fun sketch that they created this week....as always! :)
Well, after a needed week off....this Sunday gets back on schedule with Curtain Call Color Challenge 42 courtesy of Stacey's Stamping Stage blog! Here are the colors for the week!


"Apple of my Eye" supplies:
Cardstock: Bazzill Basics
Paper: Glitz Designs
Stamps: Renaissance by Design (A is for Apple, Roots & Wings add-on)
Ink: Clearsnap (Pigment: moss green, chestnut, topaz)
Jewels: Doodlebug Designs
Buttons: Basic Grey
Twine: Darice Inc.
Corner Rounder: EK Success
Instructions: Fold brown dotted paper in half to make card base, and round the bottom corners. Round the bottom corners of a vanilla cardstock block, and punch three circles to the top of it. Stamp the sentiment to the middle of the cardstock block, below the punched circles. Stamp the apples to a separate cardstock strip, and adhere it to the front so the apples will show through the punched circles. Adhere the punched block to the front of the card using dimensional adhesive. Tie twine through 3 buttons, and accent the circles with them. Finish by adding three jewels below the sentiment.
Be sure to check out what the other ladies came up with, including our fabulous August guest designer! And I sure hope that you will play along! ♥♥♥

Hi everyone!! This month, we are featuring our hometowns for you!! The inspiration photo that we were given is really fun and fabulous...check it out!
So...it has been a REALLY long time since I scrapbooked. Seriously...its been ages. So, I panicked a little when we were given a scrapbooking assignment. Me- the girl who has converted to just card making. But then I gave myself a fake slap in the face and reminded myself that I used to scrapbook all the time!! I can do this!! And this is what I came up with:
 I used a compilation of fun summer photos from some of the things we do here in the summer. My journaling really says it all. I hate winter. Sure...it is novel for a bit. When you get that first snow, and the beauty blankets the fields. It is great when you are watching it fall softly as you look out the window, past your Christmas tree. But, when MAY rolls around and it is still coming down....you decide that you actually hate winter.
But, summer (and fall!) here really does make up for the winter....totally and completely. Summer in Montana is really amazing, and I would invite anyone to take a vacation here during these months. It is really a fabulous time.
I hope that you liked a little peek into my summer hometown!
Until later,
~Lea L.
So...it has been a REALLY long time since I scrapbooked. Seriously...its been ages. So, I panicked a little when we were given a scrapbooking assignment. Me- the girl who has converted to just card making. But then I gave myself a fake slap in the face and reminded myself that I used to scrapbook all the time!! I can do this!! And this is what I came up with:


But, summer (and fall!) here really does make up for the winter....totally and completely. Summer in Montana is really amazing, and I would invite anyone to take a vacation here during these months. It is really a fabulous time.
I hope that you liked a little peek into my summer hometown!
Until later,
~Lea L.
Subscribe to:
Posts (Atom)


Social Icons