

I know...totally random title post. But it is the truth....I ADORE white cardstock. I always have! When I actually used to scrapbook....it was pretty much the only color of cardstock that I scrapped with. Now, I use all colors of cardstock for cardmaking....but white is definitely a go-to, as is kraft. My favorite white cardstock is the KI white from Bazzill, which has the orange peel texture to it. I think it is the purest white out there. But, I'll use all types of white cardstock, as long as it isn't dingy looking! I am an EOU of white cardstock....tee hee!
So, I went all CAS (clean & simple) the past couple of days, and I have a few cards to share with you. First up is my card for this week's sketch at CPS. I flipped the sketch longways, and used hearts in place of the octagons. Here it is!
Instructions: Stamp the heart six times with rainbow colors of pigment ink, and set aside to dry. Fold black cardstock in half to make your card base, and round the bottom corners. Round the bottom corners of a block of white cardstock and adhere to the front. Add the rub-on sentiment to the middle, and underline with six rainbow colored jewels. Once the ink has dried on the stamped hearts, cut each one out. Layer in a line at the bottom of the card, and accent with a jewel.
This next card is based on FTL76 at the Clean & Simple Stamping blog. The newest sketch was posted today, and I just LOVE it. Had to use it right away. This is what I came up with.

Instructions: Fold white cardstock in half to make card base, and round the bottom corners. Tie ribbon around the front of the card. Draw the lines with pencil first, and then trace over in black pen. Accent the four ends with three pearls. Cut three 1" squares from patterned paper, and round two opposite corners on each block. Adhere to the front of the card where the black lines intersect. Stamp the strawberry directly to the last slot, and then stamp to red and brown cardstock. Cut out, glitter the brown piece, and layer together on the card. Stamp the sentiment below the squares, "hugging" the black line.
And I did this next little cutie just to use those fabulous pink heart sequins!! I ♥ them....and they make a perfect little love tree!! Love it! And here is another case of using a licensed character cartridge to get the perfect cut. The tree trunk comes from the Pooh & friends cartridge, and it is the only cartridge that I own that had this perfect shape. Love finding little treasures where you think you wouldn't!

Instructions: Fold white cardstock in half to make card base, and round the bottom corners. Cut a two inch circle from white cardstock, and heavily coat with spray adhesive. Start layering the heart sequins to the circle. Once it is covered, sit something fairly heavy on it and let dry for a few minutes. Cut the tree trunk at 2 3/4" from kraft cardstocking using a Cricut Expression and the Pooh & Friends cartridge. Adhere both items to the front of the card, and accent with chipboard hearts. Stamp the sentiment directly below the tree using cranberry pigment ink. Add the three pearl accents directly below that, and then draw the black square with a ruler and black pen.
So, how has your week been? A little off schedule here because of Josh's overnights, but they aren't forever. And once he is done, his store will have brand new carpet! So, it will be worth it. I have been researching more wedding album options for my collections, hoping to make them more affordable. I think I have found who I want to use, and the plus is that she is in this state! I love supporting local business owners, and her albums are beautiful and much more affordable than the company I was thinking of using. So, it is a win win for me! Yay!!
So, I loaded a couple of older soundtracks to my iTunes catalog the other day from my humongous CD collection, and I had totally forgotten how much I LOVE this song off the Crazy/Beautiful soundtrack. I thought I would share it.
Is it such a beautiful melody and voice...love it. Sorry about the random video...the other one I found was a little inappropriate for my blog, so I just used this one. I think it is a bunch of random television show and movie couples....but whatever. I just wanted to share the song with you!! Tee hee! I hope you enjoyed listening to it!
Well, I need to get going for now! I hope the start of your weekend has been a fabulous one! ♥
Until later,
~Lea
So, I went all CAS (clean & simple) the past couple of days, and I have a few cards to share with you. First up is my card for this week's sketch at CPS. I flipped the sketch longways, and used hearts in place of the octagons. Here it is!

"I {heart} u" supplies:
Cardstock: Prism (black) & Bazzill Basics (white)
Stamps: Gina K Designs (Happy Hearts set)
Ink: Clearsnap (Pigment: scarlet, orange, canary, lime, surf, violet, heliotrope)
Rub-ons: American Crafts
Jewels: Doodlebug Designs
Corner Rounder: EK Success
Cardstock: Prism (black) & Bazzill Basics (white)
Stamps: Gina K Designs (Happy Hearts set)
Ink: Clearsnap (Pigment: scarlet, orange, canary, lime, surf, violet, heliotrope)
Rub-ons: American Crafts
Jewels: Doodlebug Designs
Corner Rounder: EK Success
Instructions: Stamp the heart six times with rainbow colors of pigment ink, and set aside to dry. Fold black cardstock in half to make your card base, and round the bottom corners. Round the bottom corners of a block of white cardstock and adhere to the front. Add the rub-on sentiment to the middle, and underline with six rainbow colored jewels. Once the ink has dried on the stamped hearts, cut each one out. Layer in a line at the bottom of the card, and accent with a jewel.
This next card is based on FTL76 at the Clean & Simple Stamping blog. The newest sketch was posted today, and I just LOVE it. Had to use it right away. This is what I came up with.

"Chocolate Hugs" supplies:
Cardstock: Bazzill Basics
Paper: K & Company
Ribbon: Renaissance By Design
Pearls: Kaiser Craft
Stamps: Cornish Heritage Farms (Kim Hughes Collection: Hugs and Kisses)
Ink: Clearsnap (Pigment: green, frost white, brown)
Glitter: Making Memories
Pen: Martha Stewart Crafts
Corner Rounder: EK Success & Marvy Uchida
Instructions: Fold white cardstock in half to make card base, and round the bottom corners. Tie ribbon around the front of the card. Draw the lines with pencil first, and then trace over in black pen. Accent the four ends with three pearls. Cut three 1" squares from patterned paper, and round two opposite corners on each block. Adhere to the front of the card where the black lines intersect. Stamp the strawberry directly to the last slot, and then stamp to red and brown cardstock. Cut out, glitter the brown piece, and layer together on the card. Stamp the sentiment below the squares, "hugging" the black line.
And I did this next little cutie just to use those fabulous pink heart sequins!! I ♥ them....and they make a perfect little love tree!! Love it! And here is another case of using a licensed character cartridge to get the perfect cut. The tree trunk comes from the Pooh & friends cartridge, and it is the only cartridge that I own that had this perfect shape. Love finding little treasures where you think you wouldn't!

"Love is in the Air" supplies:
Cardstock: Bazzill Basics
Sequins: Making Memories
Chipboard: KI Memories
Pearls: Darice Inc.
Stamp: The Cat's Pajamas (Puppy Love set)
Ink: Clearsnap (Pigment: cranberry)
Pen: Martha Stewart Crafts
Corner Rounder: EK Success
Diecut Machine: Cricut Expression by Provo Craft
Diecut Cartridge: Pooh & Friends by Provo Craft
Instructions: Fold white cardstock in half to make card base, and round the bottom corners. Cut a two inch circle from white cardstock, and heavily coat with spray adhesive. Start layering the heart sequins to the circle. Once it is covered, sit something fairly heavy on it and let dry for a few minutes. Cut the tree trunk at 2 3/4" from kraft cardstocking using a Cricut Expression and the Pooh & Friends cartridge. Adhere both items to the front of the card, and accent with chipboard hearts. Stamp the sentiment directly below the tree using cranberry pigment ink. Add the three pearl accents directly below that, and then draw the black square with a ruler and black pen.
So, how has your week been? A little off schedule here because of Josh's overnights, but they aren't forever. And once he is done, his store will have brand new carpet! So, it will be worth it. I have been researching more wedding album options for my collections, hoping to make them more affordable. I think I have found who I want to use, and the plus is that she is in this state! I love supporting local business owners, and her albums are beautiful and much more affordable than the company I was thinking of using. So, it is a win win for me! Yay!!
So, I loaded a couple of older soundtracks to my iTunes catalog the other day from my humongous CD collection, and I had totally forgotten how much I LOVE this song off the Crazy/Beautiful soundtrack. I thought I would share it.
Is it such a beautiful melody and voice...love it. Sorry about the random video...the other one I found was a little inappropriate for my blog, so I just used this one. I think it is a bunch of random television show and movie couples....but whatever. I just wanted to share the song with you!! Tee hee! I hope you enjoyed listening to it!
Well, I need to get going for now! I hope the start of your weekend has been a fabulous one! ♥
Until later,
~Lea
....on Teresa Collin's Crush collection. I don't see it on her website anymore, but I can still get it at my local scrapbooking store....and I ♥ it!! Don't be surprised if you continue to see a bunch of projects with it in the future! :)
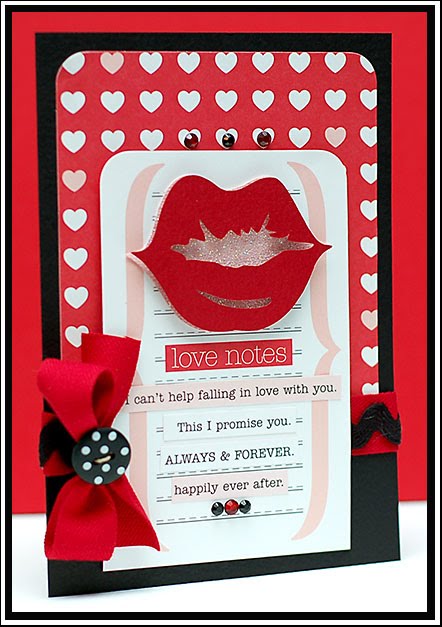
So, let's jump right into the cards I have to share today! This first card is based on 2S4U Laura's Sketch 44, and on 365 Cards: 3 R's challenge (red, rhinestones & ric-rac). I also used one of the latest seasonal Cricut cartridges called "Lovestruck". They are far less expensive than the bigger cartridges because there are no features (ie: shadow, blackout, etc....) and there are fewer cuts. And this one is just awesome! I will be using it again on more Valentine projects in the near future. I really recommend it if you are a Cricut fiend (hint, hint Carla...tee hee!).
Instructions: Fold black cardstock in half to make card base. Round the top corners of a block of red heart paper and adhere to the front. Tie red twill and black ric-rac around the bottom of the card. Tie a button around the bow with twine. Round the top corners of the journal tag. Cut the four love sentiment strips from patterned paper and adhere to the front. Cut the lips at 3" from red cardstock using a Cricut Expression and Lovestruck cartridge. This cartridge does not have a blackout feature, so trace the outside of the lips cut to pink cardstock and cut by hand. Cover the pink blackout cut in glitter, and adhere the red cut to the top using dimensional adhesive. Attach the entire piece to the journal tag, and adhere the entire block to the front of the card. Accent with red and black jewels.
This pastel beauty is based on FTL #75 (sketch- turned longways), Color Chef #36 (dark pink, light pink & white), and TPE #51 (polka dots, bow & pink). More Crush papers....what I love most about these is all the journal tags, diecuts, and text strips are all just sheets of patterned paper. One side normally includes the item you can cut out, and the other side is a matching patterned paper. So- you have multiple choices. For a crafter on a budget (like I am)...papers like these are a dream. Love them!

Instructions: Fold pink cardstock in half to make card base, and round the bottom corners. Round the bottom corners of a block of white cardstock and emboss using the Cuttlebug and Love Languages embossing folder. Adhere the block to the front. Tie ribbon around the left side, and accent the bow with a pink pearl heart and a jewel crown. Round the bottom corners of a block of pink houndstooth paper and adhere to the front. Cut out three love themed tickets from patterned paper. Add the rub-on letters to the polka dotted ticket and adhere all three to the front, using dimensional adhesive on the middle ticket. Accent the bottom ticket with a small pearl heart.
And the last card I have to share with you today is based on Get Sketchy #22 and C4C21 (Pretty In Pink). The angel winged heart cut is from the "Hello Kitty Greetings" cartridge....which I ♥♥♥! It has some of the cutest cuts on them, and as you can see...they don't all have the Hello Kitty character on them. That is what I actually love about most of the licensed carts....they have tons of really cute cuts that don't really have anything to do with the licensed character.

Instructions: Fold white cardstock in half to make the card base. Round the corners of a block of pink dotted paper and adhere to the front. Cut a block of red heart paper in a triangle half, and add a black & white striped scalloped strip to the edge. Round each of the three corners and adhere to the front. Adhere the journal tag to the lower right corner of the card. Cut the winged heart layers at 1 3/4" from black, pink & white cardstock using a Cricut Expression and the Hello Kitty Greetings cartridge. Glue the pink layer (heart) to the black cut. Glitter the white wing cuts and adhere to the black cut using dimensional adhesive. Attach to the journal tag, and embellish with a chipboard heart, sentiment strip, and red heart jewels. Add letter stickers to the top of the journal tag, replacing the "C" with a pink heart jewel.
So, how has your week been going? Mine is good- a little off schedule because Josh had yesterday off and then starts his overnights tonight. The carpet is getting replaced in his store, which means almost two weeks of overnight shifts for him. So- my days are going to be a little turned around...although he will now be sleeping much of the time I am awake. So- I might get back to my regular schedule a little bit...we shall see!
I finally got the chance to watch this movie on Sunday:
 I thought it was so good! And I don't even like to cook....Josh is the chef in this household. But, it was interesting how they combined the life story of Julia Child into Julie Powell's blogging experience. It was just really wonderful...and there was one cooking tip that I did take from it. "Don't crowd the mushrooms!!" I passed that tip along to the chef....tee hee!
Well, I am going to get going for now! I hope you are happy to be at the middle of the week! ♥
Until later,
~Lea
So, let's jump right into the cards I have to share today! This first card is based on 2S4U Laura's Sketch 44, and on 365 Cards: 3 R's challenge (red, rhinestones & ric-rac). I also used one of the latest seasonal Cricut cartridges called "Lovestruck". They are far less expensive than the bigger cartridges because there are no features (ie: shadow, blackout, etc....) and there are fewer cuts. And this one is just awesome! I will be using it again on more Valentine projects in the near future. I really recommend it if you are a Cricut fiend (hint, hint Carla...tee hee!).

"Love Notes" supplies:
Cardstock: Prism (black, red) & Bazzill Basics (pink)
Paper: Teresa Collins Designs
Twill/ric-rac: Wrights
Twine/Jewels: Darice Inc.
Button: Doodlebug Designs
Glitter: DecoArt
Corner Rounder: EK Success
Diecut Machine: Cricut Expression by Provo Craft
Diecut Cartridge: Lovestruck by Provo Craft
Instructions: Fold black cardstock in half to make card base. Round the top corners of a block of red heart paper and adhere to the front. Tie red twill and black ric-rac around the bottom of the card. Tie a button around the bow with twine. Round the top corners of the journal tag. Cut the four love sentiment strips from patterned paper and adhere to the front. Cut the lips at 3" from red cardstock using a Cricut Expression and Lovestruck cartridge. This cartridge does not have a blackout feature, so trace the outside of the lips cut to pink cardstock and cut by hand. Cover the pink blackout cut in glitter, and adhere the red cut to the top using dimensional adhesive. Attach the entire piece to the journal tag, and adhere the entire block to the front of the card. Accent with red and black jewels.
This pastel beauty is based on FTL #75 (sketch- turned longways), Color Chef #36 (dark pink, light pink & white), and TPE #51 (polka dots, bow & pink). More Crush papers....what I love most about these is all the journal tags, diecuts, and text strips are all just sheets of patterned paper. One side normally includes the item you can cut out, and the other side is a matching patterned paper. So- you have multiple choices. For a crafter on a budget (like I am)...papers like these are a dream. Love them!

"To My Sweet Love" supplies:
Cardstock: Bazzill Basics
Paper: Teresa Collins Designs
Rub-ons: American Crafts (letters)
Jewels: Heidi Swapp (crown) & Darice Inc. (hearts)
Ribbon: Renaissance By Designs
Corner Rounder: EK Success
Embossing Machine: Cuttlebug by Provo Craft
Embossing Folder: Love Languages by Provo Craft
Instructions: Fold pink cardstock in half to make card base, and round the bottom corners. Round the bottom corners of a block of white cardstock and emboss using the Cuttlebug and Love Languages embossing folder. Adhere the block to the front. Tie ribbon around the left side, and accent the bow with a pink pearl heart and a jewel crown. Round the bottom corners of a block of pink houndstooth paper and adhere to the front. Cut out three love themed tickets from patterned paper. Add the rub-on letters to the polka dotted ticket and adhere all three to the front, using dimensional adhesive on the middle ticket. Accent the bottom ticket with a small pearl heart.
And the last card I have to share with you today is based on Get Sketchy #22 and C4C21 (Pretty In Pink). The angel winged heart cut is from the "Hello Kitty Greetings" cartridge....which I ♥♥♥! It has some of the cutest cuts on them, and as you can see...they don't all have the Hello Kitty character on them. That is what I actually love about most of the licensed carts....they have tons of really cute cuts that don't really have anything to do with the licensed character.

"True Love" supplies:
Cardstock: Bazzill Basics
Paper: Teresa Collins Designs
Stickers: Making Memories
Chipboard: We R Memory Keepers
Jewels: Westrim Crafts
Glitter: DecoArt
Corner Rounder: EK Success
Diecut Machine: Cricut Expression by Provo Craft
Diecut Cartridge: Hello Kitty Greetings by Provo Craft
Instructions: Fold white cardstock in half to make the card base. Round the corners of a block of pink dotted paper and adhere to the front. Cut a block of red heart paper in a triangle half, and add a black & white striped scalloped strip to the edge. Round each of the three corners and adhere to the front. Adhere the journal tag to the lower right corner of the card. Cut the winged heart layers at 1 3/4" from black, pink & white cardstock using a Cricut Expression and the Hello Kitty Greetings cartridge. Glue the pink layer (heart) to the black cut. Glitter the white wing cuts and adhere to the black cut using dimensional adhesive. Attach to the journal tag, and embellish with a chipboard heart, sentiment strip, and red heart jewels. Add letter stickers to the top of the journal tag, replacing the "C" with a pink heart jewel.
So, how has your week been going? Mine is good- a little off schedule because Josh had yesterday off and then starts his overnights tonight. The carpet is getting replaced in his store, which means almost two weeks of overnight shifts for him. So- my days are going to be a little turned around...although he will now be sleeping much of the time I am awake. So- I might get back to my regular schedule a little bit...we shall see!
I finally got the chance to watch this movie on Sunday:

Well, I am going to get going for now! I hope you are happy to be at the middle of the week! ♥
Until later,
~Lea

I have decided to {finally} participate in this month's Papertrey Ink blog hop. I have read the challenge every month for months....but never had a little bit of extra time to come up with something for it. Well, I purchased some of the December and January released stamps from PTI as a birthday gift to myself....and decided the blog hop challenge was the perfect time break my new stamps out and put them to use! Here are the details of the challenge:
So, without further ado....here is what I came up with. The paper that I used by Doodlebug was perfect for this....other than the fact that the background is stark white. So, to warm it up, and give it that just out of the oven cupcake feel....I warmed it up with antique linen distress ink and that Tim Holtz tool with the sponge on the end (I have no idea what it is called).
That is my cute little baby card! I realized as I was getting the card finished up this afternoon that I am completely out of envelopes. So- decorating an envelope for it will have to come later. I don't actually utilize envelopes that often because handmade cards are normally going along with a present of some sort...so I use them to decorate the package! ♥
Papertrey Ink Stamps & Supplies:
Background Basics: Hearts
Baby Button Bits
Inside & Out: Baby
Vintage Buttons Holiday Mix
Other Supplies:
Cardstock: Bazzill Basics
Paper/Jewel: Doodlebug Designs
Ribbon: Renaissance By Design
Ink: Clearsnap (Pigment: orchid, Cocoa & Chalk: lime pastel, toffee)
Glitter: DecoArt
Corner Rounder: EK Success
Well, I better get going for now! A new Heroes is on tonight....yay! I missed last weeks show because we were out and about doing something, so I am going to go see if it is available on Netflix streaming. If not...I am sure it is online for veiwing! I hope that you have a wonderful rest of your Monday! ♥
Until later,
~Lea
Total Package Challenge
During this month's release there was a lot of chatter about the interior of cards and how they don't
always get the attention they need. This month's challenge is to create a card that has the "total
package". Create any style card you can dream up, then take it the next step. Embellish the interior
and adorn the envelope. You might even want to add a little something to the back of the card! Be sure
to take photos of ever aspect so we can all be inspired with what you create! We can't wait to see what
you make!
During this month's release there was a lot of chatter about the interior of cards and how they don't
always get the attention they need. This month's challenge is to create a card that has the "total
package". Create any style card you can dream up, then take it the next step. Embellish the interior
and adorn the envelope. You might even want to add a little something to the back of the card! Be sure
to take photos of ever aspect so we can all be inspired with what you create! We can't wait to see what
you make!
So, without further ado....here is what I came up with. The paper that I used by Doodlebug was perfect for this....other than the fact that the background is stark white. So, to warm it up, and give it that just out of the oven cupcake feel....I warmed it up with antique linen distress ink and that Tim Holtz tool with the sponge on the end (I have no idea what it is called).

Papertrey Ink Stamps & Supplies:
Background Basics: Hearts
Baby Button Bits
Inside & Out: Baby
Vintage Buttons Holiday Mix
Other Supplies:
Cardstock: Bazzill Basics
Paper/Jewel: Doodlebug Designs
Ribbon: Renaissance By Design
Ink: Clearsnap (Pigment: orchid, Cocoa & Chalk: lime pastel, toffee)
Glitter: DecoArt
Corner Rounder: EK Success
Well, I better get going for now! A new Heroes is on tonight....yay! I missed last weeks show because we were out and about doing something, so I am going to go see if it is available on Netflix streaming. If not...I am sure it is online for veiwing! I hope that you have a wonderful rest of your Monday! ♥
Until later,
~Lea

Hi there! Tonight I am helping out with the blog hop for one of Gina K's newest stamp sets, Happy Hearts! This set features a plethora of designed hearts, and a mix of words that can make pretty much any love, wedding, anniversary or valentine themed sentiment you can think of!
If you haven't seen, I did a rainbow card with this set earlier this week....here is a link to the post so you can check it out if you like! ♥
And without further ado, here are a couple more cards. How I love this little heart set, and I am sure you will be seeing more with it in the very near future! Thanks to Gina K and Tami Mayberry for letting me be part of this fun blog hop tonight!!

Those are what I came up with for tonight! I hope you like them! ♥
Until later,
~Lea
If you haven't seen, I did a rainbow card with this set earlier this week....here is a link to the post so you can check it out if you like! ♥
And without further ado, here are a couple more cards. How I love this little heart set, and I am sure you will be seeing more with it in the very near future! Thanks to Gina K and Tami Mayberry for letting me be part of this fun blog hop tonight!!
Happy Hearts Topiary Card

You Have My Heart For Always Card

Those are what I came up with for tonight! I hope you like them! ♥
Check out these links for even more inspiration:
Tami Mayberry {Illustrator}
Jessica Fick
Theresa Momber
Nina Brackett
Carolyn King
Lee Murphy
Joan Ervin
Maren Benedict
Lea Lawson
StampTV Idea Center
Jessica Fick
Theresa Momber
Nina Brackett
Carolyn King
Lee Murphy
Joan Ervin
Maren Benedict
Lea Lawson
StampTV Idea Center
Now, it's your turn! Please hop over to Gina's blog to add the direct link to your blog post showcasing Tami's Happy Hearts stamp set in the Mister Linkey Box. Gina will have a special prize for the one link that she chooses out of all the participating bloggers - check out her blog for the details.
Until later,
~Lea
Subscribe to:
Posts (Atom)


Social Icons