

Happy Thursday, blog friends! I hope you've had a good week so far. Mine has been busy as usual, but really...what's new?! Lol.
I wanted to share a couple of cards that I made using the brand new washi tape with coordinating stamps & dies that we've recently released at Pinkfresh Studio. This set is called Eucalyptus Fantasy, and it is so beautiful!
For this first card, I adhered a strip of the Eucalyptus Fantasy washi tape to 65 LB cardstock, then diecut the images with the Eucalyptus Fantasy diecut set.. I choose a lightweight cardstock for this process because you are going to add some weight to it with the washi tape, and I think it is easier to diecut. If you want to add some bulk to the diecut piece, just cut a couple more times from white cardstock & stack.
I also diecut the Hooray word from Essentials: Classic Words three times: once from gold glitter paper and twice from white cardstock, then adhered it together. I diecut the shadow layer from vellum, then layered the intricate piece to the top. Next I diecut the Essentials: Fancy Label Frames two times: once from white cardstock, and once from gold glitter paper. I stamped the small sentiment from the Eucalyptus Fantasy stamp set to the white label, then adhered it to the gold layer with foam dots.
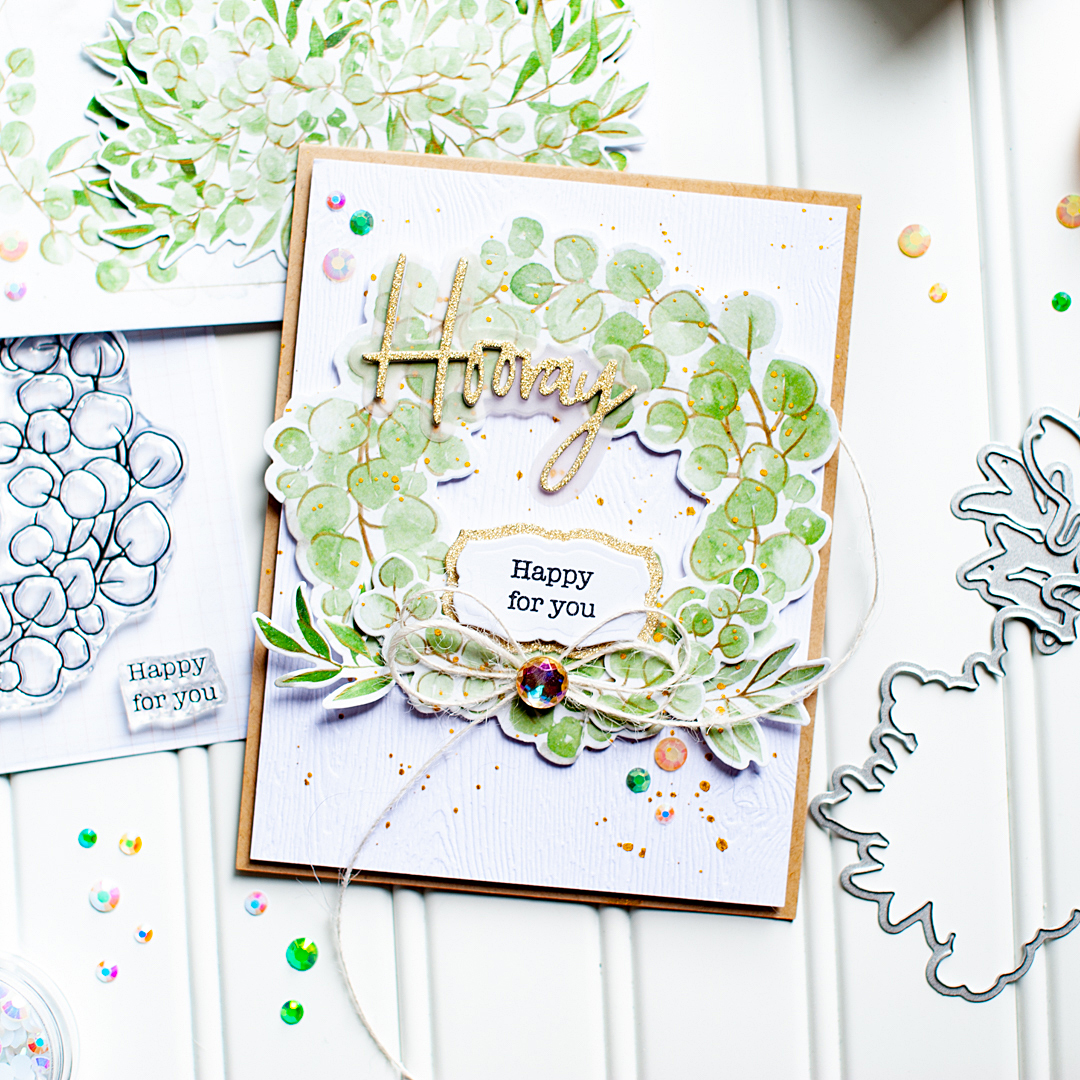
At this point it was time to put the card together. I layered a block of Lawn Fawn woodgrain cardstock to the front of a Neenah Desert Storm A2 cardbase. Then I layered the diecut washi tape pieces to the front, followed by the sentiments. Finally, I tied a double bow from ivory twine, then accented the front with some Essentials: Jewels Mix. I finished by adding some gold splatters to the front with the Gansai Tambi Starry Colors paint set.

For this card, I covered an A2 sized block of white cardstock with the beautiful frame image from the Eucalyptus Fantasy washi tape. Then I proceeded to stamp & heat emboss the sentiment directly to it. I have a couple of tips for doing this, as you can melt the washi tape if you aren't careful.
- Make sure you use a powder tool generously, as embossing powder will stick. You will still probably have to use a small brush to wipe away some excess.
- Use a MISTI or stamping platform, just in case you need to stamp more than once.
- Turn your heat gun on while you are stamping & let it get hot. I use the WOW! dual heat gun, and I actually used the lower heat setting.
- When heat setting the embossing powder, you will need to be constantly moving the heat gun. It will take longer to get the powder set, but you won't melt the washi tape this way.


These brand new A2 washi tapes from Pinkfresh Studio are super fun, and I really hope you will give them a try! I'm excited to continue to heat emboss on them, as it looks really beautiful!!


Have a wonderful rest of your Thursday!
SUPPLY LIST
For your shopping convenience, all products are linked below. {Includes affiliate linking where possible - this allows small compensation for me at no cost to you. Never fear - I will only ever link to products that I truly love & use!}


3 comments
Beautiful cards! :)
ReplyDeleteThis is so pretty Lea - I can't wait to get my hands on some of this washi!!
ReplyDeleteThese are gorgeous!
ReplyDeleteComments warm my heart. Thank you! ♥