
....been loving them lately!! Today I used yellows, light blues, light greens, and white for the cards I have to share. They are so soft and pretty...makes me sigh a little bit. Tee hee!
First up is my card for sketch 160 at the CPS Blog. Such a fun little sketch this week...I loved the little peek of a circle that is included on it!

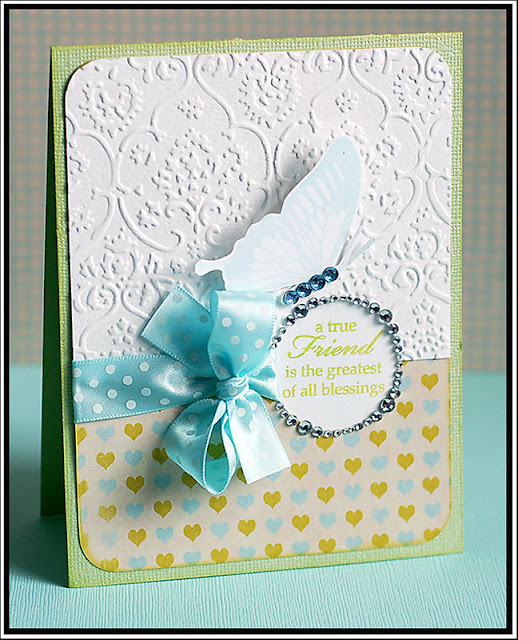
First up is my card for sketch 160 at the CPS Blog. Such a fun little sketch this week...I loved the little peek of a circle that is included on it!

"A True Friend...." supplies:
Cardstock: Bazzill Basics
Paper: K & Company
Stamps/Ribbon: Renaissance by Design (Enjoy Life set)
Ink: Clearsnap (Pigment: lime & Chalk: ice blue, lime pastel)
Jewels: Kaiser Craft
Corner Rounder: EK Success
Circle Cutter: Creative Memories
Embossing Machine: Cuttlebug by Provo Craft
Embossing Folder: Textile Texture by Provo Craft
Instructions: Fold green cardstock in half to make card base. Round the corners and ink the edges of a heart paper block. Emboss a white cardstock block using the Cuttlebug and Textile Texture embossing folder. Round the top corners and adhere to the front of the paper block. Cut a circle over the right side of the seam and tie ribbon around the left side of it. Add smooth white cardstock to the back and adhere the entire block to the front. Stamp the sentiment inside the circle and outline with jewels. Stamp the butterfly to white cardstock and cut out. Adhere to the front using foam adhesive, and accent with light blue jewels.
This next one has a glittery chick on it!!! I am so loving it! I used Sweet Sunday Sketch 62 for this one, and it is based on the Pink Elephant challenge #60 (use pastels). I guess the other card fits that one too...:)

"Spring Joy" supplies:
Cardstock: Bazzill Basics
Paper: My Mind's Eye & Sassafras
Paper Frill: Doodlebug Designs
Stamps: Renaissance by Design (Darling Damask set)
Ink: Clearsnap (Pigment: robin's egg)
Fabric: Crafty Secrets
Ribbon: Renaissance by Design
Twine: Darice Inc.
Pinking Shears: Fiskars
button/jewels: craft supply
Instructions: Fold yellow cardstock in half to make card base. Stamp the damask print to a white cardstock block. Layer a yellow scalloped paper frill and a blue damask paper strip to a yellow dotted paper strip. Adhere the entire strip to the damask stamped block, and stitch along the edges. Adhere the entire block to the front of the card. Tie ribbon around the left side of the card, and adhere a chipboard flower underneath the bow. Attach a button to the bow using twine. Mask the fabric tag so that only the chick is showing, and glitter him. Pull off the mask and adhere the fabric tag with the left corner tucked into the bow. Accent the lower right corner with three clear jewels.
Well, that is everything I have to share with you today!! I better get going for now! ♥♥♥
Until later,
~Lea

It's that time again...I have another fabulous color challenge to bring to you, courtesy of Stacey's Stamping Stage! This set of colors is one of my VERY favorites so far...when I first saw it, I couldn't wait for the week to come! Without further ado...here are the fabulous colors we are challenging you with this week!
I was not only inspired by the colors, but also by the fabulous photo that you see here. I am seriously coveting that damask wallpaper...I would LOVE that on my walls at home. Here is what I came up with for the color challenge:


"I Miss You" supplies:
Cardstock: Bazzill Basics
Stamps: Renaissance by Design (Darling Damask & Strictly Sentiments sets)
Ink: CTMH (pigment: vanilla creme) & Clearsnap (pigment: black)
Ribbon: Renaissance By design
Pearls: Kaiser Craft
Glitter: DecoArt
Flowers: craft supply
Corner Rounder: EK Success
Instructions: Fold pink cardstock in half to make card base, and round the bottom corners. Round the bottom corners of a kraft cardstock block, and stamp the damask pattern to it. Adhere the block to the front of the card. Glitter the white paper rose and adhere to the top of the card. Add two pink paper flowers with leaves to each side of it. Tie a bow with pink dotted ribbon, and tuck into the top of the flowers. Stamp the sentiment to the middle of the card, and accent with pearls.
Sigh...I really love how this card came together. It makes me happy! Be sure to check out the other gals cards...it is sure to be a treat!! ♥♥♥


Until later,
~lea

....is in the air! Today is pretty gloomy in Missoula, but we have been having beautiful spring like weather lately. I am certain it will snow again before summer hits...maybe even during summer...but for now, I will enjoy the gorgeous weather as we get it. I have stamped up some soft and pretty spring cards to share with you today...and will finish the post with something that is a bit more summery!
For my first card I used Sweet Sunday Sketch 61, and the current Jacksonbelle challenge to make a Spring or Easter themed project. I LOVE this stamp set from Renaissance by Design. It will be linked below in my supply list....but isn't it fabulous! The tree just makes me sigh....I wish that there was a real tree with heart shaped leaves. I would plant a bunch of them in my yard.


For my first card I used Sweet Sunday Sketch 61, and the current Jacksonbelle challenge to make a Spring or Easter themed project. I LOVE this stamp set from Renaissance by Design. It will be linked below in my supply list....but isn't it fabulous! The tree just makes me sigh....I wish that there was a real tree with heart shaped leaves. I would plant a bunch of them in my yard.

"Spring Tree" supplies:
Cardstock: Bazzill Basics
Paper: K & Company
Stamps: Renaissance By Design (Roots and Wings set & Roots and WingsAdd-on set)
Ink: Clearsnap (Chalk: pink pastel & Pigment: citrine, dusty plum, dune, old rose, seaglass)
Ribbon: Renaissance by Design (pink satin dot) & Making Memories (cream)
Pearls: Kaiser Craft
Corner Rounder: EK Success
Border Punch: Fiskars
Circle Cutter: Creative Memories
Instructions: Fold cream cardstock in half to make card base, and round the bottom corners. Ruffle cream colored ribbon along the bottom of the card. Ink the edges of a floral paper block. Punch two scalloped strips and adhere them to each side of the paper block. Adhere the entire paper block to the front of the card. Add pink ribbon across an aqua paper strip. Cut a flag shaped end, and adhere to the front of the card. Cut a circle from cream cardstock and ink the edges. Stamp the tree, birds and sentiment to the circle. Accent with pearls, and adhere to the front of the card. Tie a bow around the right side of the ribbon.
This was the other card that I had in mind for yesterday's PTI blog hop..but just didn't have time to get it done. So, I got it done today instead! :) This is based on 365 Card's sketch this week, and Crazy 4 Challenges spring themed challenge.


"Spring Day" supplies:
Cardstock: Bazzill Basics
Paper: Bo Bunny & Scenic Route
Stamps: Papertrey Ink (Year of the Flowers: Daffodils set)
Ink: Clearsnap (Pigment: black, fresh green & Chalk: yellow cadmium)
Ribbon: Renaissance by Design
Buttons: Papertrey Ink
Jewels: Doodlebug Designs
Glitter: DecoArt
Corner Rounder: EK Success
Instructions: Fold green dotted paper in half to make card base, and round the bottom corners. Round the bottom corners of a yellow dotted block and adhere to the bottom of the card. Round the top corners of a white cardstock block and stamp the stems & leaves to it. Adhere to the front of the card. Stamp the flowers to yellow patterned papers, and cut out the appropriate pieces. Glitter the two bottom layers and adhere to the white cardstock. Add the upper layers using dimensional adhesive, and accent with yellow jewels. Tie ribbon around the seam, and accent with buttons and a jewel. Stamp the sentiment to the lower right corner.
This next one is my card for CPS 159 this week. Some of the Gina K illustrators are doing the giveaways this week, and Melanie asked me to use one of her sets to promote the giveaway. This is what I came up with:

"Praise the Lord" supplies:
Cardstock: Bazzill Basics
Paper: Basic Grey
Stamps: Gina K Designs (Pressed Flowers set)
Ink: Clearsnap (Pigment: magenta, citrine, black & Chalk: pink pastel)
Ribbon: Renaissance by Design
Twine: Darice Inc.
Button: Papertrey Ink
Jewels: Doodlebug Designs
Glitter: Ranger Stickles
Instructions: Fold patterned paper in half to make card base. Ink the edges of a pink dotted paper block and adhere to the front. Zig-zag stitch along all the edges except the left side. Ink the edges of a white cardstock block, and stamp the flower and sentiment to it. Adhere to the front of the card. Tie ribbon around the left side, and attach a button to the bow using twine. Stamp the leaves to white cardstock and cut out. Adhere to the front, overlapping the ribbon a bit. Accent the leaves and rose with glitter Stickles. Attach the jewels in the lower right corner, on top of the stitching.
And this last one doesn't have any stamping on it at all, just a quick little card using up this fun dotted paper scrap. It is {loosely} based on Laura's sketch 48 at 2 Sketches 4 U this week. And while this could be considered springy...I think it is much more summery!

"Lazy Days" supplies:
Cardstock: Bazzill Basics
Paper/Rub-on/Felt Stickers: Basic Grey
Paper Frill: Doodlebug Designs
Ribbon: Renaissance by Design
Button/Impression Plate: Papertrey Ink
Jewels: Westrim Crafts
Pen: American Crafts
Corner Rounder: EK Success
Embossing Machine: Cuttlebug by Provo Craft
Instructions: Fold kraft cardstock in half to make card base, and round the bottom corners. Dry emboss the front using the Cuttlebug and the Picnic Plaid impression plate. Round the bottom corners of a kraft cardstock block. Add green scalloped paper frill to a dotted paper strip, and adhere to the top of the kraft block. Attach felt flower sticker to the left side, and tie ribbon around it. Attach a button the bow, and accent with jewels. Add the rub-on sentiment to the lower right corner, and accent underneath it with three jewels. Adhere the felt bee to the front, and pen a swirl from the bee.
Those are all the cards I have to share with you....but check out what landed on my doorstep this week!!!

My GCD product came, and holy canoli....the box was freaking heavy! I had to roll it into my house. I do want everyone to know that I don't share this to rub it in, or to be all "look at me...look at me..." I am just seriously excited about it...and I can't wait to get a feel for everything that they sent and get started playing with it! It is almost an overwhelming amount of product...so I need to figure out how to organize it so I know what I have. But for now...it is a basket of fabulousness that I am just looking at fondly. Tee hee! I think I will break into it this weekend!
Alright...let's have a little chat about movies! I haven't shared what we have watched lately. This one might seem a little odd....but if you can handle really fake gore, then watch this movie. Why? Because it is freaking hilarious!

And, if for any reason you have this next movie on your Netflix queue, or think you might pick it up at the Red Box.....

DON'T!!! Josh and I both thought it was AWFUL. Not very funny...maybe just a couple parts. And even those parts just get a maybe from me. It pretty much sucked. So- you have been warned. Not my fault if you watch it and then hate it. Tee hee! And if you liked it...well, that is okay! We just have differing opinions on movies. :)
Well, I better get going for now. Time to get on some makeup and change out of this t-shirt....because we are going out with friends for a bit tonight. Hope that your Friday night is a great one! ♥♥♥
Until later,
~Lea

Hi all! Sorry I have been so absent this week! I have been working on some items for my photography business...so I have been a busy girl!
I was able to get a card done for this month's PTI Blog Hop really quickly today. I had plans to get more than this one card done, but the schedule just didn't allow it this time around. Here is the info on this month's blog hop:
And this is what I came up with!
I was able to get a card done for this month's PTI Blog Hop really quickly today. I had plans to get more than this one card done, but the schedule just didn't allow it this time around. Here is the info on this month's blog hop:
This month we're calling all button lovers! Now's your chance to explore the world of possibilities that
buttons hold! From borders to backgrounds, accents and embellishments, or even incorporating them
into stamp images like any of our Button Bits stamp sets. From paper projects to home decor to jewelry
and more, the sky's the limit! We want to see all your very best creations using buttons and the
inspiration we will gain from each other should prove to be truly enticing!
And this is what I came up with!

"I Just Love You Grandma" supplies:
Cardstock: Bazzill Basics
Paper: Basic Grey
Stamps: Papertrey Ink (Delightful Dahlia set)
Ink: Clearsnap (Pigment: black, razzberry, lime)
Felt/Buttons/Diecut: Papertrey Ink
Jewels: Doodlebug Designs
Pearls: Kaiser Craft
Ribbon: Renaissance By Design
Pins: Making Memories & Maya Road
Corner Rounder: EK Success
Diecut Machine: Cuttlebug by Provo Craft
Instructions: Fold patterned paper in half to make card base, and round the bottom corners. Round the bottom corners of a white cardstock block. Stamp the sentiment, flower and leaves to the front. Cut a scalloped border to the Hawaiian Shores felt using the Cuttlebug and medium scalloped diecut. Adhere the border strip to the white cardstock, and adhere the entire block to the front of the card. Tie ribbon around a patterned paper strip. Stick pins through the bow, adding buttons to the top pin. Adhere this paper block to the top of the white cardstock using dimensional adhesive. Accent the flower and sentiment with jewels and pearls.
If you haven't tried out the PTI felt yet....make sure you add some to your next order. It cuts perfectly, and just adds so much to projects!
Well, that is all I have for now! Hope you are having a wonderful week! ♥♥♥
Until later,
~Lea

It is another wonderful Sunday, which means I have the latest Curtain Call Color Challenge to share with you! This color challenge is brought to you from Stacey's Stamping Stage...so let's get this show on the road!
Those are the fabulous colors....and here is my card using them!! I got some of my new Papertrey Ink products in the mail just a few days ago...so I had to try them out! It is also based on FTL 82 at the Clean & Simple stamping blog.


"Just Because" supplies:
Cardstock: Bazzill Basics
Stamps/Felt/Impression Plate/Diecut: Papertrey Ink
Ink: Clearsnap (Pigment: cranberry, canary, black)
Ribbon: Renaissance By Design
Jewels: Doodlebug Designs & Kaiser Craft
Corner Rounder: EK Success
Diecut/Embossing Machine: Cuttlebug by Provo Craft
Instructions: Fold pink cardstock in half to make card base and round the bottom corners. Emboss the front with the Cuttlebug machine and Polka Dots Basics II impression plate. Cut a scallop to the bottom of black felt using the Cuttlebug and the medium scalloped border die. Adhere a block of white cardstock to the front of the felt, and tie ribbon around the bottom. Stamp the dots and sentiment to the front, and accent with jewels. Adhere the entire block to the front of the card.
Be sure to check out what the rest of the gals came up with! It is sure to be fantastic! ♥♥♥
Until later,
~Lea

...Because I'm not wearing green! Tee hee! I don't actually own much green....just a sweater. Which I don't really feel like wearing. It's just not really my color, I guess.
But, I do have some fabulous green cards to share with you today! I decided I needed to get a couple St. Patty's Day cards done to share with you today! The first one uses Kazan's Sketch 48 from 2 Sketches 4 U this week. And I used the sewing machine again...two days in a row!

But, I do have some fabulous green cards to share with you today! I decided I needed to get a couple St. Patty's Day cards done to share with you today! The first one uses Kazan's Sketch 48 from 2 Sketches 4 U this week. And I used the sewing machine again...two days in a row!

"Blessings" supplies:
Cardstock: Bazzill Basics
Paper: My Mind's Eye
Vintage Image: Crafty Secrets
Rub-on: Creative Imaginations
Ribbon: Renaissance by Design
Button: craft supply
Twine/Foam Sticker: Darice Inc.
Jewels: Westrim Crafts
Corner Rounder: EK Success
Pinking Shears: Fiskars
Instructions: Fold green cardstock in half to make card base, and round the bottom corners. Round the bottom corners of a green dot paper block, and adhere to the front. Tie ribbon around the middle, and accent the bow with a foam shamrock and green jewel. Zig zig stitch the vintage image to the front. Add the rub-on to a strip of cream cardstock, and cut a banner end to it. Stitch to the front of the card, and accent with a button & twine.
And this one uses the bonus sketch at 2 Sketches 4 U this week by Sarah Martina. Funny....I think I flipped both of the sketches this week to work with how I wanted them. I was going through my entire stash the other week...pulling out things that I have not used in a VERY long time...and I found this rub-on. It is from a company that I don't think is in business any longer, and I would imagine I have had it in my stash for at least 3 years. If not longer. Figured it was time to try it out...tee hee!

"Lucky" supplies:
Cardstock: Bazzill Basics
Paper: Bo Bunny & My Mind's Eye
Rub-on: Lil Davis
Jewels: Doodlebug Designs & Westrim Crafts
Ribbon: JoAnn's Fabric
Foam Sticker: Darice Inc.
Glitter: DecoArt
Corner Rounder: EK Success
Instructions: Fold green dotted paper in half to make card base, and round the bottom corners. Round the bottom corners of a white cardstock block, and adhere to the right side of the card. Add a white scallop to a strip of green paper and adhere to the top. Tie ribbon around the left side of the card. Glitter a foam shamrock, and adhere to the bow. Top the shamrock with a green jewel. Apply the rub-on to the white cardstock block, and accent the bottom with rainbow colored jewels.
Alex Lambert was on the Ellen show today! He is such a cutie...very funny and charming. Very shy too...you can just tell. He sang a song we didn't hear on idol, and it was awesome! I just know a label is going to pick him up, and I can't wait to hear an album by him. What a good kid! Here is his portion of the show.
Well, I am going to get going for now! You can send me an internet pinch of you like...since I will not be putting on a piece of green clothing today! ♥♥♥
Until later,
~Lea

Hi everyone! Happy Tuesday! Hope your week is going along well so far! We are having a lazy morning/early afternoon so far. Josh has the day off today, and we got home pretty late last night. We drove to and from Butte to watch Casey play in an all-star basketball game. It was a lot of fun! His team didn't win, but they all had a great game! It was fun to watch all that talent from different schools play together.
I have a few cards to share with you today. This one doesn't have any felt, but the other two do! Thus...my title. Tee hee! First up is my card for sketch 158 at CPS this week. I {heart} this card. I have wanted to use this cityscape rub-on from Glitz forever...but I kept drawing a blank on what to do with it. Well, this sketch finally brought an idea out of me....yay!! I kind-of of wish I would have tried to make the moon glitter with gold...but it was the only sticker I had, and I didn't want to ruin it. Maybe I will still try it out...I don't know quite yet.

I have a few cards to share with you today. This one doesn't have any felt, but the other two do! Thus...my title. Tee hee! First up is my card for sketch 158 at CPS this week. I {heart} this card. I have wanted to use this cityscape rub-on from Glitz forever...but I kept drawing a blank on what to do with it. Well, this sketch finally brought an idea out of me....yay!! I kind-of of wish I would have tried to make the moon glitter with gold...but it was the only sticker I had, and I didn't want to ruin it. Maybe I will still try it out...I don't know quite yet.

"Let's Party!" supplies:
Cardstock: Bazzill Basics
Paper: Glitz Designs & Little Yellow Bicycle
Rub-ons: Glitz Designs & American Crafts
Stickers: Making Memories
Jewels: Westrim Crafts
Ribbon: Renaissance By Design
Twine: Darice Inc.
Button: Doodlebug Designs
Ink: Clearsnap (Chalk: charcoal)
Corner Rounder: EK Success
Paper: Glitz Designs & Little Yellow Bicycle
Rub-ons: Glitz Designs & American Crafts
Stickers: Making Memories
Jewels: Westrim Crafts
Ribbon: Renaissance By Design
Twine: Darice Inc.
Button: Doodlebug Designs
Ink: Clearsnap (Chalk: charcoal)
Corner Rounder: EK Success
Instructions: Fold pink cardstock in half to make card base. Round the corners and ink the edges of a black damask paper block, and adhere it to the front. Round the top corners and ink the edges of a pink paper block. Adhere the rub-on cityscape across it, and tie a ribbon around the bottom of it. Attach a button to the bow using twine. Add the sentiment rub-on to the left side of the city scape, and finish the sentiment with gold letter stickers in the lower left corner. Add the black glittered moon and jewel stars sporadically to the top of the cityscape. Adhere the entire block to the front of the card using dimensional adhesive.
This next card is based on 365's Sunday Sketch this week. And that fabulous felt rose was inspired by a card that I saw on Andrea Budjack's blog. You can check the card out here, because it is fabulous! I wanted mine to be a bit bigger and chunkier, so I spiraled shorter pieces of felt together. I like how it turned out! Thanks for the inspiration Andrea!


"Look Who's New" supplies:
Cardstock: Bazzill Basics & CTMH
Paper: My Mind's Eye
Stamps: Papertrey Ink (Baby Button Bits set)
Ink: Clearsnap (Chalk: warm red, ice jade) & Ranger Distress Ink (antique linen)
Pearls: Kaiser Craft
Metal: Making Memories (rose)
Felt: Provo Craft (leaves) & craft supply (cream colored)
Diecut Machine: Cricut Expression by Provo Craft
Diecut Cartridge: Accent Essential by Provo Craft
Instructions: Fold red cardstock in half to make card base. Ink the edges of a floral paper block and adhere to the front. Ink the edges of a red dotted paper block, and zig-zag stitch around the edges. Adhere to a block of green cardstock, and adhere to the middle. Distress ink a white scalloped paper strip, and adhere to the front of the card. Stamp the sentiment to a strip of off-white cardstock and adhere to the lower right corner of the dotted paper block. Cut a triangle to the ends of a strip of red cardstock and striped paper. Sew the two strips together, and add a fold to the right side of it. Adhere the entire strip to the front of the card. Cut 5 thin strips of cream felt and spiral together into a circle. Cut a 2" circle and a 2.5" scalloped circle using the Cricut Expression and Accent Essentials cartridge. Layer the two cuts together, add the felt rose to the top, and adhere to the front of the card. Accent the middle with a metal rose and pearls. Adhere felt leaves to the upper left corner and accent with pearls.
This last card uses sketch 60 at the Sweet Sunday Sketch blog, and fits the current challenge at the Jacksonbelle blog to use your newest product. I just purchased these MME Lush papers at my LSS the other day, and am loving them!!

"We Don't Remember Days...." supplies:
Cardstock: Bazzill Basics
Paper: My Mind's Eye
Stamps: Renaissance By Design (Strictly Sentiments set)
Ink: Clearsnap (Pigment: chestnut)
Felt: Provo Craft
Felt: Provo Craft
Jewels: Zva Creative & Doodlebug Designs
Ribbon: Bo Bunny
Twine: Darice Inc.
Corner Rounder: EK Success
Border Punch: Fiskars
Button: craft supply
Instructions: Fold brown cardstock in half to make card base, and round the right corners. Round the right corners of a pink dotted paper block, and adhere to the middle. Adhere a brown paper block to the left side of the card. Punch a border to pink tiny dotted paper and adhere next to the brown block. Adhere brown dotted ribbon over the seam, and zig-zag stitch along the left side. Adhere a felt flower to the lower right corner of the card and add a button tied with twine to the top. Make a banner folded strip from pink dotted paper, and stamp the sentiment to it. Adhere to the front of the card. Add the felt butterfly to the upper left corner, and accent the body with clear jewels. Adhere the pink jeweled flourish to the front of the card, giving it a little dimension in some areas. Add two jewels to the wings on the sentiment banner.
Well, that is everything I have to share with you today! I am so happy that I decided to dust off my sewing machine and use it a little on these cards! It has been awhile since I have used it, and I don't like to be wasteful with my supplies. I need to remind myself every so often that I own a sewing machine!
So, is anyone else hoping for an American Idol Miracle tonight? I am...hoping that they bring back Alex Lambert as a surprise 13th finalist. There has been quite an internet storm demanding that he be put back on the show! I bet that has to feel good to that cutie 19 year old. I am not going to get my hopes up that AI will do it...but it would definitely be a nice surprise. Well, I am going to get going for now, and hopefully be a little less "lazy" for the rest of the day! ♥♥♥
Until later,
~Lea

Happy Sunday everyone!! Sunday means I am bringing you another color challenge, courtesy of Stacey's Stamping Stage blog! Here is the color combo for this week:


And here is my card using the colors! This set of colors really made me leave my comfort zone, and I really like what I happened to come up with! I also did this card with the current Caardvarks Photo Inspiration challenge and Moxie Fab Tuesday Trigger in mind. The photos are super fabulous...be sure to check them out!

"The Lord Bless You..." supplies:
Cardstock: Bazzill Basics
Paper: Scenic Route
Stamps: Gina K Designs (Lovely Labels set)
Ink: Clearsnap (Pigment: citrine, hunter green & Chalk: yellow cadmium)
Ribbon: Renaissance by Design
Twine: Darice Inc.
Button: Papertrey Ink
Pearls: Kaiser Craft
Glitter: DecoArt
Corner Rounder: EK Success
Embossing Machine: Cuttlebug by Provo Craft
Embossing Folder: Distress Stripes by Provo Craft
Diecut Machine: Cricut Expression by Provo Craft
Diecut Cartridge: Home Accents by Provo Craft
Instructions: Fold green cardstock in half to make card base, and round the bottom corners. Emboss a block of white cardstock using the Cuttlebug and Distress Stripes embossing folder, and round the bottom corners. Ink the edges of a strip of yellow script paper and adhere to the middle. Tie ribbon around the middle and adhere a button to the bow using twine. Adhere the entire block to the front of the card. Stamp the label and sentiment to white cardstock and cut out. Accent with pearls, and adhere to the front of the card using dimensional adhesive. Cut the butterflies and their layers at 3 1/4" from white & yellow cardstock using the Cricut Expression and Home Accents cartridge. (Be sure to press the "flip" option when cutting the butterfly with the trailing flourish.) Cover the white layers in glitter, and adhere the yellow layers to them just slightly off center. Adhere the butterflies to the label, and accent with pearls.
Be sure to check out the other girls creations as well! It will be fabulous! And I really hope you join us for this week's color challenge! I would love to see what you come up with! ♥
Until later,
~Lea

Well, I thought I wasn't going to post again until Sunday....but I changed my mind! I just finished up this card, and decided it needed to be posted right away!
I did this card using Laura's Sketch 47 at 2 Sketches 4 U, and it is based on the Doilies & Lace challenge at the Moxie Fab blog as well.


I did this card using Laura's Sketch 47 at 2 Sketches 4 U, and it is based on the Doilies & Lace challenge at the Moxie Fab blog as well.

"Blessings" supplies:
Cardstock: Bazzill Basics
Paper: Basic Grey
Stamps: Gina K Designs (Lovely Labels set)
Ink: Clearsnap (Pigment: dusty plum, turquoise)
Ribbon: Renaissance By Design
Twine: Darice Inc.
Pearls: Kaiser Craft
Corner Rounder: EK Success
Doily/Pins/Button: craft supply
Instructions: Fold pink cardstock in half to make card base, and round the bottom corners. Adhere a strip of pink dotted paper to a doily paper block, and round the bottom corners. Adhere the entire block to the front of the card. Fold a doily in half, and adhere to the top. Add ribbon to the middle of the card, and tie a button around the bow using twine. Stamp the label and sentiment to white cardstock, and cut out. Accent with pearls, and adhere to the front using foam dots. Add the pins to the bottom of the ribbon, and accent the top with a pink pearl strip.
I have found a new show that I like. And of course, it is on NBC. Which means I will most likely regret getting into the show, because the network is notorious for quickly cancelling a show if it doesn't gain the market share they want right away. Let's hope that isn't the case this time around. This is the cast of the show:

The show is called "Parenthood" and I am digging it. It can be sad and a bummer at times, but they do a really good job of making you laugh pretty quickly after those parts. And isn't life kind-of like that anyways? We go through a series of heartaches, whether they be little or small, with a bunch of laughter and good times in between? I hope the network gives this show a chance, because it is really enjoyable.
So, they FINALLY updated their website...and now I want to share something pretty darn special with you. My talented little brother has made the decision to play football and sign as a Carroll College Fighting Saint!!

We are SO SO proud of him!! I know it was a really hard decision to walk away from the Griz, as he was offered a preferred walk-on spot with them...but we all believe that he absolutely made the correct decision! He was offered a very nice scholarship from the school, and we believe that he will get the chance to be a star at Carroll. I haven't met any of them yet, but my parents have nothing but awesome things to say about the coaching staff. Carroll College is a private college located in Helena, MT with a Catholic affiliation. He is going to get such an amazing education there, and I love that it is smaller in size! From an education standpoint, I think that detail will really help him flourish. Anyways...here is a link to the article on the website that has info on Casey listed in it.
Want to know a random but cool thing about this? One of the other kids listed in that article, Tyler Jacobsen, was friends with Casey when they were young. He lived across the street from some really good friends of ours, and they played all the time until Casey moved away. He wrote on Casey's facebook page the other day that he never thought he would see Casey again, and now they are going to be teammates. It is such a small world, isn't it!
When I think of Carroll College, I think of this amazing photo that graced the cover of Sports Illustrated. For one it is just an awesome photo that is full of pure emotion. But, it is also so cool that SI chose to run a photo of such a small college on the cover. Carroll has an amazing football legacy, and this just proves it.

So, needless to say...we are all filled to the brim with pride for Casey and this opportunity!! He should get 4 more full years of playing football, and we are so excited to watch him play again!! They haven't decided what position he will be playing yet or if they are going to red shirt him, so I will keep you updated on that! My parents bought me my first Fighting Saints shirt the other day, and I have been wearing it proudly! I will have to get a photo of all of us in our Carroll gear soon...hopefully at Easter. I will share it when I get it!
Well, I am going to get going for now. Hope your Saturday is a great one! ♥
Until later,
~Lea
~Lea

{I promise there is a card in this post...just keep reading! Tee hee!}
So, I had totally planned to share a post today about how much Alex Lambert had improved in just 3 short weeks, and how I couldn't wait to see what other wonderful things he would pull out of his hat in the coming weeks. Then I died a little on the inside as the results were given, and he was eliminated from the competition. There is no way that Paige, Katie or Aaron deserve to be there and he doesn't. I kept waiting for the judges to save him, and give us 13 finalists like last year. Because seriously...if Anoop Desai deserved another chance....than Alex deserves it 100%. So, during those three performances in the coming weeks...I am just going mute the TV and play this instead and pretend that Alex Lambert is still on the show.
He had some major nerve issues his first week, but the past two weeks he has been brilliant. He has such a relevant voice for what is popular right now. He is like the boy version of Colbie Caillat...which is a huge compliment coming from me. She is my favorite female artist these days, and I just adore her voice. I hope that they might surprise us next week and bring him back....but if not, I think this kid has a great career ahead of him. And he can totally rock a mullet, and it actually looks pretty good! Gotta give him props for that! :)
Anyways...moving on. So, I think I have found the culprit behind my love of rainbows. I was searching for "vintage" images of things I loved during childhood (don't ask, I can be totally random sometimes when I am googling). And I came upon these items:
Umm, do we see a pattern here? I LOVED these characters. I loved their toys, cartoon shows, games, books, coloring books...all of it. For awhile I thought that the Noah's Ark and rainbow teachings in Sunday school must have made a humongous impact on my life. Not that they didn't, but I think that these items above might have had just a wee bit to do with it too. Tee hee! ♥
Another thing that I loved....Lisa Frank.
 I had stickers, stationary, folders, notepads....all from this lady. Thinking I see another trend in these items...
So, there actually IS a card in this post. I decided to do a little ode to my favorite childhood items...and came up with this cutie of a card. I have been wanting to use the winged horse from the Hannah Montana cartridge...just wasn't really sure of what to do with it. And why didn't they add a horn to it so I could just call it a unicorn? It can't be considered a unicorn without the horn...so I have to call it a winged horse. Which just seems like a really long name. But, I digress...time to get over it. :)

So, I had totally planned to share a post today about how much Alex Lambert had improved in just 3 short weeks, and how I couldn't wait to see what other wonderful things he would pull out of his hat in the coming weeks. Then I died a little on the inside as the results were given, and he was eliminated from the competition. There is no way that Paige, Katie or Aaron deserve to be there and he doesn't. I kept waiting for the judges to save him, and give us 13 finalists like last year. Because seriously...if Anoop Desai deserved another chance....than Alex deserves it 100%. So, during those three performances in the coming weeks...I am just going mute the TV and play this instead and pretend that Alex Lambert is still on the show.
He had some major nerve issues his first week, but the past two weeks he has been brilliant. He has such a relevant voice for what is popular right now. He is like the boy version of Colbie Caillat...which is a huge compliment coming from me. She is my favorite female artist these days, and I just adore her voice. I hope that they might surprise us next week and bring him back....but if not, I think this kid has a great career ahead of him. And he can totally rock a mullet, and it actually looks pretty good! Gotta give him props for that! :)
Anyways...moving on. So, I think I have found the culprit behind my love of rainbows. I was searching for "vintage" images of things I loved during childhood (don't ask, I can be totally random sometimes when I am googling). And I came upon these items:

Another thing that I loved....Lisa Frank.

So, there actually IS a card in this post. I decided to do a little ode to my favorite childhood items...and came up with this cutie of a card. I have been wanting to use the winged horse from the Hannah Montana cartridge...just wasn't really sure of what to do with it. And why didn't they add a horn to it so I could just call it a unicorn? It can't be considered a unicorn without the horn...so I have to call it a winged horse. Which just seems like a really long name. But, I digress...time to get over it. :)

"Whimsical Wishes" supplies:
Cardstock: Bazzill Basics & Doodlebug Designs (glittered)
Paper: Imaginisce
Jewels: Doodlebug Designs
Glitter: Ranger Stickles
Stamp: Cornish Heritage Farms
Ink: Clearsnap (Pigment: violet)
Corner Rounder: EK Success
Punch: Martha Stewart Crafts
Circle Cutter: Creative Memories
Diecut Machine: Cricut Expression by Provo Craft
Diecut Cartridges: Hannah Montana, Graphically Speaking by Provo Craft
Instructions: Fold aqua cardstock in half to make cardbase, and round the bottom corners. Round the bottom corners of a white cardstock and purple paper block, and layer to the front of the card. Cut the rainbow rings from glittered cardstock and adhere to the front. Cut the cloud & its layers from white and glittered cardstock at 1 3/4" using the Cricut Expression and Graphically Speaking cartridge. Layer together, and adhere to right side of the rainbow. Stamp the sentiment to the middle using violet pigment ink. Cut the winged horse & its layers from pink and white cardstocks at 4" using the Hannah Montana cartridge. Layer together and adhere to the front using dimensional adhesive. Glitter the white parts with stickles. Punch tiny hearts from the glittered cardstock colors and adhere to the rainbow and cloud in a scattered fashion. Accent the rainbow ends with matching colored jewels.
I honestly have no idea what I will do with this card. Probably hold on to it for a little bit to see if a possible publication call comes up that it fits. If not, I will put it for sale and hope that someone who stops in at my mom's flower/gift shop knows a girl that loves winged horses & rainbows. Or a boy...I don't judge. Tee hee!
One last thing to share with you....I am SO excited for this! EEEEEK!!!!!!
It is going to be AWESOME!!! Yay for June 30th...something to look forward to!! I feel totally lame typing this, but it gave me chills watching this. Yep- I am a Twi-hard apparently....don't judge. Tee hee! And if you aren't a Twilight fan....then just "shhhhhhh....." and let me live in my little world where everyone else loves it too. :)
Well, I will leave you on that note! I hope that your Friday night and weekend is an amazing one! I will be back on Sunday with another Curtain Call color post! Yay!! ♥♥♥
Until later,
~Lea
PS- thanks for all the nice comments about my gold metal win in Moxie Fab's Olympics of Stamping! I was so excited when I saw that! One of my favorite cards...with rainbows and everything! Tee hee! ♥

So, did you think I was getting possessive of the sun or something? Tee hee- I couldn't think of a better post title, so I decided to use part of the sentiment on my CPS card this week. Although, it is my sunshine....as well as your sunshine, and her sunshine, and his sunshine....I digress. Sorry it has been so long between posts! Blogger and I haven't been getting along so well. I was about ready to permanently break up....but I think it is finally letting me add images into my posts. Let's see how it goes....:)
I have a few cards to share with you today. But first, I have some news in case you hadn't heard yet. I was asked to be on the card design team for GCD Studios! I love their papers, and the latest embellishments they have been coming out with! I can't wait to start!
Now onto some cards! First up is my card for CPS sketch 157 this week. We were sponsored by JustRite Stampers this week, and I picked out the "Romantic Sentiments Centers". But, I think I used them in a rather unique way! Check it out!

"Sunshine Everyday" supplies:
Cardstock: Bazzill Basics
Paper: Imaginisce, October Afternoon & Sassafras
Stamps: JustRite Stampers
Ink: Clearsnap (Pigment: mango tango)
Jewels: Doodlebug Designs & Michael's
Glitter: Making Memories & Ranger Stickles
Diecut Machine: Cricut Expression by Provo Craft
Diecut Cartridges: Hello Kitty Greetings, Pooh & Friends by Provo Craft
Instructions: Fold white cardstock in half to make cardbase. Round the corners of a blue paper block and adhere to the front. Freehand cut the hills from green patterned paper, and round the appropriate corner. Adhere to the bottom of the blue block. Cut the sun from yellow & orange cardstock at 2.5" and 3" using the Cricut Expression and Hello Kitty Greetings cartridge. Cut a circle of white cardstock and stamp the sentiment to it. Layer all of the items together. Cut the clouds from white cardstock at 2" & 3", and cover in glitter. Adhere the three cuts to the front of the card, popping the sun and top cloud. Accent the sun with jewels. Cut the butterfly and its layers from yellow & pink cardstock at 3/4" using the Pooh & Friends cartridge. Layer together and accent with jewels. Adhere to the top cloud cut, and cover the pink layer in Stickles.
Up next is a card I did for FTL #81 at the Clean & Simple Stamping blog. Such a fun little sketch this week...I just added a ribbon to it!

"Thank You" supplies:
Cardstock: Bazzill Basics
Stamps: Papertrey Ink (Dot Spot & Asian Fusion)
Ink: Clearsnap (Pigment: black, seaglass, robin's egg, sky blue, cyan)
Ribbon: Renaissance By Design
Jewels: Doodlebug Designs
Corner Rounder: EK Success
Instructions: Fold kraft colored cardstock in half to make card base, and round the bottom corners. Round the bottom corners of a block of white cardstock, and stamp the dots and sentiment to the bottom of it. Tie ribbon above the stamped images, and adhere the entire white block to the front of the card. Accent the dots with clear jewels.
And this last one is based on the current Embellish Magazine color/border challenge. I am not quite sure how I feel about this card...but it is done. So, I am posting it! Tee hee!

"Easter Blessings" supplies:
Cardstock: Bazzill Basics
Paper: Imaginisce
Paper Frill/Button: Doodlebug Designs
Ribbon: Renaissance By Design
Twine: Darice Inc.
Twine: Darice Inc.
Stamps: Papertrey Ink (Tags For Spring)
Ink: Clearsnap (Pigment: citrine, orchid, black & Chalk: yellow cadmium, peach pastel)
Jewels: Westrim Crafts
Puffballs: Darice Inc.
Corner Rounder: EK Success
Instructions: Fold pink cardstock in half to make card base. Cover the bottom with an Easter paper block. Round the top corners of a strip of white cardstock. Stamp the bunnies to the middle and give them white puffball tails. Adhere the strip to the top of the card. Add pink paper frill a little below the seam, and then tie ribbon around the seam. Adhere a button to the bow using twine. Stamp the sentiment in black directly to the patterned paper. Accent underneath with jewels, and add a thin strip of paper to each side of the "Easter" part of the sentiment.
Since Blogger is finally letting me post images, I am just going to keep this short and sweet! I will be back in a couple days to share some more!! Hopefully it will be a bit more personal of a post then! Have a great night! ♥
Until later,
~Lea

I was asked to join the color challenge team at Stacey's Stamping Stage blog, and I thought it would be a lot of fun, so of course I said yes! This week is my first week as a team member, so I am here to share the challenge with you....I hope you will take it on. First up, here is the color challenge:
And here is my take using these fabulous colors!


"Just Because" supplies:
Cardstock: Bazzill Basics
Paper: Shabby Green Door
Stamps: Papertrey Ink (Year of the Flowers: Violets & Asian Fusion)
Ink: Clearsnap (Pigment: moss green, cranberry, colonial blue)
Ribbon: Renaissance by Design
Twine: Darice Inc.
Button: Doodlebug Designs
Pearls: Kaiser Craft
Corner Rounder: EK Success
Instructions: Fold dotted paper in half to make cardbase and round the bottom corners. Round the bottom corners of a block of white cardstock, and adhere to the front. Punch a border to striped paper and adhere to the middle. Add a floral block to the top using dimensional adhesive. Stamp the flower, leaves and sentiment to the bottom half of the white block, and accent with pearls.
Be sure to check out the rest of the crew's cards as well....it is sure to be a treat! ♥♥♥

Until later,
~Lea

Hi everyone! Hope your day is going wonderfully so far!! It is a GORGEOUS day in Missoula! Sunny, mild...I would daresay almost warm....but I think the air is also full of allergens. Because I have been sneezing non-stop! Oh well...I will deal with that if it means nice weather. Josh and I planted two strawberry plants yesterday. They are sitting in the windowsill with the most sunshine in our house, and I can't wait to watch them grow and grow. We are thinking of planting a small garden this year with things we eat often...like sweet onions, strawberries, tomatoes, and maybe some grapes. I think it sounds like something fun we can do together, and we will get some rewards from it (if we do it right...tee hee!). What do you think...let me know if there are any other fruits or veggies that you think we just have to try and grow!
I have a few cards to share with you today! I did all of them with the Olympics of Stamping at the Moxie Fab blog in my mind. First up is my card for Sketch 156 at CPS this week, and fits the "Hello/Thinking of You" theme for the OOS.
Instructions: Fold white cardstock in half to make card base, and round the bottom corners. Emboss the front using a Cuttlebug and Argyle embossing folder. Tie pink ribbon around the bottom. Stamp the label, shoe and sentiment to white cardstock and cut out. Adhere over top of the ribbon using dimensional adhesive. Accent with colored pearls.
For these next few cards, I played with the PTI spring color challenge that Nichole came up with. This first one uses Dawn's color combo of aqua mist, hibiscus burst, spring moss and fresh snow. It also fits the "Thank You" section of OOS.


I have a few cards to share with you today! I did all of them with the Olympics of Stamping at the Moxie Fab blog in my mind. First up is my card for Sketch 156 at CPS this week, and fits the "Hello/Thinking of You" theme for the OOS.

"From My Sole To Yours" supplies:
Cardstock: Bazzill Basics
Stamps: Gina K Designs (Lovely Labels) & Renaissance By Designs (Sole to Soul)
Ink: Clearsnap (Pigment: turquoise, razzberry)
Ribbon: Michael's brand
Pearls: Kaiser Craft
Corner Rounder: EK Success
Embossing Machine: Cuttlebug by Provo Craft
Embossing Folder: Argyle by Provo Craft
Instructions: Fold white cardstock in half to make card base, and round the bottom corners. Emboss the front using a Cuttlebug and Argyle embossing folder. Tie pink ribbon around the bottom. Stamp the label, shoe and sentiment to white cardstock and cut out. Adhere over top of the ribbon using dimensional adhesive. Accent with colored pearls.
For these next few cards, I played with the PTI spring color challenge that Nichole came up with. This first one uses Dawn's color combo of aqua mist, hibiscus burst, spring moss and fresh snow. It also fits the "Thank You" section of OOS.

"Thanks For Everything" supplies:
Cardstock: Bazzill Basics
Stamps: Papertrey Ink (Dot Spot & Year of the Flowers: Violets)
Ink: Clearsnap (citrine, robin's egg, razzberry)
Jewels: Doodlebug Designs
Corner Rounder: EK Success
Instructions: Fold white cardstock in half to make card base, and round the bottom corners. Stamp the three dots to the front of the card, and accent with matching colored jewels. Stamp the sentiment to the right of the dots.
This next one uses Kelly Purkey's color picks of raspberry fizz, summer sunrise, melon berry, and sweet blush. It is goes with the "Hello/Thinking of You" section of OOC.

"Wishing You Well" supplies:
Cardstock: Bazzill Basics
Stamps: Papertrey Ink (Dot Spot & Asian Fusion)
Ink: Clearsnap (Pigment: magenta, mango tango & Chalk: rouge, rose coral)
Jewels: Doodlebug Designs
Corner Rounder: EK Success
Instructions: Fold orange cardstock in half to make card base, and round the bottom corners. Round the bottom corners of a block of white cardstock. Stamp the three dots to the middle of the cardstock, and accent with orange jewels. Stamp the sentiment below them, and adhere the block to the front of the card.
And last but not least, this one uses Lisa Johnson's color choice of sweet blush, vintage cream, kraft, and dark chocolate. And yes...I am a bit smitten with the Dot Spots set from PTI. I ♥♥♥ this set lots!! It fits the "Happy Birthday" section of OOC.

"Birthday Wishes" supplies:
Cardstock: Bazzill Basics
Cardstock: Bazzill Basics
Paper: Basic Grey & October Afternoon
Stamps: Papertrey Ink (Dot Spots & Asian Fusion)
Ink: Clearsnap (Pigment: dusty plum, chestnut)
Ribbon: Renaissance By Design
Pearls: Kaiser Craft
Corner Rounder: EK Success
Border Punch: Fiskars
Instructions: Fold chocolate brown cardstock in half to make card base, and round the bottom corners. Round the bottom corners of a block of kraft cardstock. Ink the edges of a strip of dotted paper and adhere to the right side of the kraft block. Stamp the dots and sentiment to to the left side, and adhere the entire block to the front. Punch a border to a strip of paper and tie ribbon around the left side. Adhere to the dotted strip using dimensional adhesive. Accent the stamped dots with pearls.
Do you want to hear something crazy? I used to say I was just NOT a stamper. I struggled with stamping SO much. When we started getting sponsors at the CPS blog, and most of them were stamping companies...I didn't know if I was going to be able to do it. But, I have found the type of stamps, images, and ink that work best for me...and now I actually love it! There are so many more sentiment possibilities out there when you use stamps, and all the fabulous colors of ink. I just had to find my system, and now I consider myself a stamper. Craziness, I tell you.
Do you want to hear a random stamping tip of mine? Well, if you have a Cricut of any kind...then make sure you save these when they are no longer sticky enough to use for cutting:

Wipe them down with a damp cloth or baby wipe, let it dry, and then put the plastic cover back on it. And then when you are stamping...use this to hold down the paper blocks you are stamping on. It has all the measurement grids you need for marking pencil lines where you want to stamp...and it makes a safe place for letting your stamped images dry. I use pigment ink A LOT, and we all know that it smears. I just put this whole piece to the side to let my inky images dry so they don't get ruined. This is my stamping secret that I am now sharing with all of you! It is how I get images/sentiments to stamp straight, and how I don't smear them all over.
I watched the first disk over a couple of days last week:

Oh my goodness...it is hilarious!! I love this show! I very rarely watch many shows on television, and we don't have DVR or Tivo (I know...we are probably one of very few. It just $16 per month that doesn't seem necessary.) So, I just wait until they are available on Netflix...and this is at the top of my queue now. Disk 2 is coming tomorrow! I cringe during the scenes with his wife....she portrays the type of woman that I just don't care for in the least. But, I adore the rest of the show. I am excited to see what happens next!
Any thoughts on American Idol this week? I think the right people went home...I totally agree with you America. Although the majority of them did SO much better this week...those 4 were still pretty bad. And I was SO excited to see Danny Gokey sing last night! That isn't my favorite song of his, but I do love the lyrics, and he seems so excited about it. I am happy that things are turning out for him...I adore him and his outlook on life!
Any thoughts on American Idol this week? I think the right people went home...I totally agree with you America. Although the majority of them did SO much better this week...those 4 were still pretty bad. And I was SO excited to see Danny Gokey sing last night! That isn't my favorite song of his, but I do love the lyrics, and he seems so excited about it. I am happy that things are turning out for him...I adore him and his outlook on life!
Well, I am going to get going for now. We want to get out and about for a little bit today. I am thinking a stop at DQ is in order so I can get a yummy grape Arctic Rush freeze. Yum...love those things! Have a great one! ♥♥♥
Until later,
~Lea
Subscribe to:
Posts (Atom)


Social Icons