

Happy Tuesday, everyone!! I hope your Monday went well. Mine was pretty normal...worked out, worked on the computer, ran errands, met with my friend Laurie for Bible study, dinner with Josh, watched The Voice...pretty much just our normal routine. Oh- and I booked my travel to Las Vegas this summer for CHA (or whatever it's called there). ;) I am SO excited about this!! I haven't been to CHA in a REALLY long time...and the first time I went, it was too overwhelming. I just didn't know enough about the industry. BUT...I do now, and I can't wait to actually meet people that I've "known" forever, it feels. Especially the Glitz girls....I have worked for them for over 7 years, and never met them in real life. Eeeeek! Anyways....I got an amazing deal on my airfare/hotel/airport transportation- and now I just have to WAIT until it gets here. Good thing I will be busy with weddings soon to fill my time. :)
Speaking of Glitz Design...we are announcing our new design team this week! Over on the Glitz Design Blog we announced 2 returning members, me & Noel, and 1 brand new designer, Stephanie!! You should click on the link and check it out once you're done here...we all answered a small questionnaire, and there are photos of my craft area included in my segment! If you've never seen where I create....I think it is a pretty cute little space. Nothing big or elaborate....but I love it!
Since I'm celebrating my continued partnership with Glitz Design, I figured I would share this card today! It uses the Color Me Happy 6x6 & 8x8 paper pads, among other items. Did you know that the paper pads actually have more paper designs than the 12x12 counterparts? They are fabulous, and perfect for card making, or layering on your layouts!! Definitely check them out if you get a chance. Here is my card!
Instructions:
1. Make A2 card from white cardstock.
2. Cut woodgrain paper slightly smaller, then adhere.
3. Cut two paper strips, fussy cut the hello scallops, and layer them all to the front.
4. Cut a banner edge to chalboard paper, stamp the sentiment to it, then layer to the front with a polka dot strip.
5. Stamp the arrow to the card front, pointing to the sentiment.
6. Add the pink heart stickers, the ombre tab & letter stitckers above the stamped sentiment banner.
7. Add a strip of rainbow jewels across the seam of the sentiment banner.
8. Add a glittered photo corner to the upper right corner.
9. Add a cloud sticker, sequins & a wood veneer convo bubble to finish.
Challenges:
-Papertake Weekly - any past sketch (#68)
-Creative Card Crew #35 - bling
-Simon Says Stamp - anything goes
Isn't that a fun & eclectic little card? It's a little random, but I like it! :) We will be announcing new team members every day this week on the Glitz Blog, so be sure to check back each day to see who is returning, and who is brand new!!
Well, that is everything I have for you today! I hope that you have a wonderful rest of your day!
Until later,
~L.
Supplies:
Cardstock: WPlus9 (white) | Paper: Glitz Design (Color Me Happy 6x6 & 8x8) | Stamps: Sweet Stamp Shop (Chalkboard Sign) | Ink: WPlus9 (white) | Other:Glitz Design (cloud/letter stickers) | Studio Calico (tab sticker, wood veneer) | Echo Park (heart stickers) | Martha Stewart Crafts (photo corner) | Prima Marketing (rainbow jewels) | Craft Supply: sequins
Speaking of Glitz Design...we are announcing our new design team this week! Over on the Glitz Design Blog we announced 2 returning members, me & Noel, and 1 brand new designer, Stephanie!! You should click on the link and check it out once you're done here...we all answered a small questionnaire, and there are photos of my craft area included in my segment! If you've never seen where I create....I think it is a pretty cute little space. Nothing big or elaborate....but I love it!
Since I'm celebrating my continued partnership with Glitz Design, I figured I would share this card today! It uses the Color Me Happy 6x6 & 8x8 paper pads, among other items. Did you know that the paper pads actually have more paper designs than the 12x12 counterparts? They are fabulous, and perfect for card making, or layering on your layouts!! Definitely check them out if you get a chance. Here is my card!
1. Make A2 card from white cardstock.
2. Cut woodgrain paper slightly smaller, then adhere.
3. Cut two paper strips, fussy cut the hello scallops, and layer them all to the front.
4. Cut a banner edge to chalboard paper, stamp the sentiment to it, then layer to the front with a polka dot strip.
5. Stamp the arrow to the card front, pointing to the sentiment.
6. Add the pink heart stickers, the ombre tab & letter stitckers above the stamped sentiment banner.
7. Add a strip of rainbow jewels across the seam of the sentiment banner.
8. Add a glittered photo corner to the upper right corner.
9. Add a cloud sticker, sequins & a wood veneer convo bubble to finish.
Challenges:
-Papertake Weekly - any past sketch (#68)
-Creative Card Crew #35 - bling
-Simon Says Stamp - anything goes
Isn't that a fun & eclectic little card? It's a little random, but I like it! :) We will be announcing new team members every day this week on the Glitz Blog, so be sure to check back each day to see who is returning, and who is brand new!!
Well, that is everything I have for you today! I hope that you have a wonderful rest of your day!
Until later,
~L.
Supplies:
Cardstock: WPlus9 (white) | Paper: Glitz Design (Color Me Happy 6x6 & 8x8) | Stamps: Sweet Stamp Shop (Chalkboard Sign) | Ink: WPlus9 (white) | Other:Glitz Design (cloud/letter stickers) | Studio Calico (tab sticker, wood veneer) | Echo Park (heart stickers) | Martha Stewart Crafts (photo corner) | Prima Marketing (rainbow jewels) | Craft Supply: sequins

Happy Sunday, everyone!! Did you have a great rest of your Saturday? Once Josh got home from Spokane...we headed out to a local brewery so he could get a growler fill & then picked up a bottle of wine for me. We brought them home to go along with our grilled ribeye steaks & sauteed zucchini....YUM! We watched the movie "What To Expect When You're Expecting"...and it was pretty good! So many funny, over the top moments, but also some sad & tender parts. Kind-of like real life, but not. Ha!
I have another card to share with you today...I got the chance this morning to just sit in my room & create again, which is so nice. There won't be a supply list for this one, because it is pretty much all Crate Paper. I've combined 4 of their collections on this- Maggie Holmes, Fourteen, Paper Heart, & Pretty Party. The only items that are not Crate are the vintage cream cardstock by PTI, the gold teeny alphas by Glitz Design & the sequins. Check it out!
Instructions:
1. Make A2 card from vintage cream cardstock.
2. Cut doily paper slightly smaller, then adhere.
3. Cut a strip of pink chevron paper, add a fussy cut doily to the bottom of it, then adhere across the middle.
4. Layer the diecut tags & cutouts to the left side of the card.
5. Add the vellum sentiment banner along with the fussy cut banners & stickers.
6. Frame the sentiment with two glittered brackets.
7. Add the gold teeny alphas above the vellum banner to finish the sentiment.
8. Add the fabric flower to the upper right corner, then accent with sequins.
9. Add the brads to the bottom of the card to finish.
Challenges:
-The Paper Players #143 - sketch
-By The Cute & Girly April - vintage
-Simon Says Stamp challenge - anything goes
Well, there you have it...tons of pink goodness on this one!! I love how easily it came together, and all the fun layers it has! I hope that you like it as well! That is all I have for you this Sunday...I will be back this week with more to share! have a great rest of your day!
Until later,
~L.

Happy Saturday, friends!! I hope your weekend has been a good one so far! Josh was up bright & early (well, it was actually pitch black) to head to Spokane for the day with his agents....and I didn't sleep much longer after he left. So- I've been cleaning, organizing, doing laundry, and creating a card for no other reason than I just really wanted to. Gotta love moments like that!! Our replacement espresso machine was delivered yesterday, and after getting it all set up & cleaned thoroughly....I had a vanilla spice latte for the first time in over a week. Sigh- it was fabulous. And I am so thankful for companies that honor their warranties...and just send brand new ones rather than fixing it. That is a very small "best things in life". :)
Since I'm blogging & all....why don't I share with you the card that I created today just because I wanted to. Tee hee! I combined Studio Calico "Sundrifter" with Elle's Studio "You and Me", then added some other things here and there to create this sweetie of a card. I'm totally loving it...I hope you do too!
Instructions:
1. Make A2 card from white cardstock.
2. Cut pink paper slightly smaller, then adhere.
3. Adhere the tabbed block to the upper right corner.
4. Adhere all of the chipboard circles to the top of it, except for the last one.
5. Adhere the diecut circles to the top of each one, then adhere the vellum frame to the front.
6. Add the diecut circles to the rest of the chipboard circles, including the one not adhered yet.
7. Adhere a blue glitter photo corner to the bottom, then layer the last chipboard circle to the top of it.
8. Add the letter stickers to that circle, then accent with a chipboard arrow & wood veneer @ symbol.
9. Layer the banner cutout with a blue glittered tab to the top chipboard circle, then accent with a wood asterisk & bling.
10. Add sequins to the middle chipboard circle to finish.
Challenges:
-Studio Calico Sunday Sketch - sketch
-Studio Calico Weekly Challenge - sequins
-Fab N Funky #168 - love
-Crafting for All Seasons #50 - no stamps
-Simon Says Stamp challenge - anything goes
Well, there you have it!! That sketch baffled me earlier this week....but then it REALLY inspired me to use up those chipboard circles that have really random cutouts in the center. Gotta love getting rid of some stash you've had around for ages!! Yay!!
I am going to get off the computer, and continue on with my day. Need to go fold some laundry & put it away. Talk to you soon!
Until later,
~L.
Supplies:
Cardstock: WPlus9 (white) | Paper: Studio Calico (Sundrifter 6x6) | Other: Studio Calico (stickers, wood venner, vellum) | Elle's Studio (diecuts, cutouts) | Maya Road (chipboard) | Prima Marketing (jewel) | Kaiser Craft (pearls) | Martha Stewart Crafts (photo corner) | Craft Supply: sequins

Happy Friday, everyone!! We've made it to the weekend!! Do you have any big plans? Josh is has to go to Spokane tomorrow to work...so it is going to be just me & the pups for the day. I'm not quite sure what I am going to do...but card making has definitely got to be on the list!! :)
Today is my final WPlus9 inspiration day for April, and today I am sharing a gift set that I created with Mother's Day in mind...but it could really be used for anything! The jar has a homemade sugar scrub in it, and I will give you all the info on that at the end of the post. This would be great to give as is if you are on a tight budget, or with a gift card to local spa or for their fave skin care line! Any woman would love to receive that!! Here is the gift set!

 Card Instructions:
1. Make A2 card from oatmeal cardstock, then ink the edges.
2. Cut wood paper slightly smaller, ink the edges & ahdere.
3. Cut a strip of grey paper, ink the edges & adhere down the middle.
4. Tie ribbon around the middle, then stitch a button around the bow with twine.
5. Add a doily to the front.
6. Cut a strip of butterfly paper, ink the edges and adhere over top of the doily bottom.
7. Diecut the tag, ink the edges & stamp the sentiment to it.
8. Adhere the tag, tucked slightly underneath it.
9. Stamp the canisters to oatmeal cardstock, cut out and adhere.
10. Accent the lower left corner with flowers to finish.
Jar Instructions:
1. Cut a circle from a block of lace, then wrap around the top of the jar using natural twine.
2. Tie a double bow with the twine, then stitch a button around the middle.
3. Diecut the tag & spoon from oatmeal cardstock, then stamp them.
4. Adhere the spoon to the tag, then tuck the tag underneath the button as shown on the card.
Challenges:
-Sweet Sunday Sketch #182 - Sketch
-DL Art #108 - Mother's Day
-Creative Inspirations #211 - Ribbon & Pearls
-Ribbon Carousel #80 - Showers & Flowers
-Alota Rubber Stamps #105 - Lace, Ribbon & Something Round
-Simon Says Stamp - Anything Goes
Alright...now onto the sugar scrub!! This is a homemade vanilla olive oil sugar scrub, and everything in the recipe I have readily available in the kitchen...which I am sure most people do!! So, there was no need to go out and purchase anything additional...which is really nice. No, it does not have a bunch of essential oils in it...so if that is important to you, then I would suggest finding another recipe online. There are HUNDREDS of them available!! I choose to do this less expensive version without the essential oils, because I use this scrub to exfoliate my legs before shaving. So, by the time I am done shaving....using essential oils & such would be a waste. But the olive oil stays, and keeps my legs nice & soft for the day! I do want to make a scrub sometime soon that is just for hands, and for that one...I will definitely go out and find some of my fave essential oils that are good for dry skin.
I love Arbonne product, and their scrub is really nice....but SO expensive. I couldn't justify spending $40+ on a scrub that I then shave off...so that is what started my search for a more frugal scrub, and the one linked above only costs me a few dollars in the end. (BTW- I cut that recipe in half to make just one jar of it for myself.)
Well, there you have it...my WPlus9 inspiration for the day! The WPlus9 designers have been sharing their creations all month long & it will continue on after my few days as well, so head on over to Dawn's Blog to check everything out! I hope that you have a fabulous Friday!
Until later,
~L.
Supplies:
Cardstock: WPlus9 (oatmeal) | Paper: Prima Marketing (Fairy Rhymes 12x12) | Stamps: WPlus9 (Fresh Baked) | Ink: Prima Marketing (attic dust, pastel brown) | Dies: WPlus9 (Fresh Baked companion, Timeless Tags 2) | Other: Prima Marketing (flowers, buttons) | May Arts (twine) | Craft Supply: doily, ribbon, lace
Today is my final WPlus9 inspiration day for April, and today I am sharing a gift set that I created with Mother's Day in mind...but it could really be used for anything! The jar has a homemade sugar scrub in it, and I will give you all the info on that at the end of the post. This would be great to give as is if you are on a tight budget, or with a gift card to local spa or for their fave skin care line! Any woman would love to receive that!! Here is the gift set!
Wplus9 Supplies:
1. Make A2 card from oatmeal cardstock, then ink the edges.
2. Cut wood paper slightly smaller, ink the edges & ahdere.
3. Cut a strip of grey paper, ink the edges & adhere down the middle.
4. Tie ribbon around the middle, then stitch a button around the bow with twine.
5. Add a doily to the front.
6. Cut a strip of butterfly paper, ink the edges and adhere over top of the doily bottom.
7. Diecut the tag, ink the edges & stamp the sentiment to it.
8. Adhere the tag, tucked slightly underneath it.
9. Stamp the canisters to oatmeal cardstock, cut out and adhere.
10. Accent the lower left corner with flowers to finish.
Jar Instructions:
1. Cut a circle from a block of lace, then wrap around the top of the jar using natural twine.
2. Tie a double bow with the twine, then stitch a button around the middle.
3. Diecut the tag & spoon from oatmeal cardstock, then stamp them.
4. Adhere the spoon to the tag, then tuck the tag underneath the button as shown on the card.
Challenges:
-Sweet Sunday Sketch #182 - Sketch
-DL Art #108 - Mother's Day
-Creative Inspirations #211 - Ribbon & Pearls
-Ribbon Carousel #80 - Showers & Flowers
-Alota Rubber Stamps #105 - Lace, Ribbon & Something Round
-Simon Says Stamp - Anything Goes
Alright...now onto the sugar scrub!! This is a homemade vanilla olive oil sugar scrub, and everything in the recipe I have readily available in the kitchen...which I am sure most people do!! So, there was no need to go out and purchase anything additional...which is really nice. No, it does not have a bunch of essential oils in it...so if that is important to you, then I would suggest finding another recipe online. There are HUNDREDS of them available!! I choose to do this less expensive version without the essential oils, because I use this scrub to exfoliate my legs before shaving. So, by the time I am done shaving....using essential oils & such would be a waste. But the olive oil stays, and keeps my legs nice & soft for the day! I do want to make a scrub sometime soon that is just for hands, and for that one...I will definitely go out and find some of my fave essential oils that are good for dry skin.
I love Arbonne product, and their scrub is really nice....but SO expensive. I couldn't justify spending $40+ on a scrub that I then shave off...so that is what started my search for a more frugal scrub, and the one linked above only costs me a few dollars in the end. (BTW- I cut that recipe in half to make just one jar of it for myself.)
Well, there you have it...my WPlus9 inspiration for the day! The WPlus9 designers have been sharing their creations all month long & it will continue on after my few days as well, so head on over to Dawn's Blog to check everything out! I hope that you have a fabulous Friday!
Until later,
~L.
Supplies:
Cardstock: WPlus9 (oatmeal) | Paper: Prima Marketing (Fairy Rhymes 12x12) | Stamps: WPlus9 (Fresh Baked) | Ink: Prima Marketing (attic dust, pastel brown) | Dies: WPlus9 (Fresh Baked companion, Timeless Tags 2) | Other: Prima Marketing (flowers, buttons) | May Arts (twine) | Craft Supply: doily, ribbon, lace

With that being said, we will be introducing the new design team starting on Monday at the Glitz blog...so be sure to check back with us each day next week as we share those staying on with us, and our new team members!
I have three cards to share with you today using the Love You Madly collection! They are cards I finished awhile back, but have never shared them on my blog. So, I figured it was a good time to share them!!


Glitz Design is giving a "Love You Madly" prize package to one lucky commenter! The winner will be picked randomly from all of the designer blogs & the Glitz blog...so be sure to comment on each one for a higher chance at winning!! But please, only one comment per blog!
Here is the list of designers, and where you need to go next!
Lea Lawson – http://
Audrey Yeager – http://audreysreflection.
Camilla Ekman – http://camillaslillasida.
Gerry Van Gent – http://www.gerryscrafts.
Janna Werner – http://jannawerner.de/
Karola Witczak – http://www.karolakraftuje.
Laurie Schmidlin – http://justgivemestamps.
Lisa Andrews – http://lisaandrews.blogspot.
Mou Saha – http://collagecollagecollage.
Nicole Martel – http://nicolemartel.blogspot.
Noel Culbertson - http://paperpassionpixels.blogspot.com/
Rommel Okuma - http://risqueerabisque.wordpress.com/
Teresa Kline – http://paperieblooms.blogspot.
Glitz Design – http://glitzitnow.com/blog/
I know that I can't wait to sit down with a cappuccino and check out what everyone did!
Glitz Design will announce the winner on their blog on Sunday afternoon. You have until then to leave a comment! Have a great rest of your day!
Until later,
~L.

Happy Thursday, everyone!! Did you have a great Wednesday? I did some organizing, which was much needed. It seems like the organization of my craft area is an ongoing process which will never be mastered. That's okay though...I am constantly purging too. We have a big garage sale coming up in May, and we make a good bit of extra cash by selling the scrapbooking stuff that I don't use. For instance...I love being featured in Northridge Publishings, but their goodie boxes leave a lot to be desired in terms of card makers. So, I just put stuff away in boxes all year long & sell everything at our annual garage sale. It works great for me, and gives crafters in this area new stuff at a great discount!
Today is another WPlus9 feature day for me, and I have two cards to share with you. I wanted to try and use as much of the new product as possible over my block of days, which required me to create two really different cards for today's post. Up first is a bright and cheery card for mom, which I also created for the current 10 minute craft dash. I was unsure if I was going to be able to get it all finished in time....and you should have seen my desk afterwards (I seriously should have taken a photo). But I DID get this card done in 9 minutes, 34 seconds....and had time to spare to get the jewels on. I wasn't sure if I would. Ha! The key to creating this quickly...is to have EVERYTHING pulled out, organized, and ready to use. Also- DON'T clean your stamps. Just peel them off your clear block and keep going (just have a wet rag nearby to wipe your fingers on). I won't ever take on this much stamping again for the craft dash, but it was definitely fun to take on this once!
Instructions:
1. Make A2 card from white cardstock, then round the lower right corner.
2. Cut floral paper slightly smaller, add a purple dotted strip to the right side, then round the same corner.
3. Adhere the floral block to the front, then layer a green paper block & doily to the it.
4. Stamp the first part of the sentiment directly to the doily.
5. Diecut the letters from patterned paper, and the flowers from white cardstock.
6. Adhere the letters directly below the sentiment.
7. Tie pink ribbon around the top of the card.
8. Stamp the different layers to each diecut flower, then adhere to the corner of the doily.
9. Accent with jewels to finish.
Challenges:
-Retro Sketches #60 - Sketch
-10 Minute Craft Dash #16 - Color Inspiration
-Really Reasonable Ribbon #70 - Mother's Day
-Simon Says Stamp - Anything Goes
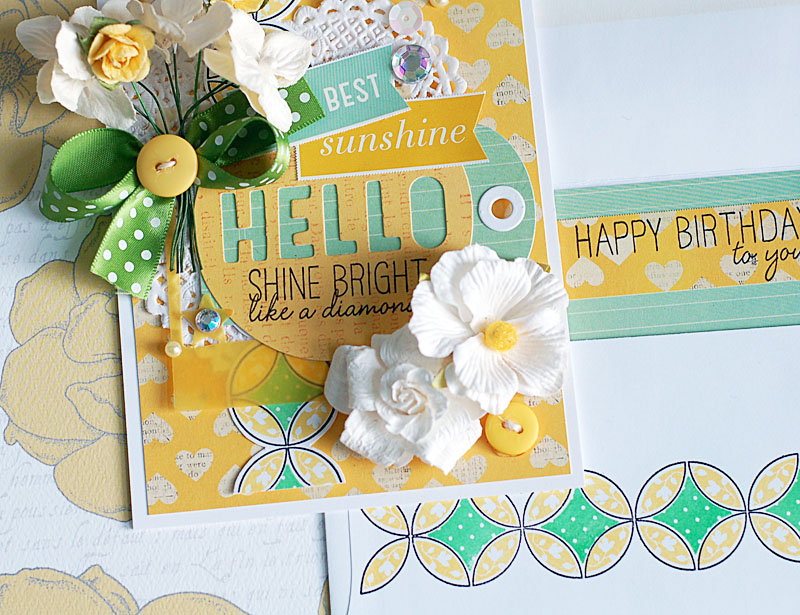
Up next is a super clean & simple card, using the new paisley stamp set. Can I tell you a little secret? I literally get anxiety about having to figure out how to stamp an entire background. And I have seen some of our other designer's do an AMAZING job with this stamp set creating a gorgeous & colorful paisley background. But because it seemed so daunting for me this time around....I chose to just use a couple paisley's here and there...and I do love how it turned out!! Here is what came of it:
 Instructions:
1. Make A2 card from oatmeal cardstock, then round the lower right corner.
2. Diecut the tag from grey paper & its circle layer from cranberry cardstock, then layer together.
3. Adhere the tag to the card front, then stamp the sentiment to it.
4. Stamp the paisleys and their layers directly to the top and bottom of the tag.
5. Adhere a flower to the top of the tag, then accent the card with sequins & jewels to finish.
Challenges:
-Runway Inspired #34 - Photo Inspiration
-Stamp and Create April - Diecut(s)
-CAS-ual Fridays #99 - Happy Birthday
Well, there you have it...my WPlus9 inspiration for the day! The WPlus9 designers have been sharing their creations all month long & it will continue on after my few days as well, so head on over to Dawn's Blog to check everything out! I hope that you have a fabulous Thursday!
Until later,
~L.
Supplies:
"Brighten Your Day" card
Cardstock: WPlus9 (white) | Paper: October Afternoon (Woodland Park 8x8) & Prima Marketing (Yuki 12x12) | Stamps: WPlus9 (Blanket Stitched Blooms) | Ink: Tsukineko (onyx black) & Clearsnap (moss green, berry, violet) | Dies: WPlus9 (Blanket Stitched Blooms companion, Folk Art Alphabet) | Other: Papertrey Ink (ribbon) | Doodlebug Designs (jewels) | Craft Supply: corner rounder, doily
"Shine Like a Diamond" card
Cardstock: WPlus9 (oatmeal, cranberry crush) | Paper: October Afternoon (Woodland Park 8x8) | Stamps: WPlus9 (Paisley Pattern, Strictly Sentiments 1) | Ink: Tsukineko (onyx black, smokey grey) & WPlus9 (cranberry crush) | Dies: WPlus9 (Timeless Tags 2) | Other: Prima Marketing (flower) | Craft Supply: corner rounder, sequins, jewels
Today is another WPlus9 feature day for me, and I have two cards to share with you. I wanted to try and use as much of the new product as possible over my block of days, which required me to create two really different cards for today's post. Up first is a bright and cheery card for mom, which I also created for the current 10 minute craft dash. I was unsure if I was going to be able to get it all finished in time....and you should have seen my desk afterwards (I seriously should have taken a photo). But I DID get this card done in 9 minutes, 34 seconds....and had time to spare to get the jewels on. I wasn't sure if I would. Ha! The key to creating this quickly...is to have EVERYTHING pulled out, organized, and ready to use. Also- DON'T clean your stamps. Just peel them off your clear block and keep going (just have a wet rag nearby to wipe your fingers on). I won't ever take on this much stamping again for the craft dash, but it was definitely fun to take on this once!
1. Make A2 card from white cardstock, then round the lower right corner.
2. Cut floral paper slightly smaller, add a purple dotted strip to the right side, then round the same corner.
3. Adhere the floral block to the front, then layer a green paper block & doily to the it.
4. Stamp the first part of the sentiment directly to the doily.
5. Diecut the letters from patterned paper, and the flowers from white cardstock.
6. Adhere the letters directly below the sentiment.
7. Tie pink ribbon around the top of the card.
8. Stamp the different layers to each diecut flower, then adhere to the corner of the doily.
9. Accent with jewels to finish.
Challenges:
-Retro Sketches #60 - Sketch
-10 Minute Craft Dash #16 - Color Inspiration
-Really Reasonable Ribbon #70 - Mother's Day
-Simon Says Stamp - Anything Goes
Up next is a super clean & simple card, using the new paisley stamp set. Can I tell you a little secret? I literally get anxiety about having to figure out how to stamp an entire background. And I have seen some of our other designer's do an AMAZING job with this stamp set creating a gorgeous & colorful paisley background. But because it seemed so daunting for me this time around....I chose to just use a couple paisley's here and there...and I do love how it turned out!! Here is what came of it:
1. Make A2 card from oatmeal cardstock, then round the lower right corner.
2. Diecut the tag from grey paper & its circle layer from cranberry cardstock, then layer together.
3. Adhere the tag to the card front, then stamp the sentiment to it.
4. Stamp the paisleys and their layers directly to the top and bottom of the tag.
5. Adhere a flower to the top of the tag, then accent the card with sequins & jewels to finish.
Challenges:
-Runway Inspired #34 - Photo Inspiration
-Stamp and Create April - Diecut(s)
-CAS-ual Fridays #99 - Happy Birthday
Well, there you have it...my WPlus9 inspiration for the day! The WPlus9 designers have been sharing their creations all month long & it will continue on after my few days as well, so head on over to Dawn's Blog to check everything out! I hope that you have a fabulous Thursday!
Until later,
~L.
Supplies:
"Brighten Your Day" card
Cardstock: WPlus9 (white) | Paper: October Afternoon (Woodland Park 8x8) & Prima Marketing (Yuki 12x12) | Stamps: WPlus9 (Blanket Stitched Blooms) | Ink: Tsukineko (onyx black) & Clearsnap (moss green, berry, violet) | Dies: WPlus9 (Blanket Stitched Blooms companion, Folk Art Alphabet) | Other: Papertrey Ink (ribbon) | Doodlebug Designs (jewels) | Craft Supply: corner rounder, doily
"Shine Like a Diamond" card
Cardstock: WPlus9 (oatmeal, cranberry crush) | Paper: October Afternoon (Woodland Park 8x8) | Stamps: WPlus9 (Paisley Pattern, Strictly Sentiments 1) | Ink: Tsukineko (onyx black, smokey grey) & WPlus9 (cranberry crush) | Dies: WPlus9 (Timeless Tags 2) | Other: Prima Marketing (flower) | Craft Supply: corner rounder, sequins, jewels

Happy Wednesday, everyone!! Sorry for the lack of posts...I have been busy getting some stuff done in advance, so not a lot of time for daily postings. We ended up not going to Spokane over the weekend, but Josh did have to go work with his agents in Kalispell (he works for Geek Squad)...so I crafted a bit, and got a lot of Glitz stuff taken care of. It was a pretty quiet weekend, and has been a pretty quiet week so far too! Like I said...just working on some stuff in advance, dancing my butt off in Oula (Best. Workout. Ever.), and hanging out with the husband.
So, we had to do the April WPlus9 release a little differently this time around, due to a little bit of a delay from the manufacturer & ship times. So, Dawn did the release all by her lonesome and the designers took a block of days to showcase what we've made with the new stuff! Well, my block starts today...so I am going to have three days of WPlus9 goodness to share with you!! How about we get right to it!
 Instructions:
1. Make A2 card from white cardstock.
2. Cut heart paper slightly smaller.
3. Adhere a heart shaped doily to the heart block, wrapping the excess around the left side.
4.Adhere the entire block to the card front.
5. Stamp the quilt prints & layers to a white cardstock strip, cut out and adhere.
6. Diecut the tag from patterned paper & white cardstock, then layer together.
7. Layer the vellum frame, tag & diecut circle to the card front, then stamp the sentiment to it.
8. Adhere the flower bunch to the upper left corner, and the two white flowers to the lower right.
9. Tie a bow from green ribbon, stitch a button around the center with twine and adhere to the bunch.
10. Stitch another button with twine, and adhere to the lower right corner.
11. Add the sticker banners, then accent with jewels, pearls & a sequin.
12. Decorate the envelope to finish.
Challenges:
-The Shabby Tea Room #163 - Photo Inspiration
-Ribbon Carousel #80 - Showers & Flowers
-Party Time Tuesday #117 - Bingo Card (Buttons, Twine, Flower)
-Craft Your Passion #159 - Diamonds
-Sweet Stampin' - Buttons, Bows & Polka Dots
Now to be completely honest with you...that card isn't going to fit in the envelope. Ha!! That's okay...you could easily just clip them together and then decorate the gift box or bag with them! That is what I do with the majority of my cards...since they tend to be pretty dimensional. You can also send them in a padded envelope if you are just sending a card and not a gift. That is how I deal with the crazy dimensionality of my cards! :)
That is all I have to share with you today! If you have some time and want to be super inspired, head on over to Dawn's Blog to check out what everyone has been creating this month. It is a treat!! Have a great rest of your Wednesday!
Until later,
~L.
Supplies:
Cardstock: WPlus9 (white) | Paper: American Crafts (Dear Lizzy - Lucky Charm 6x6) | Stamps: WPlus9 (Quilt Prints, Strictly Sentiments 1) | Ink: Tsukineko (onyx black, dandelion) | Clearsnap (fresh green) | Dies: WPlus9 (Timeless Tags 2) | Other: Prima Marketing (flowers) | American Crafts (stickers, diecuts) | Studio Calico (vellum diecut) | Kaiser Craft (pearls) | May Arts (twine) | Craft Supply: buttons, ribbon, jewels
So, we had to do the April WPlus9 release a little differently this time around, due to a little bit of a delay from the manufacturer & ship times. So, Dawn did the release all by her lonesome and the designers took a block of days to showcase what we've made with the new stuff! Well, my block starts today...so I am going to have three days of WPlus9 goodness to share with you!! How about we get right to it!
Wplus9 Supplies:
Stamps: Quilt Prints, Strictly Sentiments 1 | Dies: Timeless Tags 2 | Cardstock: White
Stamps: Quilt Prints, Strictly Sentiments 1 | Dies: Timeless Tags 2 | Cardstock: White
1. Make A2 card from white cardstock.
2. Cut heart paper slightly smaller.
3. Adhere a heart shaped doily to the heart block, wrapping the excess around the left side.
4.Adhere the entire block to the card front.
5. Stamp the quilt prints & layers to a white cardstock strip, cut out and adhere.
6. Diecut the tag from patterned paper & white cardstock, then layer together.
7. Layer the vellum frame, tag & diecut circle to the card front, then stamp the sentiment to it.
8. Adhere the flower bunch to the upper left corner, and the two white flowers to the lower right.
9. Tie a bow from green ribbon, stitch a button around the center with twine and adhere to the bunch.
10. Stitch another button with twine, and adhere to the lower right corner.
11. Add the sticker banners, then accent with jewels, pearls & a sequin.
12. Decorate the envelope to finish.
Challenges:
-The Shabby Tea Room #163 - Photo Inspiration
-Ribbon Carousel #80 - Showers & Flowers
-Party Time Tuesday #117 - Bingo Card (Buttons, Twine, Flower)
-Craft Your Passion #159 - Diamonds
-Sweet Stampin' - Buttons, Bows & Polka Dots
Now to be completely honest with you...that card isn't going to fit in the envelope. Ha!! That's okay...you could easily just clip them together and then decorate the gift box or bag with them! That is what I do with the majority of my cards...since they tend to be pretty dimensional. You can also send them in a padded envelope if you are just sending a card and not a gift. That is how I deal with the crazy dimensionality of my cards! :)
That is all I have to share with you today! If you have some time and want to be super inspired, head on over to Dawn's Blog to check out what everyone has been creating this month. It is a treat!! Have a great rest of your Wednesday!
Until later,
~L.
Supplies:
Cardstock: WPlus9 (white) | Paper: American Crafts (Dear Lizzy - Lucky Charm 6x6) | Stamps: WPlus9 (Quilt Prints, Strictly Sentiments 1) | Ink: Tsukineko (onyx black, dandelion) | Clearsnap (fresh green) | Dies: WPlus9 (Timeless Tags 2) | Other: Prima Marketing (flowers) | American Crafts (stickers, diecuts) | Studio Calico (vellum diecut) | Kaiser Craft (pearls) | May Arts (twine) | Craft Supply: buttons, ribbon, jewels

We've made it to Friday, all!! I hope that your week has been a good one! We are finalizing our weekend plans, and trying to decide if we want to make a quick little jaunt over to Spokane together. Josh would have to work most of the day on Saturday, but I could go shopping and hang with my Aunt if she is in town & available. We shall see...I will let you know in my next post if we end up going! :)
Today at Mama Elephant we are showcasing the final new stamp set for April, and it is an alphabet stamp set that you will just LOVE! It is called "Flashy Letters", and it is the same font that many of the sentiments from this month were created in as well! I love how cohesive the majority of this release was, and how well three of the stamp sets work together! For my card today, I went with a little sparkle...and created a custom sentiment using my computer and the stamp set. This is one of my latest fave sayings right now...it is my pick me up when I'm feeling down, so I knew I had to create a card with it! Here is what I made!
Instructions:
1. Make A2 card from white cardstock.
2. Print the top part of the sentiment using your Microsoft Word or Photoshop & the Century Gothic font.
3. Stamp the rest of the sentiment directly below the printed part.
4. Cut five 1/4-inch strips of cardstock and attach them to a piece of scrap cardstock.
5. Cover them in glitter, then adhere to the top of the card.
6. Fussy cut a camera from patterned paper, then adhere next to the sentiment.
7. Add matching colored jewels underneath the sentiment to finish.
Challenges:
-Muse #13 - Card Inspiration
-CASology #40 - Word
-Crafts and Me #129 - Bling
-Delightful Challenge - Colorful
-Word Art Wednesday #76 - Anything Goes

Yeah- I pretty much love how this turned out. Rainbows, sparkle, a fabulous sentiment, a cute little Polaroid camera....you pretty much can't go wrong with those things. Even better when they're combined....tee hee!!
The other Mama Elephant designers also have some projects to share using the Flashy Letters stamps set....so be sure to check them out too!
Savannah O'Gwynn http://savannahland2.blogspot.com/
Lea Lawson http://leascupcakesandsunshine.blogspot.com/
Mariana Grigsby http://marianagrigsby.wordpress.com/
JJ Bolton http://www.jjbolton.org
Cheiron Brandon http://www.cheironbrandon.typepad.com/
Pearl Lui http://kraftypearl.blogspot.com/
Alice Wertz http://aliceslittlewonderland.blogspot.com/
I hope that you have a wonderful Friday!!
Until later,
~L.
1. Make A2 card from white cardstock.
2. Print the top part of the sentiment using your Microsoft Word or Photoshop & the Century Gothic font.
3. Stamp the rest of the sentiment directly below the printed part.
4. Cut five 1/4-inch strips of cardstock and attach them to a piece of scrap cardstock.
5. Cover them in glitter, then adhere to the top of the card.
6. Fussy cut a camera from patterned paper, then adhere next to the sentiment.
7. Add matching colored jewels underneath the sentiment to finish.
Challenges:
-Muse #13 - Card Inspiration
-CASology #40 - Word
-Crafts and Me #129 - Bling
-Delightful Challenge - Colorful
-Word Art Wednesday #76 - Anything Goes
Yeah- I pretty much love how this turned out. Rainbows, sparkle, a fabulous sentiment, a cute little Polaroid camera....you pretty much can't go wrong with those things. Even better when they're combined....tee hee!!
The other Mama Elephant designers also have some projects to share using the Flashy Letters stamps set....so be sure to check them out too!
Savannah O'Gwynn http://savannahland2.blogspot.com/
Lea Lawson http://leascupcakesandsunshine.blogspot.com/
Mariana Grigsby http://marianagrigsby.wordpress.com/
JJ Bolton http://www.jjbolton.org
Cheiron Brandon http://www.cheironbrandon.typepad.com/
Pearl Lui http://kraftypearl.blogspot.com/
Alice Wertz http://aliceslittlewonderland.blogspot.com/
I hope that you have a wonderful Friday!!
Until later,
~L.

Happy Thursday, everyone! I hope you had a wonderful Wednesday! I made some cards, went to Oula, and then made two desserts for community group. I made gluten-free lemon bars using fresh squeezed lemon juice & zest...and then peanut butter rice Krispies treats, just in case anyone doesn't care for lemon. I think I just really wanted both, and couldn't decide on what to make. Ha!
Today at Mama Elephant we are showcasing the next new stamp set in our arsenal called "Central Park". This set is SO fun. You are going to just LOVE the cityscape it comes with....not to mention, it fits with two of the other brand new stamp sets perfectly. They compliment each other so well! I paired the sets with Glitz Design "Uncharted Waters", and this is what came to fruition!
Instructions:
1. Make A2 card from pink swiss dot cardstock.
2. Cut chalkboard paper slightly smaller, then adhere to the front.
3. Stamp & heat emboss the cityscape to the middle of the chalkboard paper block.
4. Wrap washi tape around the top of a scalloped paper block, then layer to the bottom with a banner sticker.
5. Cut a banner edge to a pink paper strip, then stamp the sentiment to it.
6. Adhere the sentiment strip to the top of the card, then accent with a gold star & sequins.
7. Add a wooden symbol to the middle, then finish the sentiment with gold teeny alphas.
8. Add three sequins to the scalloped paper block to finish.
Challenges:
-Sunday Stamps #44 - Sketch
-Simon Says Stamp - Travel/Cityscapes
-Word Art Wednesday #76 - Anything Goes

I hope that you like my city love themed card today! The other Mama Elephant designers also have some projects to share using the Central Park stamps set....so be sure to check them out too!
Savannah O'Gwynn http://savannahland2.blogspot.com/
Lea Lawson http://leascupcakesandsunshine.blogspot.com/
Mariana Grigsby http://marianagrigsby.wordpress.com/
JJ Bolton http://www.jjbolton.org
Cheiron Brandon http://www.cheironbrandon.typepad.com/
Pearl Lui http://kraftypearl.blogspot.com/
Alice Wertz http://aliceslittlewonderland.blogspot.com/
I hope that you have a wonderful Thursday!!
Until later,
~L.
Today at Mama Elephant we are showcasing the next new stamp set in our arsenal called "Central Park". This set is SO fun. You are going to just LOVE the cityscape it comes with....not to mention, it fits with two of the other brand new stamp sets perfectly. They compliment each other so well! I paired the sets with Glitz Design "Uncharted Waters", and this is what came to fruition!
1. Make A2 card from pink swiss dot cardstock.
2. Cut chalkboard paper slightly smaller, then adhere to the front.
3. Stamp & heat emboss the cityscape to the middle of the chalkboard paper block.
4. Wrap washi tape around the top of a scalloped paper block, then layer to the bottom with a banner sticker.
5. Cut a banner edge to a pink paper strip, then stamp the sentiment to it.
6. Adhere the sentiment strip to the top of the card, then accent with a gold star & sequins.
7. Add a wooden symbol to the middle, then finish the sentiment with gold teeny alphas.
8. Add three sequins to the scalloped paper block to finish.
Challenges:
-Sunday Stamps #44 - Sketch
-Simon Says Stamp - Travel/Cityscapes
-Word Art Wednesday #76 - Anything Goes
I hope that you like my city love themed card today! The other Mama Elephant designers also have some projects to share using the Central Park stamps set....so be sure to check them out too!
Savannah O'Gwynn http://savannahland2.blogspot.com/
Lea Lawson http://leascupcakesandsunshine.blogspot.com/
Mariana Grigsby http://marianagrigsby.wordpress.com/
JJ Bolton http://www.jjbolton.org
Cheiron Brandon http://www.cheironbrandon.typepad.com/
Pearl Lui http://kraftypearl.blogspot.com/
Alice Wertz http://aliceslittlewonderland.blogspot.com/
I hope that you have a wonderful Thursday!!
Until later,
~L.

Today at Mama Elephant we are showcasing the new stamp set called "Bling". This set has some of the most amazing sentiments in it, and can be used effortlessly with the other new sets, "Central Park" & "Flashy Letters". I had fun combining this stamp set with the October Afternoon "Midway" collection...and this is what I created!
1. Make A2 card from black cardstock.
2. Cut three strips of patterned paper, adhere angled to the card front, then trim the excess.
3. Stamp the sentiment to a journal card, then fussy cut & adhere to the front with foam adhesive.
4. Fussy cut the arrow, and adhere to the stamped speech bubble.
5. Add a wood geotag accent with a pink jewel to the bottom of the speech bubble.
6. Accent with sequins to finish.
Challenges:
-CAS(E) This Sketch #23 - Sketch
-Crazy 4 Challenges #181 - Wooden Accent
-Tuesday Throwdown #143 - Sentiment Focus
-Word Art Wednesday #76 - Anything Goes

I hope that you like my fun encouragement card today! The other Mama Elephant designers also have some projects to share using the Bling stamps set....so be sure to check them out too!
Savannah O'Gwynn http://savannahland2.blogspot.com/
Lea Lawson http://leascupcakesandsunshine.blogspot.com/
Mariana Grigsby http://marianagrigsby.wordpress.com/
JJ Bolton http://www.jjbolton.org
Cheiron Brandon http://www.cheironbrandon.typepad.com/
Pearl Lui http://kraftypearl.blogspot.com/
Alice Wertz http://aliceslittlewonderland.blogspot.com/
I hope that you have a wonderful Wednesday!!
Until later,
~L.

Happy Tuesday, everyone!! Hope your Monday was a good one! Well, my experience at Oula on Monday was....interesting. We'll just leave it at that because, you know, if you don't have anything nice to say. Then I came home & made cards, met with my friend Laurie that afternoon....and then hung out with Josh for the rest of the night. Our DVR was FULL when we got home from Texas, so we have been chipping away at it, trying to get everything watched.
Today at Mama Elephant we are showcasing the new stamp set called "Tree Friend". This is a super sweet stamp set with lovely sentiments & adorable silhouetted animals. There is also a large, flowering tree....but I did not use it for my card this time around. Here is what I created!
Instructions:
1. Make A2 card from cream cardstock.
2. Cut a navy blue paper strip, glitter the top of it, then adhere to the bottom of the card.
3. Cut a pink paper block and adhere to the top, adding foam dots underneath just the bottom of it.
4. Add a scalloped sticker to the top, then trim the excess.
5. Wrap ribbon around the left side.
6. Stamp the sentiment & animals to a journal card, then adhere it to the center, over top of the ribbon.
7. Tie a bow from matching ribbon, and adhere to the upper left corner.
8. Accent with a pink jewel & navy blue paper flowers.
9. Add the diecut butterfly below the flowers, then accent with navy blue jewels.
10. Layer the diecut arrow, flower & twine threaded button to the right of the sentiment to finish.
Challenges:
-April Cards Magazine challenge - Color Inspiration
-Bearly-Mine #82 - Spring Flowers
-Cupcake Craft #238 - Cute & Cuddly
-Stampin' for the Weekend - Friendship

I hope that you like my sweet little friendship card today! The other Mama Elephant designers also have some projects to share using the Tree Friends stamps set....so be sure to check them out too!
Savannah O'Gwynn http://savannahland2.blogspot.com/
Lea Lawson http://leascupcakesandsunshine.blogspot.com/
Mariana Grigsby http://marianagrigsby.wordpress.com/
JJ Bolton http://www.jjbolton.org
Cheiron Brandon http://www.cheironbrandon.typepad.com/
Pearl Lui http://kraftypearl.blogspot.com/
Alice Wertz http://aliceslittlewonderland.blogspot.com/
I hope that you have a wonderful Tuesday!!
Until later,
~L.
Today at Mama Elephant we are showcasing the new stamp set called "Tree Friend". This is a super sweet stamp set with lovely sentiments & adorable silhouetted animals. There is also a large, flowering tree....but I did not use it for my card this time around. Here is what I created!
1. Make A2 card from cream cardstock.
2. Cut a navy blue paper strip, glitter the top of it, then adhere to the bottom of the card.
3. Cut a pink paper block and adhere to the top, adding foam dots underneath just the bottom of it.
4. Add a scalloped sticker to the top, then trim the excess.
5. Wrap ribbon around the left side.
6. Stamp the sentiment & animals to a journal card, then adhere it to the center, over top of the ribbon.
7. Tie a bow from matching ribbon, and adhere to the upper left corner.
8. Accent with a pink jewel & navy blue paper flowers.
9. Add the diecut butterfly below the flowers, then accent with navy blue jewels.
10. Layer the diecut arrow, flower & twine threaded button to the right of the sentiment to finish.
Challenges:
-April Cards Magazine challenge - Color Inspiration
-Bearly-Mine #82 - Spring Flowers
-Cupcake Craft #238 - Cute & Cuddly
-Stampin' for the Weekend - Friendship
I hope that you like my sweet little friendship card today! The other Mama Elephant designers also have some projects to share using the Tree Friends stamps set....so be sure to check them out too!
Savannah O'Gwynn http://savannahland2.blogspot.com/
Lea Lawson http://leascupcakesandsunshine.blogspot.com/
Mariana Grigsby http://marianagrigsby.wordpress.com/
JJ Bolton http://www.jjbolton.org
Cheiron Brandon http://www.cheironbrandon.typepad.com/
Pearl Lui http://kraftypearl.blogspot.com/
Alice Wertz http://aliceslittlewonderland.blogspot.com/
I hope that you have a wonderful Tuesday!!
Until later,
~L.

Welcome to the Mama Elephant April Design Team blog hop! Our April release is now live and available for purchase in the store: www.mamaelephant.com.
To celebrate the new release, Mama Elephant is giving away 3 gift certificates worth $20.00 each to 3 lucky people! Winners will be chosen at random from the collective blogs in the Stampede. Winners will be announced on the blog on Friday, April 19th.
I've used the new stamp set "Central Park" for my card today, and I kept it super clean & simple!! I love how well this stamp set worked with these fabulous glittery Thickers! Here is what I created!

1. Make A2 card from kraft cardstock.
2. Stamp the cityscape to the bottom of the card front.
3. Stamp the speech bubble and heart above the city scape.
4. Add the sentiment using glitter thickers to the bottom of the cityscape.
5. Adhere gold stars randomly to the top of the card to finish.
Challenges:
-CAS-ual Fridays #98 - Glitter
-The Kraft Journal #117 - Clean & Simple
-Totally PaperCrafts #162 - Kraft
-V's Sweet Ideas #10 - Anything Goes
See? Easy peasy...and super cute! These could easily be mass produced with a number of different sentiments, and different icons in the speech bubble! The gold stars are not listed in the supply list above, and that is because I picked them up at Michael's in the sequins section. Just an FYI if you are looking for them!
Here's how to qualify to win (please DO NOT leave multiple comments on my blog for each step. You only need to do that on the Mama Elephant blog):
1. Leave a comment on this blog post
2. Become a follower of our blog
3. Like/share us on Facebook: http://facebook.com/mamaelephant
4. Follow/tweet about us on Twitter: http://twitter.com/heymamaelephant
Kryssi Ng / Mama Elephant http://www.mamaelephantblog.com/
Lisa Spangler (guest designer!) http://sideoatsandscribbles.wumple.com/
Mariana Grigsby http://marianagrigsby.wordpress.com/
Lea Lawson http://leascupcakesandsunshine.blogspot.com/
Alice Wertz http://aliceslittlewonderland.blogspot.com/
Elena Roussakis (guest designer!) http://justmeprints.blogspot.ca/
Geralyn Sy http://inacreativebubble.blogspot.com/
Savannah O'Gwynn http://savannahland2.blogspot.com/
Cheiron Brandon http://www.cheironbrandon.typepad.com/
Pamela Ho (guest designer!) http://fishydesign.wordpress.com/
Jenn Biederman http://createdbyjb.typepad.com/
Pearl Lui http://kraftypearl.blogspot.com/
JJ Bolton http://jjbolton.org
I know that I can't wait to see what the rest of the Mama Elephant designers have come up with for today's stampede, so have a great time hopping!! Have an inspiring rest of your day!
Until later,
~L.

Welcome to the NinaB Designs Blog Hop! The theme of this month's hop is Stamping Techniques. Nina challenged the team to do a technique, which could be as simple as coloring, die-cutting or more involved like emboss resist, making your own embellishments, etc.
I'm not really the most technique oriented person, so I stuck with what I know....and that is stamping on patterned paper. This probably isn't really considered a technique, but it is about as technique oriented as I get. Here is what I created!
Instructions:
1. Make A2 card from oatmeal cardstock.
2. Cut aqua dotted paper slightly smaller and adhere.
3. Cut two matching floral strips and adhere to the aqua block.
4. Fussy cut the journal card from patterned paper and adhere to the middle with foam adhesive.
5. Punch a border to pink patterned paper, and adhere to the bottom of the journal card.
6. Cut a banner edge to light patterned paper, and stamp the sentiment to it and adhere.
7. Layer flowers to the right of the sentiment banner, then accent with a brad.
8. Add a cluster of diecut embellishments to the lower right corner of the journal card, popping the heart with foam.
9. Tie a twine bow, and layer to the heart with a jewel to finish.
Challenges:
-The Friday Mashup #105 - Sketch
-There She Goes #203 - Just Because
-Stamp and Create April - Diecuts
-V's Sweet Ideas #10 - Anything Goes
The NinaB Designs team is giving away these TWO PRIZE PACKAGES:

Prize #2: TCM's Crafty Shelf and Retired LOC Elegant Labels set

Thank you for joining us today!
Until later,
~L.
1. Make A2 card from oatmeal cardstock.
2. Cut aqua dotted paper slightly smaller and adhere.
3. Cut two matching floral strips and adhere to the aqua block.
4. Fussy cut the journal card from patterned paper and adhere to the middle with foam adhesive.
5. Punch a border to pink patterned paper, and adhere to the bottom of the journal card.
6. Cut a banner edge to light patterned paper, and stamp the sentiment to it and adhere.
7. Layer flowers to the right of the sentiment banner, then accent with a brad.
8. Add a cluster of diecut embellishments to the lower right corner of the journal card, popping the heart with foam.
9. Tie a twine bow, and layer to the heart with a jewel to finish.
Challenges:
-The Friday Mashup #105 - Sketch
-There She Goes #203 - Just Because
-Stamp and Create April - Diecuts
-V's Sweet Ideas #10 - Anything Goes
The NinaB Designs team is giving away these TWO PRIZE PACKAGES:
Prize #1

Prize #2: TCM's Crafty Shelf and Retired LOC Elegant Labels set
Winners will be picked randomly from 2 of the designers' blogs:
Nina Brackett * Clare Buswell * Heather Jensen * Jennie Harper * Jessica Fick * Lea Lawson * Linda Lucas * Rae Barthel
Everybody is welcome to comment and be eligible to win. The winners will be announced on April 22 on Nina's Blog, where you will also find all the relevant info regarding the giveaways. Finally, please consider liking the following Facebook pages that are represented on today's hop, so you don't miss the latest news and happenings:
Thank you for joining us today!
Until later,
~L.

Hey there, everyone!! Did you have a good weekend? Ours was great! It felt busy...but kind-of not at the same time. Hard to explain really. :) We spent the day doing pretty much nothing but watching the Masters, eating and chatting with Grant & Meagan on Saturday. Today Josh spent some time at the Clay Studio while I made cards at home & went to Oula. Then church this evening, and just hanging out after that. Like I said...busy, but not. :)
I have my card to share with you for this week's Shabby Tea Room challenge. This week the challenge is an inspiration photo, along with using a recycled item. I kind-of thought outside of the box on this one, and used some lace that my grandma gave me that at once had a different purpose. It was never used for that project, so I am using a bit of it on this project so it won't go to waste! So, there you have it...my recycled item! Here is what I created:
Instructions:
1. Make A2 card from vintage cream cardstock.
2. Cut background paper slightly smaller.
3. Thread the lace with seam binding, then wrap around the bottom of the paper block.
4. Cut a banner edge to a pink paper strip, then layer to the top of the card with a doily piece.
5. Stamp the sentiment to the pink strip, then zig-zag stitch along the seam.
6. Adhere the entire paper block to the card front.
7. Cut a scalloped edge to a polka dot strip, cut in two and adhere to the card as shown.
8. Layer the floral vine, fabric flower & paper flower to the right corner.
9. Tie a double bow from matching seam binding, and layer to the flower cluster with two buttons.
10. Add the butterfly and three flowers to the sentiment banner.
11. Add pink pearls to the flower centers to finish.
Challenges:
-Ribbon Carousel #80 - Showers & Flowers
-Totally Gorjuss #179 - Spring Colors
-Cute Card Thursday #264 - Butterfly Kisses
-Divas By Design - Flowers

I will come back and add in the supply list a little bit later. I need to finish it up, and I still have a couple other things I need to get done. But just so you know for now....the majority of the product used above is from Prima's new "Divine" collection!
I hope that you've enjoyed my sweet & shabby engagement card today! I will be back soon with more cards to share!
Until later,
~L.
I have my card to share with you for this week's Shabby Tea Room challenge. This week the challenge is an inspiration photo, along with using a recycled item. I kind-of thought outside of the box on this one, and used some lace that my grandma gave me that at once had a different purpose. It was never used for that project, so I am using a bit of it on this project so it won't go to waste! So, there you have it...my recycled item! Here is what I created:
1. Make A2 card from vintage cream cardstock.
2. Cut background paper slightly smaller.
3. Thread the lace with seam binding, then wrap around the bottom of the paper block.
4. Cut a banner edge to a pink paper strip, then layer to the top of the card with a doily piece.
5. Stamp the sentiment to the pink strip, then zig-zag stitch along the seam.
6. Adhere the entire paper block to the card front.
7. Cut a scalloped edge to a polka dot strip, cut in two and adhere to the card as shown.
8. Layer the floral vine, fabric flower & paper flower to the right corner.
9. Tie a double bow from matching seam binding, and layer to the flower cluster with two buttons.
10. Add the butterfly and three flowers to the sentiment banner.
11. Add pink pearls to the flower centers to finish.
Challenges:
-Ribbon Carousel #80 - Showers & Flowers
-Totally Gorjuss #179 - Spring Colors
-Cute Card Thursday #264 - Butterfly Kisses
-Divas By Design - Flowers
I will come back and add in the supply list a little bit later. I need to finish it up, and I still have a couple other things I need to get done. But just so you know for now....the majority of the product used above is from Prima's new "Divine" collection!
I hope that you've enjoyed my sweet & shabby engagement card today! I will be back soon with more cards to share!
Until later,
~L.

Happy Thursday, everyone!! How have the past couple of days been for you? Mine have been great, but I'm even more excited because my husband will FINALLY be home today! Yay!! I was awakened bright & early yesterday to a text from my lifelong best friend with news that he got engaged the night before, which just warms my heart. I cannot wait to meet his fiance....sometime soon hopefully!! My other best friend, Meagan, came over the other night and we had dinner together and watched Breaking Dawn 2. I finished editing and sent off the images to one of my couples that were married in March. Just been trying to stay busy while I'm all alone...tee hee! That just makes me sound pitiful...it really isn't that bad, I promise. :)
And of course...I've created some cards. ;) I have spring themed love card to share with you today, using some older (but still FAB!) Pink Paislee papers/tag, and freshened it up with some Studio Calico "Sundrifter" & other newer embellishments. Here is what I created!
Instructions:
1. Make a 5-inch card from white cardstock.
2. Cut pink paper slightly smaller, and adhere to the front.
3. Cut a thin strip of map paper, and adhere to the left side.
4. Layer a doily, journal card & tag to the card front, then add a glitter photo corner & jewel to the tag.
5. Add a dimensional scalloped border across the top, then accent with a sentiment diecut & wooden quotes.
6. Add the sticker tab, pearls, dated snippet, and accent with a diecut heart from map paper.
7. Add a feather tag to the top of the card, then accent with a ribbon bow.
8. Accent the front with paper flowers & feather diecuts to finish.
Challenges:
-Pink Paislee Craft N Connect - Spring Color Combo
-Viva la Verve! April Week 1 - Sketch
-Simon Says Stamp - Spring Flowers
-Stamp and Create April - Use a Diecut
-V's Sweet Ideas #10 - Anything Goes

I just love the color combo and the feminine feel of this card...not to mention all the fun bits & baubles from some of my favorite manufacturers! Do you have a set of go to manufacturers that you find yourself reaching for quite often? I know that I do! Mine would be Glitz Design, Studio Calico, American Crafts/Dear Lizzy, Crate Paper & of course, Prima! I also just recently got some really fabulous October Afternoon product from ScrapbookDailyDeals.com, and it is already starting to make it's way into "reach for" status. :)
Well, that is all I have for you today! I hope that you have a wonderful rest of your day, and I will be back soon with another card to share!
Until later,
~L.
And of course...I've created some cards. ;) I have spring themed love card to share with you today, using some older (but still FAB!) Pink Paislee papers/tag, and freshened it up with some Studio Calico "Sundrifter" & other newer embellishments. Here is what I created!
1. Make a 5-inch card from white cardstock.
2. Cut pink paper slightly smaller, and adhere to the front.
3. Cut a thin strip of map paper, and adhere to the left side.
4. Layer a doily, journal card & tag to the card front, then add a glitter photo corner & jewel to the tag.
5. Add a dimensional scalloped border across the top, then accent with a sentiment diecut & wooden quotes.
6. Add the sticker tab, pearls, dated snippet, and accent with a diecut heart from map paper.
7. Add a feather tag to the top of the card, then accent with a ribbon bow.
8. Accent the front with paper flowers & feather diecuts to finish.
Challenges:
-Pink Paislee Craft N Connect - Spring Color Combo
-Viva la Verve! April Week 1 - Sketch
-Simon Says Stamp - Spring Flowers
-Stamp and Create April - Use a Diecut
-V's Sweet Ideas #10 - Anything Goes
I just love the color combo and the feminine feel of this card...not to mention all the fun bits & baubles from some of my favorite manufacturers! Do you have a set of go to manufacturers that you find yourself reaching for quite often? I know that I do! Mine would be Glitz Design, Studio Calico, American Crafts/Dear Lizzy, Crate Paper & of course, Prima! I also just recently got some really fabulous October Afternoon product from ScrapbookDailyDeals.com, and it is already starting to make it's way into "reach for" status. :)
Well, that is all I have for you today! I hope that you have a wonderful rest of your day, and I will be back soon with another card to share!
Until later,
~L.

Happy Tuesday, friends! I hope your day is going well! I'm on my own for the week, as J is still traveling for work. I am finishing up editing a wedding from March, and getting caught up on some items that need to be created. Along with taking care of two very needy pups- I think they are extra clingy because at least one of us has been gone for the past 3 weeks. Poor pups...they are just ready for their lives to go back to normal!! :)
The song "Stars" by Grace Potter & The Nocturnals just played on my iTunes list, which couldn't be more fitting for the card I am about to share with you. (BTW- I LOVE that song. If you haven't heard it, I highly suggest it!!) I created this card primarily as a birthday card, but it could also be used for graduation season, which is sneaking up on us! I have mixed Studio Calico, October Afternoon, American Crafts & some other fun goodies, and this is how it turned out.
Instructions:
1. Make A2 card from oatmeal cardstock.
2. Cut woodgrain paper slightly smaller.
3. Adhere a star paper block to the lower right side, and a beige dotted paper block to the upper left.
4. Add the tag to the lower left, then wrap a strip of vellum across the middle.
5. Add the two banner stickers to the right side of the tag, then adhere the butterfly journal card over top.
6. Trim the excess journal card, then adhere the entire block to the card front.
7. Stamp the star trails to the vellum strip, leaving the word "loved" showing through.
8. Stitch a button around the bow using twine, then add to the top of the tag.
9. Stamp the sentiment to the journal card, then add a strip of washi underneath it.
10. Accent the washi tape with jewels & a diecut photo corner.
11. Add the diecut stars and wood veneer pieces as shown, then accent with jewels & sequins to finish.
Challenges:
-Studio Calico Sunday Sketch - April 7 Sketch
-The Play Date Cafe #176 - Color Inspiration (cappuccino, slate, burlap)
-City Crafter #154 - Birthday Theme
-Stamp and Create April - Diecut(s)
-V's Sweet Ideas #10 - Anything Goes

In case you are wondering, the diecut stars & photo corner are from the Studio Calico "Back to School" ephemera pack. I couldn't find it anywhere online available for purchase....but I wanted you to be aware in case you had them in your stash! Of course, if you want to recreate this look you can use any diecut stars or photo corners.
That is all I have to share with you today! I hope you enjoyed my neutral toned card full of stars!! Have a wonderful rest of your day, and I will be back soon with another card to share!
Until later,
~L.
The song "Stars" by Grace Potter & The Nocturnals just played on my iTunes list, which couldn't be more fitting for the card I am about to share with you. (BTW- I LOVE that song. If you haven't heard it, I highly suggest it!!) I created this card primarily as a birthday card, but it could also be used for graduation season, which is sneaking up on us! I have mixed Studio Calico, October Afternoon, American Crafts & some other fun goodies, and this is how it turned out.
1. Make A2 card from oatmeal cardstock.
2. Cut woodgrain paper slightly smaller.
3. Adhere a star paper block to the lower right side, and a beige dotted paper block to the upper left.
4. Add the tag to the lower left, then wrap a strip of vellum across the middle.
5. Add the two banner stickers to the right side of the tag, then adhere the butterfly journal card over top.
6. Trim the excess journal card, then adhere the entire block to the card front.
7. Stamp the star trails to the vellum strip, leaving the word "loved" showing through.
8. Stitch a button around the bow using twine, then add to the top of the tag.
9. Stamp the sentiment to the journal card, then add a strip of washi underneath it.
10. Accent the washi tape with jewels & a diecut photo corner.
11. Add the diecut stars and wood veneer pieces as shown, then accent with jewels & sequins to finish.
Challenges:
-Studio Calico Sunday Sketch - April 7 Sketch
-The Play Date Cafe #176 - Color Inspiration (cappuccino, slate, burlap)
-City Crafter #154 - Birthday Theme
-Stamp and Create April - Diecut(s)
-V's Sweet Ideas #10 - Anything Goes
In case you are wondering, the diecut stars & photo corner are from the Studio Calico "Back to School" ephemera pack. I couldn't find it anywhere online available for purchase....but I wanted you to be aware in case you had them in your stash! Of course, if you want to recreate this look you can use any diecut stars or photo corners.
That is all I have to share with you today! I hope you enjoyed my neutral toned card full of stars!! Have a wonderful rest of your day, and I will be back soon with another card to share!
Until later,
~L.

Hey there everyone! It's been awhile...hasn't it? I got back from Texas on Saturday evening, and we had a wonderful time with Josh's family! It was really great to see his mom. I don't usually post a whole lot of really personal things on my blog, but this personal story is going to have a happy ending! We found out in December that Vanessa (my mother in law) was diagnosed with two forms of cancer, but they were caught very early. They immediately put together a plan to fight it, and she has been going through chemo ever since. About two weeks before we left for Texas they called us with news that her most recent Petscan came back clear. Nothing there- praise God!! She has to finish out her treatment because the cancer had been in her bone marrow....and they just want to make sure they aggressively kill it so it won't ever come back. Vanessa told us a lot of amazing stories about what has unfolded with her diagnosis in regards to people, friends & family members around her. She has fought this battle with the belief that God would completely heal her through the use of medicine, and teach her even more about her faith and self. I am amazed by her strength, and her determination that cancer & chemo does not define her...it is just part of the path she has to walk in this life.
I got a little teary eyed typing that...wow. Anyways....now that I am home, it is time to get back into the swing of things! I am a little tardy on my card for my guest design spot at The Shabby Tea Room this month, but Debbie graciously allowed me to be late due to my vacation & crazy travel day home. The inspiration photo this week is gorgeous, full of flowers & beautiful colors. Here is what I created for it!
Instructions:
1. Make A2 card from white cardstock.
2. Cut grey floral paper slightly smaller & adhere.
3. Cut a block of grey dotted paper and adhere to the left side.
4. Cut a floral block, and layer together with a bracket sticker to the dotted paper.
5. Cut a banner edge to a vellum strip, then stamp & heat emboss the sentiment to it.
6. Adhere the sentiment banner to the top, then add a resin & flower accent to it.
7. Layer the flowers to the right side as shown.
8. Stamp an umbrella to white cardstock, cut out and accent with jewels.
9. Tuck & adhere into the flowers to finish.
Challenges:
-Retro Sketches #58 - Sketch
-The Shabby Tea Room #161 - Shabby Spring
-Alota Rubber Stamps #104 - Dress to Impress
-DL Art #106 - Spring
-V's Sweet Ideas #10 - Anything Goes

Don't you just LOVE that quote? I've had this Glitz stamp set forever, and never found a reason to use this sentiment. Shame on me...it is PERFECT for spring! So glad that I broke it out and used it!
Well, that is all I have to share with you today! I will definitely have more to share this week as I get back into crafting mode! I hope you have a wonderful rest of your Monday!
Until later,
~L.
I got a little teary eyed typing that...wow. Anyways....now that I am home, it is time to get back into the swing of things! I am a little tardy on my card for my guest design spot at The Shabby Tea Room this month, but Debbie graciously allowed me to be late due to my vacation & crazy travel day home. The inspiration photo this week is gorgeous, full of flowers & beautiful colors. Here is what I created for it!
1. Make A2 card from white cardstock.
2. Cut grey floral paper slightly smaller & adhere.
3. Cut a block of grey dotted paper and adhere to the left side.
4. Cut a floral block, and layer together with a bracket sticker to the dotted paper.
5. Cut a banner edge to a vellum strip, then stamp & heat emboss the sentiment to it.
6. Adhere the sentiment banner to the top, then add a resin & flower accent to it.
7. Layer the flowers to the right side as shown.
8. Stamp an umbrella to white cardstock, cut out and accent with jewels.
9. Tuck & adhere into the flowers to finish.
Challenges:
-Retro Sketches #58 - Sketch
-The Shabby Tea Room #161 - Shabby Spring
-Alota Rubber Stamps #104 - Dress to Impress
-DL Art #106 - Spring
-V's Sweet Ideas #10 - Anything Goes
Don't you just LOVE that quote? I've had this Glitz stamp set forever, and never found a reason to use this sentiment. Shame on me...it is PERFECT for spring! So glad that I broke it out and used it!
Well, that is all I have to share with you today! I will definitely have more to share this week as I get back into crafting mode! I hope you have a wonderful rest of your Monday!
Until later,
~L.

I created this fabulous card featuring the new Maggie Holmes line from Crate Paper! I combined this fabulous collection with Mama Elephant's "Hello" stamp set...and LOVE how it turned out! It may just be the photographer in me....but I am in LOVE with the bokeh papers that manufacturers are coming out with these days!!

Do you want to play along with the sketch challenge this month? Of course you do!! Here's how to play:
- Create a project using the sketch
- You must use a Mama Elephant stamp and/or the free digital stamp
- Post the challenge graphics on your blog post
- Link back to this Mama Elephant blog post
- You may enter as many times as you wish
- Deadline to enter is March 14, 2013 at 12:00PM EST
There will be TWO winners who will receive TWO stamp sets from our
upcoming April release. How awesome is that!! We can't wait to see
what you create using the sketch and some Mama Elephant stamps or
digital stamps!!
I hope you enjoyed my card today!! Have a wonderful rest of your day!
Until later,
~L.
Subscribe to:
Posts (Atom)


Social Icons