

Okay...I am completely smitten with this collection. Smitten...I tell you. If it hadn't already been 2am when I was finishing up my projects for CHA...I would have kept on going. But, I figured I was probably getting a bit too tired and risking ruining a project...so I decided to stop. But there will definitely be a lot more Hoopla projects in my future...LOVE this line!
Here are the cards that I did with it! The second card with the circle glitzers was inspired by a card that Glitz DT member Kay Sibley did awhile back. Thanks for the inspiration Kay!!:


 Make sure that you head over to the Glitz blog, because we are giving away a Hoopla collection to one lucky winner! The winner will be drawn at midnight...so hurry on over to the blog!
Until later,
~Lea L.
Here are the cards that I did with it! The second card with the circle glitzers was inspired by a card that Glitz DT member Kay Sibley did awhile back. Thanks for the inspiration Kay!!:


And here is the peek at this line in its entirety:

Until later,
~Lea L.

Today I have cards to share with you that feature another new line by Glitz called Love Nest. This line is so perfectly Shabby Chic....it is fabulous!!
 Here is a peek at the entire collection:
 Isn't it fabulous!! Be sure to check out the Glitz blog today, because we are giving away this collection! But hurry...the winner will be picked at midnight!!
Until later,
~Lea L.


Until later,
~Lea L.

Hi everyone! I know...two posts right in a row on the same day! I have had so much to share in the past few days, that this is the only way I could think to do it! Anyways...today I have cards to share with you featuring one of the newest collections by Glitz Designs called Scarlett. So, let's get right to it!! Here are the cards!


 I just love the vivid colors mixed with black, and the vintage feel of it!! Here is a peek at the full line:
 We are also doing some giveaways this week on the blog!! Up first is the giveaway of the Scarlett collection! Go to THIS post on the Glitz blog...check out all the fabulous projects...and let us know what you like best about the Scarlett collection. But hurry....we will be picking the winner tonight at MIDNIGHT!!
Until later,
~Lea L.


Until later,
~Lea L.

Hi everyone!! I have this week's Curtain Call Color challenge for you, courtesy of Stacey's Stamping Stage blog! Here are the colors for the week:
And this is what I came up with for the week:


"Best Wishes" supplies:
Cardstock: Bazzill Basics
Stamps: Papertrey Ink (Just The Ticket) & Kitchen Sink (Plaid Plus)
Ink: Clearsnap (Pigment: turquise, scarlet, lime) & Tsukineko (Versafine: onyx black)
Jewels: Doodlebug Designs
Pen: Zig Millenium
Corner Rounder: EK Success
Instructions: Fold white cardstock in half to make cardbase, and round the bottom corners. Stamp the tickets, stars and sentiment to the front of the card. Add three jewels to the bottom middle of the card. Pen a black line around the card, meeting at the jewels.
Be sure to check out what the rest of the gals came up with this week! ♥♥♥

The month of July is when America celebrates its independence. But, we wouldn't have that independence without the sacrifice of our armed forces, and their families. For this month's technique post, I chose to focus on cards that honor those in our military.
The technique that I am sharing with you is by no means a new one, but one that maybe you haven't visited in awhile. I seem to forget how much texture and detail sanding can add to a project, and paired with the beautiful texture of GCD Studios papers....it is a sure winner.
The supply list is pretty basic. All you need is some sandpaper, your patterned paper block, and an old surface that you don't mind getting scratched up.
When I sand paper block, I start by sanding the edges first. It brings out that nice white core to the paper, and adds a great border to the paper block.
 I don't normally sand inside of the paper block....but GCD Studios paper just screams for it to be done. Check out how much texture and detail the sanding brings out of the paper block:
 And here is a little side by side comparison to some unsanded GCD Studios paper. They are both gorgeous....
 And here are the two cards that I came up with. My first card was meant for sending to wherever your soldier might be located. I read somewhere online that you don't want to ever send cards that have glitter on them to a soldier, because glitter makes them visible at night if it gets on them at all. So, I made sure that I didn't use any type of paper with glitter on it. I also made the card very flat, so it would be easier to send, and wouldn't possibly cause any mail problems. Look at how much texture the sanding gives the card, even with the card being so flat in nature.
 This next card is meant to give to your soldier once they get home. This one is chalk full of glittery paper, jewels, dimension, sanding, texture....you name it. Soldiers coming home deserve all the decoration in the world....so why shouldn't their welcome home card be the same?
 All of the papers on these cards are from the Independence collection by GCD Studios. This is a completely fabulous paper set, and works with so many different themes....but especially patriotic themes. They are a perfect addition to your scrapbooking paper collection!
Thanks for honoring our soldiers with me this month!
Until later,
~Lea
The technique that I am sharing with you is by no means a new one, but one that maybe you haven't visited in awhile. I seem to forget how much texture and detail sanding can add to a project, and paired with the beautiful texture of GCD Studios papers....it is a sure winner.
The supply list is pretty basic. All you need is some sandpaper, your patterned paper block, and an old surface that you don't mind getting scratched up.


Thanks for honoring our soldiers with me this month!
Until later,
~Lea

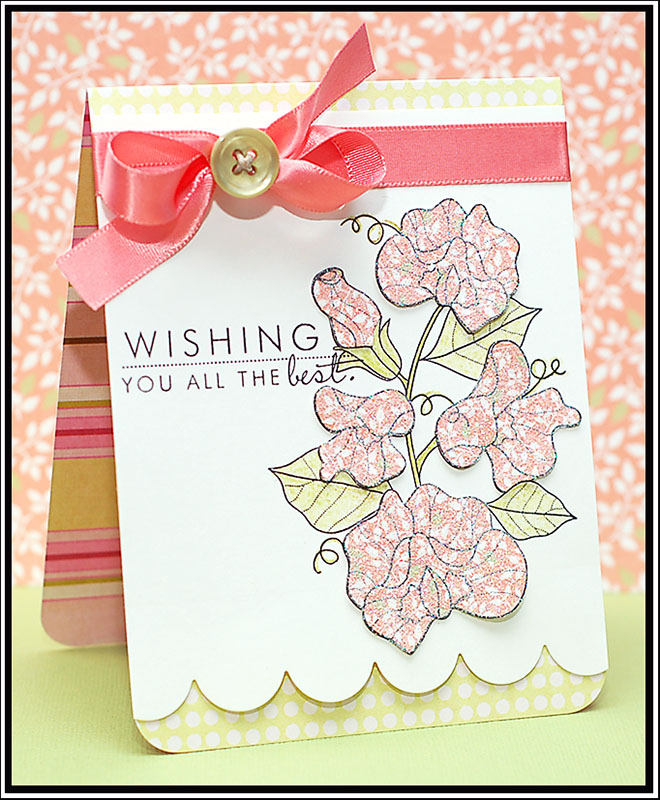
I was very excited this week when I received an email from Natasha at the Clean & Simple blog, asking me to take part in their 100th Sketch celebration! I love that sketch site, and I use the sketches often for the cards on my blog. Here is the card that I came up with for the 100th sketch!!
I hope that you have a wonderful Friday evening, and weekend!
Until later,
~Lea
"Wishing You All the Best" supplies:
Cardstock: The Paper Company
Paper: K & Company and Papertrey Ink
Stamp/Ribbon/Button/Die: Papertrey Ink (YOF: Sweet Peas set)
Ink: Tsukineko (Versafine: onyx black)
Twine: Darice Inc.
Glitter: DecoArt
Colored Pencil: Heidi Swapp
Corner Rounder: EK Success
Diecut Machine: Cuttlebug by Provo Craft
Instructions: Fold green dotted paper in half to make card base, and round the bottom corners. Cut a scalloped border to a cream cardstock block using a Cuttlebug and medium scallop die. Stamp the floral image directly to the cardstock block, color in the greenery, and then stamp the sentiment to the front. Stamp the floral image to pink patterned paper, and cut out just the flowers. Glitter them, and piece them on top of the existing stamped image. Adhere the entire block to the front of the card base. Tie ribbon across the top, and add a button to the middle of the bow using twine.
For the celebration, the Clean & Simple blog is doing a blog hop with some amazing card designers!!! Here is the list, starting at the Clean & Simple blog. If you came to my blog for other purposes, I would love for you to check out the blog hop! It is sure to be amazing!! Here you go, and have lots of fun! ♥♥♥
For the celebration, the Clean & Simple blog is doing a blog hop with some amazing card designers!!! Here is the list, starting at the Clean & Simple blog. If you came to my blog for other purposes, I would love for you to check out the blog hop! It is sure to be amazing!! Here you go, and have lots of fun! ♥♥♥
Clean & Simple- http://cleanandsimplestamping.blogspot.com/
Angie Tieman- http://schwooo.blogspot.com/
Becky Carafa- http://www.lakeshorestamper.com/
Harriet Skelly- http://allycatcards.blogspot.com/
Heather Pulvirenti- http://heatherpulvirenti.blogspot.com/
Iwona Palamountain- http://ipalamountain.blogspot.com/
Jen Carter- http://jensinkspot.blogspot.com/
Julie Ebersole- http://papertrufflez.typepad.com/
Julie Lacey- http://stampsandtaxes.blogspot.com/
Kelly Jo- http://kjsstamppad.blogspot.com/
Lea Lawson- http://leascupcakesandsunshine.blogspot.com/ (that's me!)
Natasha Trupp- http://palmtreesandpogosticks.blogspot.com/
Silke Ledlow- http://silkeledlow.blogspot.com/
Susan Raihala- http://simplicitybylateblossom.blogspot.com/
Until later,
~Lea

This is such a beautiful color combination....perfectly complimenting each other. The OTWC #16 challenge happens to be these colors...so I decided to make a few cards for it. I also did them with the "Classy & Elegant" Moxie Fab challenge in mind.
My first card features this beautiful chandelier stamp. And while the colors are non-traditional, this would make a beautiful Valentine for someone special. I think it would also be great for anniversaries, weddings, and any love occasion you can think of.


My first card features this beautiful chandelier stamp. And while the colors are non-traditional, this would make a beautiful Valentine for someone special. I think it would also be great for anniversaries, weddings, and any love occasion you can think of.

"Be Mine...Always & Forever" supplies:
Cardstock: Bazzill Basics
Paper: My Mind's Eye
Stamps: Gina K Designs (Fine Furnishings set)
Ink: Clearsnap (Pigment: antique pewter)
Rub-ons: Basic Grey (be mine) & Creative Imaginations (always & forever)
Ribbon: Renaissance by Design
Flowers: Zva Creative
Pearls: Kaiser Craft
Border Punch: Fiskars
Instructions: Fold gray cardstock in half to make card base. Adhere rub-on sentiments to the bottom of a white cardstock block. Stamp the chandelier to the middle of the white cardstock block, and accent with pink pearls. Adhere a bow to the top of the chandelier, and accent the middle with white paper flowers. Punch two border strips from pink dotted paper, and adhere to each side of the white cardstock block. Adhere the entire block to the front of the gray card base using dimensional adhesive.
I am not sure if it is because I have either photographed or attended some weddings recently, but I have been in a wedding card making mood lately! Love must just be in the air, or something. Tee hee!

"I Do" supplies:
Cardstock: Bazzill Basics
Stamps: Renaissance by Design (Darling Damask set)
Ink: Tsukineko (Chalk: pixie dust)
Ribbon: Michael's brand
Flowers: Recollections
Pearls: Kaiser Craft
Corner Rounder: EK Success
Diecut Machine: Cricut Expression by Provo Craft
Diecut Cartridge: Tie The Knot by Provo Craft
Instructions: Fold pink cardstock in half to make card base, and round the bottom corners. Round the bottom corners of a white cardstock block, and stamp a damask pattern to the front of it. Tie ribbon around the top, and accent the middle of the bow with paper flowers. Adhere the white cardstock block to the front of the card. Cut the tag at 2 1/4" using the Cricut Expression and Tie The Knot cartridge. Cover the back of the tag with pink cardstock, and adhere it to the front of the card, tucking the top part underneath the bow. Accent the three damasks underneath the tag with pearls.
This card could be used for so many different purposes. It would make a wonderful graduation card for a young woman graduating from any type of school. It would be great for someone who recently got a new job or a promotion. It could also just serve as an encouragement card for someone. So many great reasons to send a card with a sentiment like this!

"Success & Dreams Come True" supplies:
Cardstock: Bazzill Basics
Paper: My Mind's Eye
Stamps: Papertrey Ink (A Little Argyle & For The Graduate sets)
Ink: Tsukineko (Chalk: pixie dust) & Clearsnap (Pigment: antique pewter)
Ribbon: Webster's Pages (bloomers)
Pearls: Kaiser Craft
Corner Rounder: EK Success
Instructions: Fold gray cardstock in half to make card base, and round the bottom corners. Stamp an argyle pattern to a white cardstock block. Cover the top and bottom with pink dotted paper, and round the bottom corners. Adhere bloomers ribbon right above the argyle pattern, and adhere the entire block to the front of the card. Stamp the sentiment above the bloomers, and then accent the card with pink & silver pearls.
This is the lovely inspiration photo that was posted on the OTWC blog. Hmmm...maybe that is part of where I got the wedding inspiration. Tee hee!

This is the lovely inspiration photo that was posted on the OTWC blog. Hmmm...maybe that is part of where I got the wedding inspiration. Tee hee!

How about a movie post? I haven't done one of those in a little while! Here is what we have watched recently:

REALLY loved Invictus. And even though I am going to Kenya, and not South Africa....it made me even more excited for the mission trip. Very inspiring and amazing movie. Valentine's Day was HILARIOUS. We both laughed so much...especially at the Taylor/Taylor scenes. They made the whole movie. And When in Rome was okay. Not my favorite movie of all time, but cute enough. I won't ever watch it again....but it was cute enough to watch once.
Well, there you have it. Cards and movie info...hope that you have enjoyed the post!
Until later,
~Lea

Happy Tuesday morning, everyone!! I hope that your day is going well so far! I am joining in on the Taylored Expression "Blast from the Past" blog hop fun this month...and I loved breaking out TE stamps for it!! I am also entering it into the "Shabby & Vintage" Moxie Fab challenge! So....let's get right to it!! Here is my card for the hop!


"Time for Tea" supplies:
Stamps: Taylored Expressions (CreativiTEA set)
Ink: Clearsnap (Pigment: chestnut & Chalk: ice blue)
Cardstock: The Paper Company
Paper: My Mind's Eye
Paper Frill: Doodlebug Designs
Ribbon: Renaissance by Design
Lace: vintage craft supply
Flowers: Prima
Pearls: Kaiser Craft
Diecut Machine: Cricut Expression by Provo Craft
Diecut Cartridge: Storybook by Provo Craft
Instructions: Fold cream cardstock in half to make card base. Adhere a block of blue flocked dot paper to the front of the card. Add a blue paper frill to a brown damask paper block, and adhere to the left side of the card. Layer lace and ribbon over top of the seam on that paper block. Cut the scalloped circle at 2 1/2" inches from patterned paper using the Cricut Expression and the Storybook cartridge. Adhere it to the lower right corner of the card. Tie a bow from brown dotted ribbon, and adhere to the upper right part of the scalloped circle. Cut a circle at 2" from cream cardstock and ink the edges. Stamp the sentiment to the bottom and adhere to the middle of the scalloped circle using dimensional adhesive. Stamp the teapot to cream cardstock and cut out. Adhere the teapot off center to the sentiment circle, and accent with pearls. Add two cream paper flowers to the middle of the bow.
We were given a sketch by Sankari Wegman that we could use if we wanted to...and you all know me! I love a good sketch...so of course, I used it. Here is the sketch so you can try it out if you like!!

And don't forget to check out the rest of the "Blast from the Past" blog hop creations as well...it is sure to be a treat!! ♥♥♥
I hope that you have a really wonderful day!!
Until later,
~Lea

Well, it isn't Sunday...but I am bringing my color challenge card to you on Monday instead! I just had a super busy weekend...I mean, SUPER BUSY, and was behind on pretty much everything craft related. So, here is the color challenge courtesy of Stacey's Stamping Stage blog.
Love the fabulous earth tones that Stacey chose for this week!! I also used Clean & Simple Sketch 99 for my card....which was perfect for the stamping that I wanted to do!! Here is my card!

Instructions: Fold kraft cardstock in half to make card base, and round the right side corners. Round the right side corners of a white paper block, and adhere a strip of ribbon to the left side. Stamp the tree layers and sentiment to it, and accent with green pearls. Adhere the white paper block to the front of the kraft card using dimensional adhesive.
Don't forget to check out what the other gals came up with this week!! ♥♥♥

 My busy weekend was all about Casey, and football! He played in the East West Shrine game in Butte, which is an all-star game that chooses the best of the best players from all classes and benefits Shriner's hospitals. We had the banquet on Friday night, a parade on Saturday morning, and the game on Saturday night. He played on the West team, and they won 34-18! Casey was put at a wide receiver spot, and he played a little on special teams. He was only thrown the ball once, and it was in the 4th quarter. But let me tell you...the kid capitalized on that one pass....and he ran it down field for a 91 yard touchdown!!! Which also broke a Shrine game record...so his name will be in the record books as well. SO proud of him! His recruiting coach from Carroll happened to be at the same end of the field that Casey scored, so we were very excited that he was able to see it! Casey had an amazing week with players from all over the state in all of the different classes (Class C-Class AA). And a lot of money was raised for the Shrine Children hospitals. It was a really great weekend!
I hope your weekend was as great as mine! I will be back tomorrow for Taylored Expression's Blast From the Past blog hop! I hope you will come back and check it out!!
Until later,
~Lea L.


"Eternal Summer..." supplies:
Cardstock: The Paper Company
Stamps: Renaissance By Design (Roots & Wings, Roots & Wings add-on) & Papertrey Ink (Through The Trees)
Ink: Clearsnap (Pigment: chestnut, fresh green, dune & Chalk: ice jade)
Ribbon: Renaissance by Design
Pearls: Kaiser Craft
Corner Rounder: EK Success
Instructions: Fold kraft cardstock in half to make card base, and round the right side corners. Round the right side corners of a white paper block, and adhere a strip of ribbon to the left side. Stamp the tree layers and sentiment to it, and accent with green pearls. Adhere the white paper block to the front of the kraft card using dimensional adhesive.
Don't forget to check out what the other gals came up with this week!! ♥♥♥


I hope your weekend was as great as mine! I will be back tomorrow for Taylored Expression's Blast From the Past blog hop! I hope you will come back and check it out!!
Until later,
~Lea L.

Yep- I have some more cards for the Moxie Fab card style week. So, let's get right to it!
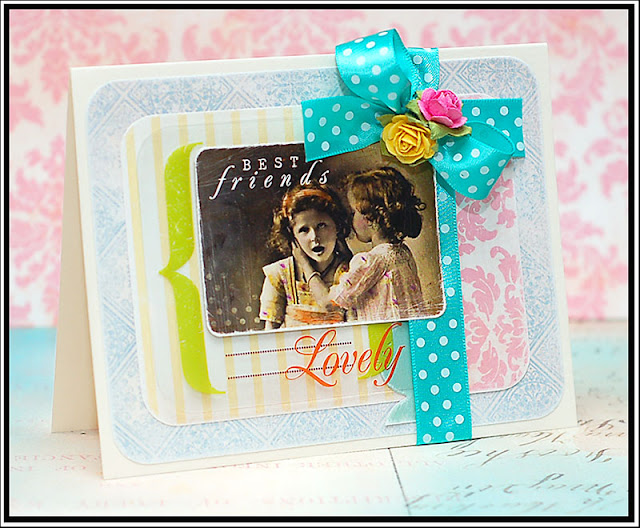
These next two cards are for the "Shabby & Vintage" Style Challenge at Moxie Fab. This first one is also my card for CPS Sketch 175 this week! Here is how Cath describes shabby & vintage...which is definitely NOT my strong style. It is characterized by layering. It is soft, utilizing ribbon, lace and techniques like inking and distressing. I will admit...both of my cards are probably considered a "clean" version of the shabby style.


These next two cards are for the "Shabby & Vintage" Style Challenge at Moxie Fab. This first one is also my card for CPS Sketch 175 this week! Here is how Cath describes shabby & vintage...which is definitely NOT my strong style. It is characterized by layering. It is soft, utilizing ribbon, lace and techniques like inking and distressing. I will admit...both of my cards are probably considered a "clean" version of the shabby style.


"Remembering" supplies:
Cardstock: Prism
Paper/Chipboard: Prima
Paper Frill: Doodlebug Designs
Flowers: Prima
Ribbon: Renaissance by Design
Jewels: Glitz Designs
Glitter: DecoArt
Ink: Ranger Distress ink
Corner Rounder: EK Success
Paper/Chipboard: Prima
Paper Frill: Doodlebug Designs
Flowers: Prima
Ribbon: Renaissance by Design
Jewels: Glitz Designs
Glitter: DecoArt
Ink: Ranger Distress ink
Corner Rounder: EK Success
Instructions: Fold cream cardstock in half to make card base, and round the bottom corners. Round the bottom corners of an aqua dot paper block, and adhere to the front of the card. Ink a white strip of tiny scalloped paper flair, and adhere to the bottom of a pink paper strip. Adhere the entire strip to the lower section of the card. Layer two pieces of glittered chipboard to the left side of the paper strip, and accent with a jewel flourish. Glitter an aqua flower and adhere to the top of the chipboard accent. Add a strip of ribbon and bow to the top of the flower, and accent with two paper roses.
This next card is still for the Shabby & Vintage style challenge, and it also uses Paulina's sketch for the Practicing Creativity Sketch Challenge.

"Enjoy Life" supplies:
Cardstock: Bazzill Basics
Paper: Prima & My Mind's Eye
Stamps/Ribbon: Renaissance by Design (Enjoy Life, Darling Damask sets)
Ink: Tsukineko (Chalk: pixie dust)
Flowers: Prima
Button: craft supply
Pearls: Kaiser Craft
Twine: Darice Inc.
Corner Rounder: EK Success
Border Punch: Fiskars
Diecut Machine: Cricut Expression by Provo Craft
Diecut Cartridge: Storybook by Provo Craft
Instructions: Fold white cardstock in half to make cardbase, and round the bottom corners. Punch a border to pink houndstooth paper, and adhere to the top of an aqua dotted paper block. Adhere the entire block to the front of the card. Tie ribbon around the seam, and adhere a button to the bow using twine. Stamp the damasks directly below the paper block, and accent with pearls. Cut the scalloped oval at 2 1/2" from pink dotted paper using the Cricut Expression and Storybook cartridge. Adhere the scalloped oval to the upper right corner of the card. Cut the regular oval at 2" from white cardstock. Stamp the butterfly sentiment to it, and accent the left wing with pearls. Adhere the oval on top of the scalloped one using dimensional adhesive. Accent the leftover white space on the stamped oval with three paper flowers.
These next two cards were done for the "Classy & Elegant" Style Challenge at Moxie Fab. This first one is also based on Alice's sketch for the Practicing Creativity Sketch Challenge. Here is Cath's description for Class & Elegant. A shiny finish, sparkling embellishments, a rich color scheme, and sophisticated sentiment treatments are all part of the classy and elegant pedigree. Its look is regal, stunning, and dashing. And while its lines are clean, sweeping, and dramatic, it can also incorporate monochromatic color schemes with layered textures that awe and impress equally as well.

"On Your Wedding Day" supplies:
Cardstock: Bazzill Basics
Paper: Crafty Secrets & My Mind's Eye
Stamps/Ribbon: Papertrey Ink (YOF: Roses set)
Ink: Clearsnap (Pigment: raven black, evergreen, magenta)
Lace: Making Memories
Jewels: Kaiser Craft
Glitter: DecoArt
Colored Pencil: Heidi Swapp
Corner Rounder: EK Success
Border Punch: Fiskars
Diecut Machine: Cricut Expression by Provo Craft
Diecut Cartridge: Storybook by Provo Craft
Instructions: Fold cream cardstock in half to make card base, and round the bottom corners. Punch a border to a pink dot paper strip, and adhere to the top of a black diamond paper block. Adhere black lace around the seam. Round the bottom corners of the block and adhere to the lower part of the card. Cut the black cardstock label at 4" using the Cricut Expression and Storybook cartridge. Cut the cream cardstock label at 3 3/4" and adhere on top of the black layer. Stamp the rose and sentiment to the cream label, and color in the rose stem. Stamp the rose to pink dotted paper, cut it out and cover in glitter. Piece the cut rose to the stamped rose on the cream label, and accent with jewels. Adhere the entire stamped label to the right side of the card using dimensional adhesive. Tie a bow from green ribbon, and adhere right below the sentiment.
This last card is still for the Classy & Elegant style, and it also uses the Waltzingmouse sketch #5...the second time using that sketch this week. It is a goodie! We had a wedding to attend last night, and this is the card that I made to go with their gift. It matched the wrapping paper perfectly....tee hee! Love it!

"On Your Wedding Day" supplies:
Cardstock: The Paper Company
Paper: My Mind's Eye
Stamps: Gina K Designs (Lovely Labels set) & Papertrey Ink (YOF: Roses set)
Ink: Clearsnap (Pigment: raven black, amber satin, moss green, magenta)
Pearls: Kaiser Craft
Glitter: Deco Art
Colored Pencil: Heidi Swapp
Embossing Machine: ScorPal
Instructions: Fold cream cardstock in half to make card base. Dry emboss two lines to the bottom of the card using a Scorpal. Stamp the label to the front of the card, and them stamp the roses on top of the label. Color in the stem of the roses with a colored pencil. Stamp two roses to pink dotted paper and cut out. Cover them both in glitter, and then piece on top of the stamped roses. Accent the roses and the lower right corner with pearls.
Those are all the cards I have to share with you today!! I hope you enjoyed them...I know I posted quite a few. And this is where my post ends today, as I have some things I need to go and get done!! Have a good one! ♥♥♥
Until later,
~Lea
~Lea

....going on at my blog today!! Moxie Fab is touting the new Style issue this week. I am not part of the issue this time around, but I can't wait to check it out!! It already looks like there is a TON of inspiration in it!! So, let's get started!!
My first card is based on the "Fun & Cute" Style Challenge at the Moxie Fab blog. It also uses Courtney Baker's sketch at her Practicing Creativity blog. So, let's see....the fun & cute checklist. Happy color scheme...yep! A sweet sentiment...well, I think so! Uncomplicated design....check (even though there are quite a few patterns...it is just a couple of layers.) Throw in some whimsy, simple shapes & friendly patterns....got it!! I think this fits the criteria pretty well...tee hee!

My first card is based on the "Fun & Cute" Style Challenge at the Moxie Fab blog. It also uses Courtney Baker's sketch at her Practicing Creativity blog. So, let's see....the fun & cute checklist. Happy color scheme...yep! A sweet sentiment...well, I think so! Uncomplicated design....check (even though there are quite a few patterns...it is just a couple of layers.) Throw in some whimsy, simple shapes & friendly patterns....got it!! I think this fits the criteria pretty well...tee hee!

"Cute as a Button": supplies:
Cardstock: Bazzill Basics
Paper: October Afternoon
Stamps: Lawn Fawn (Sew Lovely set)
Ink: Clearsnap (Pigment: chestnut, cranberry, aqua)
Ribbon: Renaissance by Design
Twine: Darice Inc.
Button: Papertrey Ink
Button: Papertrey Ink
Jewels: Kaiser Craft
Diecut Machine: Cricut Expression by Provo Craft
Diecut Cartridge: Storybook by Provo Craft
Instructions: Adhere a block of striped paper to a block of brown dotted paper. Adhere a block of red star paper to the main block, and zig-zag stitch along the top and bottom seams. Adhere the entire block to the front of a white cardbase. Cut the scalloped square at 3" from kraft cardstock using the Cricut Expression & Storybook cartridge (make sure the real dial size option is on). Adhere the square to the front of the card. Add ribbon around the middle of the card, and adhere a button to the bow using twine. Dry emboss a square inside of a white cardstock block. Stamp the button and sentiment to the bottom of the block. Stamp the thread spools above the sentiment. Stamp the spools to patterned paper, cut out the thread portions, and piece on top of the spools on the white block. Accent the tops of the spools with jewels, and adhere the entire block to the front of the card using dimensional adhesive.
This next card is based on the "Clean & Graphic" style challenge at the Moxie Fab blog. It also uses Dana's sketch at Courtney Practicing Creativity blog. Alright...here is the checklist for Clean & Graphic cards. White space....check! Clean lines....yep! Simple treatment of text...absolutely. I let the stamp designer make the text pretty- I just covered it in ink and plopped it right on the cardstock. Here is my card:


"With Faith..." supplies:
Cardstock: Bazzill Basics
Stamps: Papertrey Ink (A Little Argyle, YOF: Violets sets)
Ink: Clearsnap (Pigment: frost white, violet, moss green)
Ribbon: Renaissance by Design
Jewels: Doodlebug Designs
Pen: Uniball Signo
Corner Rounder: EK Success
Instructions: Fold kraft cardstock in half to make card base, and round the bottom corners. Stamp the argyle pattern to the bottom of the card. Add a white penned border to the top of the card. Stamp the violet and leaves to patterned paper and cut out. Adhere them to the top right of the argyle border. Accent the middle of the violet with purple jewels. Tie ribbon on the left side at the top of the argyle border. Stamp the sentiment inside the white penned box, and accent with jewels.
This last card is just a really quick one that I threw together for the Fruity Challenge that Sarah Martina is doing at her blog. Cupcards to Go is offering up a fabulous prize to the winner, so be sure to check it out!!

"You're Berry Special" supplies:
Cardstock: Bazzill Basics
Paper: Doodlebug Designs & October Afternoon
Stamps/Ribbon: Renaissance by Design (Summer Fruit set)
Ink: Clearsnap (Pigment: lime, fresh green, cranberry) & Tsukineko (Versafine: onyx black)
Jewels/Brad: Doodlebug Designs
Corner Rounder: EK Success
Diecut Machine: Cricut Expression by Provo Craft
Diecut Cartridge: Winter Woodlands by Provo Craft
Instructions: Round the lower left corner of a berry paper strip, and adhere to the left side of the card. Punch a border strip from striped paper, and adhere to the right side of a glittered dot paper strip. Round the lower left corner of the paper block, and adhere to the front of the card. Cut the scalloped circle and its layers using the Cricut Expression and Winter Woodlands cartridge. Tie ribbon through the left side of the scalloped circle, and adhere to the front of the card. Stamp the sentiment and strawberries to the white circle layer, and accent with jewels. Stamp the lime slice to white cardstock and cut out. Add glitter, cut a slit, and attach it to the sentiment circle. Accent with a jewel, and adhere the entire circle to the top of the scalloped circle. Accent the middle of the bow with a strawberry brad.
I really like the cute sketches on Courtney's blog, and I have a couple more ideas with the other two sketches!! So, I will post those this week at some point!!
Okay, so I came upon this site today. It is called Awkward Family Pet Photos....and it is pretty hilarious. I don't mean to laugh at people, but they are pretty freaking funny. I will admit...I had a good chuckle while perusing. And I would assume a lot of them were submitted by the actual people in the photos.
And I will leave you with a photo of this beautiful Sadie...not awkward at all. Isn't she darling?!!
 She was a little grumpy with me, because I woke her up. Oh well...it was worth it! And, she got past her grumpiness pretty quickly when she got petted (is that correct?) and a treat!! :) Have a great rest of your day!! ♥♥♥
Until later,
~Lea
I really like the cute sketches on Courtney's blog, and I have a couple more ideas with the other two sketches!! So, I will post those this week at some point!!
Okay, so I came upon this site today. It is called Awkward Family Pet Photos....and it is pretty hilarious. I don't mean to laugh at people, but they are pretty freaking funny. I will admit...I had a good chuckle while perusing. And I would assume a lot of them were submitted by the actual people in the photos.
And I will leave you with a photo of this beautiful Sadie...not awkward at all. Isn't she darling?!!

Until later,
~Lea

Happy Sunday everyone!! Of course, Sunday means that I have a new color challenge to share with you courtesy of Stacey's Stamping Stage blog! Here are the colors this week:
Here is my card using these fabulous pastel colors! It is also based on Waltzingmouse Sketch #5, which is a pretty awesome sketch! Be sure to check it out!


"You're The Best" supplies:
Cardstock: Bazzill Basics
Paper: Papertrey Ink, My Mind's Eye, October Afternoon
Paper Flair: Doodlebug Designs
Stamps/Ribbon: Renaissance by Design (Blossom & Wilt, Darling Damask)
Ink: Clearsnap (Pigment: heliotrope, amber, raven black & Chalk: rose coral)
Jewels: Darice Inc.
Corner Rounder: EK Success
Border Punch: Fiskars
Instructions: Fold vanilla colored cardstock in half to make card base. Round the corners of a pink leaf paper block, and adhere to the front of the card. Punch a border to a light orange cardstock strip, and adhere a green dotted paper strip to the top of it. Adhere the strip to the bottom of the card. Round the corners of a vanilla cardstock block and stamp the frame & sentiment to the top of it. Adhere the block to the front of the card. Add green patterned paper to the bottom of the block, and an orange scalloped paper right above it. Adhere ribbon over the seam. Stamp the flowers and leaves to vanilla cardstock, and cut out. Adhere to opposite corners of the stamped frame, and accent with jewels.
Be sure to check out what the other ladies came up with too! I know it will be pure inspiration! ♥♥♥
I got a few new dresses at Target the other day! I was browsing through the clearance sections, and they had a whole rack of dresses that were 75% off. So, I started looking through the small section, and they had quite a few cute ones left! They are dresses that I will also be able to wear while I am in Africa, and get this....I got them for $5.48 each!! Such a deal. I could only find images for two of the dresses online, so here they are:
 The other dress is dark blue, black & white, with a v-neck cut and hits me a little past my knees. It is a very light cotton, and nice and flowy. The first dress up there hits me at my knees, so it will be appropriate on my trip. If it hit me the way it did on the model....there is no way I would take it with me. But, being short.....it is much longer on me. Tee hee!! I will wear tops with at least cap sleeves either underneath or over top the dresses while in Africa. We will be able to wear capris or pants while we are in the orphanage and on the mini safari....but when working in schools/churches or in the cities....we need to wear dresses or skirts. So- I am trying to get prepared while things are inexpensive!!
Well, that is everything I have to share today! I hope that you have had a fabulous weekend!! We had friends over for steaks, parmesan baked red potatoes and grilled veggies last night. We sat out on the back deck and chatted while we ate...it was so nice! Then us girls ran and got TCBY for everyone for dessert. So yummy!!
Until later,
~Lea

**Because these were posted so close to each other....scroll down to see my CPS card, and other challenge cards as well!**
Today is the 100th color challenge from Color Throwdown, and that means a chance to win LOTS of great prizes!! One of the prizes being given away is from Tami Mayberry. Here is a peek at what you can win:
The prize pack is valued at nearly $100 and includes the following:
Gina K Designs stamps by Tami Mayberry-Happy Hearts and In Stitches
CardMakers Sketchbooks-Original, Christmas and Birthday editions
To celebrate, Tami and a few friends (which includes me!!) are sharing their creations using the Happy Hearts set combined with the Color Throwdown 100th color combo.
Here is the combo for the challenge:

Here is my project!!

For even more ideas using this set be sure and visit the rest of the designers participating:
Tami Mayberry
Lea Lawson
Maren Benedict
Jeanne Strieff
Tina Gilliland
Jennie Harper
Then when you are finished hop on over to the Color Throwdown blog for details on how you can enter to win this prize as well as many others.
Until later,
~Lea
Today is the 100th color challenge from Color Throwdown, and that means a chance to win LOTS of great prizes!! One of the prizes being given away is from Tami Mayberry. Here is a peek at what you can win:

The prize pack is valued at nearly $100 and includes the following:
Gina K Designs stamps by Tami Mayberry-Happy Hearts and In Stitches
CardMakers Sketchbooks-Original, Christmas and Birthday editions
To celebrate, Tami and a few friends (which includes me!!) are sharing their creations using the Happy Hearts set combined with the Color Throwdown 100th color combo.
Here is the combo for the challenge:

Here is my project!!

For even more ideas using this set be sure and visit the rest of the designers participating:
Tami Mayberry
Lea Lawson
Maren Benedict
Jeanne Strieff
Tina Gilliland
Jennie Harper
Then when you are finished hop on over to the Color Throwdown blog for details on how you can enter to win this prize as well as many others.
Until later,
~Lea
Subscribe to:
Posts (Atom)


Social Icons