

Happy New Year's Eve everyone! Seriously...where did this year go?! It is crazy how life just seems to fly by so quickly. It feels just like yesterday that I was struggling to write the correct date, and here I am...a day away from having the same struggle again. Crazy!
This has been a wonderful year! My first year in business...which has been hard and frustrating, but amazing at the same time. I love working for myself, and I just hope that as my name gets out there that I will continue to get busier and busier. I also made my first trip overseas to Africa, and I can't wait to start sharing photos with you. I will probably share them on my photography blog, and will just link you to it. Be on the lookout for that in January!
It has been another great year in the card making world too! I have met lots of new people, and been able to work with lots of fabulous product. I was made the Glitz Design Team coordinator in the spring, and that has been so much fun! I think the Glitz blog has been looking fabulous since then, and be sure to head over there tomorrow at some point for some new Glitzy info! I have also vastly improved as a stamper, which I am very excited about!
So, today I want to share with you my VERY FAVORITE cards created this year. (Although, some of my very favorites are out for publication...so I will pick my favorites of the ones I can post. Tee hee!) These are in no particular order, other than how they are named on my computer! :)
1. I have a soft spot for the Papertrey Ink "Year of Flowers" sets, and this card is one of my favorites that I made with them.
2. This is my favorite Christmas card that I created this year. The "Wreath for All Seasons" set is one of my favorites from Papertrey Ink, and I just love the sentiment of this one.

3. It makes me sad that Renaissance by Design has since gone out of business, but I just love this card. This stamp set is one of my favorites!

4. This year, Lawn Fawn stamps also came about. They are such cute and whimsical stamps, and I am so honored to be part of their design team now! I still think one of their first sets, Sew Lovely, is my favorite....and here is one of my very favorite cards using it.

5. Rosettes became a huge trend this year, and I just love the ribbons that many of the companies came out with. These ones are Webster's bloomers, and they are just gorgeous! I also just adore this stamp set, For the Graduate, by Papertrey Ink. It is another one of my faves this year!

6. Another stamp company that I found that I just love is Taylored Expressions. This set, called CreativiTEA, is one of my very favorites that they have come out with so far.

7. Papertrey Ink came out with a super fun set this year called Friendship Jar, and have also created filler sets to go with it. This card features stamps from the Fall Fillers set, and I didn't even use the jar stamps at all. Love how this one turned out!

8. I had a thing for glittering large paper flowers this year too, and this is one of my favorites using this technique. I also just love the sentiment of it...so heartfelt and full of love.

9. While I just posted this card this week, it is probably my very favorite card as of late. Glitz Design came out with some of the most amazing collections this year, and this card mixes both the Hoopla and Love Nest collections.

10. I LOVE to make winter themed cards...not sure why since I don't actually really like winter all that much. But, this is one of my favorite Cricut cuts and I was so happy to use it on a card in such a cute way!
 Well, there you have it...my favorite cards of 2010. I can't wait to see what 2011 has in store for me, and be ready for some fun announcements this coming week! ;)
And so I leave you with this, and hope that as you ring in the new year....you know that you are fabulous! Can't wait to see what 2011 has in store for all of us! ♥♥♥

This has been a wonderful year! My first year in business...which has been hard and frustrating, but amazing at the same time. I love working for myself, and I just hope that as my name gets out there that I will continue to get busier and busier. I also made my first trip overseas to Africa, and I can't wait to start sharing photos with you. I will probably share them on my photography blog, and will just link you to it. Be on the lookout for that in January!
It has been another great year in the card making world too! I have met lots of new people, and been able to work with lots of fabulous product. I was made the Glitz Design Team coordinator in the spring, and that has been so much fun! I think the Glitz blog has been looking fabulous since then, and be sure to head over there tomorrow at some point for some new Glitzy info! I have also vastly improved as a stamper, which I am very excited about!
So, today I want to share with you my VERY FAVORITE cards created this year. (Although, some of my very favorites are out for publication...so I will pick my favorites of the ones I can post. Tee hee!) These are in no particular order, other than how they are named on my computer! :)
1. I have a soft spot for the Papertrey Ink "Year of Flowers" sets, and this card is one of my favorites that I made with them.

2. This is my favorite Christmas card that I created this year. The "Wreath for All Seasons" set is one of my favorites from Papertrey Ink, and I just love the sentiment of this one.

3. It makes me sad that Renaissance by Design has since gone out of business, but I just love this card. This stamp set is one of my favorites!
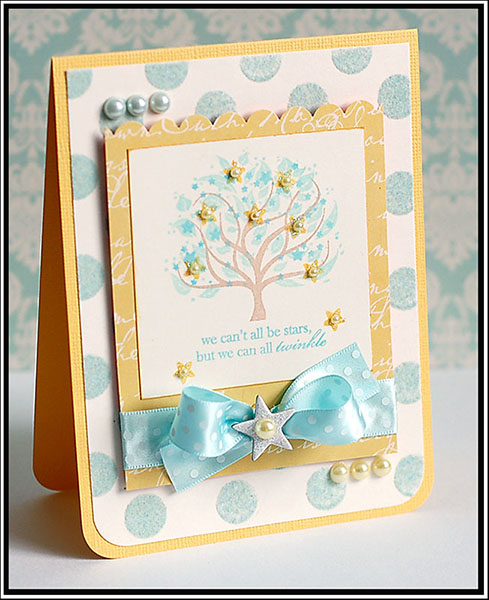
4. This year, Lawn Fawn stamps also came about. They are such cute and whimsical stamps, and I am so honored to be part of their design team now! I still think one of their first sets, Sew Lovely, is my favorite....and here is one of my very favorite cards using it.

5. Rosettes became a huge trend this year, and I just love the ribbons that many of the companies came out with. These ones are Webster's bloomers, and they are just gorgeous! I also just adore this stamp set, For the Graduate, by Papertrey Ink. It is another one of my faves this year!

6. Another stamp company that I found that I just love is Taylored Expressions. This set, called CreativiTEA, is one of my very favorites that they have come out with so far.

7. Papertrey Ink came out with a super fun set this year called Friendship Jar, and have also created filler sets to go with it. This card features stamps from the Fall Fillers set, and I didn't even use the jar stamps at all. Love how this one turned out!

8. I had a thing for glittering large paper flowers this year too, and this is one of my favorites using this technique. I also just love the sentiment of it...so heartfelt and full of love.

9. While I just posted this card this week, it is probably my very favorite card as of late. Glitz Design came out with some of the most amazing collections this year, and this card mixes both the Hoopla and Love Nest collections.

10. I LOVE to make winter themed cards...not sure why since I don't actually really like winter all that much. But, this is one of my favorite Cricut cuts and I was so happy to use it on a card in such a cute way!

And so I leave you with this, and hope that as you ring in the new year....you know that you are fabulous! Can't wait to see what 2011 has in store for all of us! ♥♥♥

As I look upon the sentiment of the card I have to share with you today, I can't help but feel that it is my sincere thanks to all my card making friends and blog readers. Over the years, this hobby and the people in it have touched my life in so many ways, and I am so thankful for that. So, as you read my post today and check out my card...know that if I could send it to each and everyone on of your mailboxes, I would. So, consider this some internet mail, just for you.
The card is also for "Year in Review" at the CPS Blog this week. We all chose a favorite sketch from this past year, and made another card for it. I chose CPS 155 for my card, but if you chose to participate (and we hope you do!), you can use any past sketch from this year. Here is a link to all of the past CPS sketches, and remember that you can use sketches 148-198 for your card to be eligible. Without further ado, here is my card:

The card is also for "Year in Review" at the CPS Blog this week. We all chose a favorite sketch from this past year, and made another card for it. I chose CPS 155 for my card, but if you chose to participate (and we hope you do!), you can use any past sketch from this year. Here is a link to all of the past CPS sketches, and remember that you can use sketches 148-198 for your card to be eligible. Without further ado, here is my card:
"Thank You for Touching my Life" supplies:
Cardstock: Bazzill Basics
Paper: Glitz Design
Vellum: The Paper Company
Stamps: Papertrey Ink (YOF: Morning Glories set)
Ink: Close To My Heart (Pigment: vanilla cream)
Ribbon: Renaissance by Design
Pearls: Prima
Glitter: DecoArt
Corner Rounder: EK Success
Diecut Machine: Cricut Expression by Provo Craft
Diecut Cartridge: Give a Hoot by Provo Craft (Butterfly cuts)
Instructions: Fold cream cardstock in half to make card base. Round the corners of an aqua paper block, and adhere to the front. Cut a strip of polka dot paper and adhere to the left side of the card. Round the corners of a pink damask paper block and adhere to the front. Stamp the sentiment in the upper right corner of the pink paper. Add ribbon over top of where the polka dot strip is, and finish with a bow. Diecut the butterfly at 2" from vellum, and at 1" from polka dot paper using the Cricut Expression & Give A Hoot cartridge. Cover the vellum butterfly in glitter, and adhere the two cuts together. Adhere the butterfly accent near the bow, and then accent with pearl flourishes.
Did you have a wonderful Christmas? Ours was nice...we spent it in Sheridan with my parents and brother. We enjoyed the Candlelight Christmas Eve service at my parents church, where we sang Christmas carols and heard from Luke Chapter 2. We opened up our Christmas PJ's on Christmas Eve, and ate a TON of food. We woke on Christmas morning and had some coffee first off. Then waited for Casey to get out of bed, and finally just made him get up. We then opened our stockings all at once, and then our gifts one by one. After opening up all the gifts, we decided a Christmas soak in the hot tub would be nice...and it was definitely that. My parent's church decided it would be a nice gesture to make a traditional Christmas meal in bulk, and deliver meals to those who either had to work on Christmas day or to those that just wouldn't get a Christmas meal without them. We packed our car up, and then went and ate with those that were serving. After that we drove on home, because Josh had to be at work at 3am the next morning. Gotta love the joys of working in retail.
My blogging should be back to normal in January, posting regularly and all that. Thank you for continuing to read my blog, even as sparse as it has been.
And I will leave you with a movie post. I watched these two movies recently:

I watched Slumdog Millionaire on the advice of a friend of mine, and it was wonderful. Such a good movie. The Last Song was sweet and then sad...and a bit typical. But, I enjoyed it for the most part. Definitely a watch only once movie, so I am glad it was a Netflix rental. Might have to buy Slumdog Millionaire at some point...I really enjoyed it. My favorite part...probably the credits. Tee hee! If you've seen it, you will know what I mean. If you haven't seen in...you will just have to watch it to know why. (I really loved the entire movie...but that was definitely my fave part.)
Well, I better get going for now. Hope you have fun ringing in the New Year! ♥♥♥
Until later,
~Lea L.
~Lea L.

Happy Tuesday everyone! Well....yesterday I went out and finished all the Christmas shopping that needed to get done. So, that is a big old check. Today I have a lot of baking and cleaning to do, and then we have friends coming over for dinner. So- that should be fun. Oh- and I have to make a run to the post office. Joy.
Today I have my card for CPS 198 to share with you. Sigh...don't you just love the soft and gorgeous colors on this one. It makes me melt a little on the inside....:)
Today I have my card for CPS 198 to share with you. Sigh...don't you just love the soft and gorgeous colors on this one. It makes me melt a little on the inside....:)
"Welcome Home" supplies:
Cardstock: Bazzill Basics
Paper: My Mind's Eye
Stamps: Papertrey Ink (Wreath for all Seasons set)
Ink: Clearsnap (Pigment: old rose, cranberry, dune) & Ranger Industries (Distress Ink: antique linen)
Twine: Darice Inc.
Jewels: Westrim Crafts
Pearls: Kaiser Craft
Pencil
Paper: My Mind's Eye
Stamps: Papertrey Ink (Wreath for all Seasons set)
Ink: Clearsnap (Pigment: old rose, cranberry, dune) & Ranger Industries (Distress Ink: antique linen)
Twine: Darice Inc.
Jewels: Westrim Crafts
Pearls: Kaiser Craft
Pencil
Instructions: Fold pink cardstock in half to make card base. Cut and adhere a block of heart patterned paper to the front of it. Ink the edges of a cream cardstock block, and stamp the wreath and sentiment to the middle of it. Draw a pencil lined edge inside of the stamped block, and accent the lower right corner with three jewels. Accent the stamped wreath with pearls, and add a twine bow & heart jewel.
I did want to thank everyone for continuing to stop by my blog, and leave me comments when I do get a chance to post. I know that I have been completely out of the blog world since a bit before my trip to Kenya, but I promise I will catch up and get back in the swing of things once Christmas is over. I hope that the hustle and bustle of the holidays have been a blessing for each and every one of you!! ♥♥♥
Until later,
~Lea L.

Happy Monday everyone! I just realized that I hadn't scheduled my CPS card from last week to post, and wanted to share it with you today. I love this card....it is one of my most recent favorites!
Like I said, this card is for CPS Sketch 197. I tend to change the long and skinny sketches to a normal sized card, but I am so happy that I didn't this time. I just love how it turned out, and the long and skinny look of it just makes it for me.
Like I said, this card is for CPS Sketch 197. I tend to change the long and skinny sketches to a normal sized card, but I am so happy that I didn't this time. I just love how it turned out, and the long and skinny look of it just makes it for me.
"Warmest Winter Wishes" supplies:
ardstock: Bazzill Basics
Paper/Diecut: Doodlebug Designs
Stamps/Button/Steel Die: Papertrey Ink (On Ice set)
Ink: Clearsnap (Pigment: sky gray, cranberry, aqua)
Ribbon: Renaissance by Design
Twine/Puff Balls: Darice Inc.
Diecut Machine: Cuttlebug by Provo Craft
Paper/Diecut: Doodlebug Designs
Stamps/Button/Steel Die: Papertrey Ink (On Ice set)
Ink: Clearsnap (Pigment: sky gray, cranberry, aqua)
Ribbon: Renaissance by Design
Twine/Puff Balls: Darice Inc.
Diecut Machine: Cuttlebug by Provo Craft
Instructions: Fold red cardstock in half to make card base. Trim scalloped edge paper, and adhere to the front. Add a strip of ribbon around the top of a diecut tag, and adhere to the front of the card. Diecut the ice skates, stamp them, and adhere to the right side of the ribbon. Tie a button around the middle of a bow using twine, and adhere the bow above the skates so it looks like they are hanging. Stamp the sentiment in the white space available on the tag, and accent the skates with red glitter puff balls.
Well, I better get going for now. I promise that I will share photos and stories from Kenya, but probably not until January. I have so much left to get done before Christmas, and then the week after Christmas...I have a lot of crafty catch up to do as well. My trip was amazing, and it changed me in so many ways. I can't wait to share it with you, but for now it has to. ♥♥*hearts;
Until later,
~Lea L.

Well, hi strangers! I am home from Kenya, but super busy right now. So, blog posts are going to be sparse through the end of the year.
Today though...I helping with the re-release of Jane Beljo's stamp set called Jane's Bakery! They are super cute clear stamps that are for sell in her Etsy Shop and at Jay Gee's Nook. The stamps are made in the U.S.A. and are of top quality photopolymer rubber. Here is my card featuring the stamps {and I also used FTL 121 from the Clean & Simple Stamping blog for it!}:
Today though...I helping with the re-release of Jane Beljo's stamp set called Jane's Bakery! They are super cute clear stamps that are for sell in her Etsy Shop and at Jay Gee's Nook. The stamps are made in the U.S.A. and are of top quality photopolymer rubber. Here is my card featuring the stamps {and I also used FTL 121 from the Clean & Simple Stamping blog for it!}:
"Happy Birthday" supplies:
Cardstock: Bazzill Basics
Paper: Basic Grey
Stamps: Jane Beljo
Ink: Clearsnap (Pigment: aqua, chestnut)
Sticker: Doodlebug Designs
Pearls: Kaiser Craft
Corner Rounder: EK Success
Circle Cutter: Creative Memories
Be sure to check out the creations of all the other gals!
Jane's {Giveaway!!}- http://janeb-myblog.blogspot.com/
Mariana- http://marianagrigsby.wordpress.com/
Hope that your holidays are going so wonderfully right now! I am so behind, it isn't even funny! I'll get there though! ♥♥♥
Until later,
~Lea
~Lea

Happy Thursday, friends!! As this posts today, I should be on the 3 day long safari that is at the end of our time in Kenya. Hopefully I will be photographing lions and giraffes and zebras and such....
Today I have my card for CPS Sketch 196 to share with you. No sponsors during the month of December, so we get to play with whatever we like!! Here is my card:
Today I have my card for CPS Sketch 196 to share with you. No sponsors during the month of December, so we get to play with whatever we like!! Here is my card:
"Sparkle & Cheer" Supplies:
Cardstock: Bazzill Basics
Paper: Basic Grey
Stamps: Taylored Expressions (Sparkle & Cheer set)
Ink: Clearsnap (Pigment: peony, turquoise) & Tsukineko (Versafine: onyx black)
Pearls: Prima
Corner Rounder: EK Success
Cardstock: Bazzill Basics
Paper: Basic Grey
Stamps: Taylored Expressions (Sparkle & Cheer set)
Ink: Clearsnap (Pigment: peony, turquoise) & Tsukineko (Versafine: onyx black)
Pearls: Prima
Corner Rounder: EK Success
Have a super happy day today! I will be back in just a few short days!!! ♥♥♥
Until later,
~Lea L.

Hi there! So, this post marks where my blog will wind down for a bit until I get home. Basically, you will only see a post each Thursday with my CPS sketch until I return.
This card is for CPS Sketch 195. We were sponsored by The {Stamps} of Life this week, and I got a couple of super cute Christmas sets to play with. Here is my card!
This card is for CPS Sketch 195. We were sponsored by The {Stamps} of Life this week, and I got a couple of super cute Christmas sets to play with. Here is my card!
"From Our Home to Yours" Supplies:
Cardstock: Bazzill Basics
Paper: GCD Studios
Stamps: The {Stamps} of Life (Holly 4 Christmas set)
Ink: Clearsnap (Pigment: lime, scarlett) & Tsukineko (Versamark, Versafine-onyx black)
Ribbon: Papertrey Ink
Button: Doodlebug Designs
Jewels: Kaiser Craft
Glitter: Ranger Stickles
Border Punch: Fiskars
Diecut Machine: Cricut Expression by Provo Craft
Diecut Cartridge: Sentimentals by Provo Craft
Sandpaper
I hope that you have a wonderful day!! I can't wait to share some of my Kenya stories with you soon! ♥♥♥
Until later,
~Lea L.

Well, today is the last day of sneak peeks for Lawn Fawn this month!! This latest set is called "Hello Friend" and it has so many amazing Friendship sentiments in it! You are going to just love it...and it will definitely be a must have!!
Here is the card I made using this new set!
Here is the card I made using this new set!
"If Friends Were Flowers..." supplies:
Cardstock: Bazzill Basics
Paper: Cosmo Cricket
Stamps/Twill: Lawn Fawn
Ink: Tsukineko (Versafine: onyx black)
Jewels: Bazzill Basics
Scalloped Die: Papertrey Ink
Diecut Machine: Cuttlebug by Provo Craft
Be sure to check out the other Lawn Fawn designers and see what they came up with as well!!
Latisha Yoast- http://crafteebee.blogspot.com/
Lynnette Kauffman- http://nettersnotables.blogspot.com/
Mariana Grigsby- http://marianagrigsby.wordpress.com/
Teri Anderson- http://terisplace.wordpress.com/
Tiffany Johnson- http://tiffguam.com/
Because I am in Kenya, I can't update all the giveaway links. So be sure to visit each post during the sneak peeks in order to be eligible for each giveaway!
Don't forget...all of these new Lawn Fawn stamps will release at midnight!! So, get to shopping and pick up your favorite Lawn Fawn stamps!! ♥♥♥
Until later,
~Lea L.

Hi there! Another day means another Lawn Fawn sneak peek!! Today we are featuring a new set called "Fly Free". This is a fairly small set, and I would daresay that I used all the stamps in it. ;)
I went with some teeny, clean & simple cards for this stamp set. I think they are so cute to hang on packages, or just set around your house in their teeny tiny size! Here are my cards:

I went with some teeny, clean & simple cards for this stamp set. I think they are so cute to hang on packages, or just set around your house in their teeny tiny size! Here are my cards:
"Fly Free" supplies:
Cardstock: Bazzill Basics
Stamps/Trim: Lawn Fawn
Ink: Clearsnap (Pigment: frost white)
Pearls: Darice Inc.
Corner Rounder: EK Success
Be sure to check out the other Lawn Fawn designers and see what they came up with as well!!
Latisha Yoast- http://crafteebee.blogspot.com/
Lynnette Kauffman- http://nettersnotables.blogspot.com/
Mariana Grigsby- http://marianagrigsby.wordpress.com/
Teri Anderson- http://terisplace.wordpress.com/
Tiffany Johnson- http://tiffguam.com/
Because I am in Kenya, I can't update all the giveaway links. So be sure to visit each post during the sneak peeks in order to be eligible for each giveaway!
Until later,
~Lea L.

Hi there! Today brings another Lawn Fawn sneak peek! Yay! Today we are sharing a new Valentine's set with you! It is super cute and full of puns...you will just love it!
Here is my card using My Silly Valentine:
Here is my card using My Silly Valentine:
"Some Bunny Loves You" supplies:
Cardstock: Bazzill Basics
Paper: My Mind's Eye
Stamps/Twine: Lawn Fawn
Ink: Tsukineko (Versafine: onyx black)
Ribbon/Button: Papertrey Ink
Puff Balls: Darice Inc.
Glitter: Ranger Stickles
Colored Pencils: Heidi Swapp
Border Punch: Stampin Up
Be sure to check out the other Lawn Fawn designers and see what they came up with as well!!
Latisha Yoast- http://crafteebee.blogspot.com/
Lynnette Kauffman- http://nettersnotables.blogspot.com/
Mariana Grigsby- http://marianagrigsby.wordpress.com/
Teri Anderson- http://terisplace.wordpress.com/
Tiffany Johnson- http://tiffguam.com/
Because I am in Kenya, I can't update all the giveaway links. So be sure to visit each post during the sneak peeks in order to be eligible for each giveaway!
Until later,
~Lea L.

I have written about this before, but the texture in GCD Studios patterned paper is to die for!! I just adore it! A lot of the techniques that I have done in the past are about this textured paper, and I have yet another one for you!! This month, I want to show you how stamping on this textured paper makes for a different and beautiful looking image! I used the new GCD Studios "Joyful Peace" collection for my cards today...and they were just perfect for the stamps!!
First up, gather the few supplies you will need. I have a piece of textured patterned paper, the stamp I want to use on a clear block, and the ink I want to use.
Ink the stamp up so it has an even, thick layer of ink on it. I choose to use Clearsnap pigment ink (chestnut) when doing this technique. This is because it doesn't dry super quickly, so you have enough time to get it on the paper. And on the textured paper...it actually does dry pretty quickly when you are done stamping. Be sure to add even, but fairly heavy pressure to the stamp when you are stamping it to the paper.
 This is what the stamping looks like when you are done. Doesn't the texture give it such an amazing look and feel? I just love it!
 After that, design and decorate your card. Here is what I came up with using this fabulous stamped image above.
 Notice that I have also stamped the sentiment onto patterned paper using Vanilla Cream pigment ink. This paper is the backside of a GCD Studios patterned paper, so there isn't as much texture.
Here is another card using the same technique!
 So, I challenge you to break out your favorite textured GCD Studios paper, and your favorite stamps...and try this technique out! It definitely works on a silhoutted image better than any other type, so try to stick with that type of stamped image. This technique also works with clear stamps, so don't feel like you need to use rubber stamps. It works wonderfully with both types!! ♥♥♥
Until later,
~Lea L.
P.S. All stamps on these cards are from the Taylored Expressions "Christmas Blessings" set.
First up, gather the few supplies you will need. I have a piece of textured patterned paper, the stamp I want to use on a clear block, and the ink I want to use.
Here is another card using the same technique!
Until later,
~Lea L.
P.S. All stamps on these cards are from the Taylored Expressions "Christmas Blessings" set.

Hi everyone!! Today starts the Lawn Fawn sneak peek, and up first is a new item that Lawn Fawn is introducing. It is called "Lawn Trimmings", and they are the cutest little packages of ribbons and trims all bundled together! They are super cute!
Here is my card using the Lawn Trimmings!
Here is my card using the Lawn Trimmings!
"Wedding Wishes" supplies:
Cardstock: The Paper Company
Paper: K & Company
Stamps/Trim: Lawn Fawn (Sophie's Sentiments set)
Ink: Clearsnap (Pigment: cranberry)
Sticker: Bo Bunny
Metal Tabs: Making Memories
Ribbon Charm: craft supply
Corner Rounder: EK Success
Scalloped Die: Papertrey Ink
Diecut Machine: Cuttlebug by Provo Craft
Be sure to check out the other Lawn Fawn designers and see what they came up with as well!!
Latisha Yoast- http://crafteebee.blogspot.com/
Lynnette Kauffman- http://nettersnotables.blogspot.com/
Mariana Grigsby- http://marianagrigsby.wordpress.com/
Teri Anderson- http://terisplace.wordpress.com/
Tiffany Johnson- http://tiffguam.com/
Because I am in Kenya, I can't update all the giveaway links. So be sure to visit each post during the sneak peeks in order to be eligible for each giveaway!
Until later,
~Lea L.

Happy black Friday, everyone! I hope that today means you also had an amazing Thanksgiving as well! Sorry I have been so sparse...just been getting ready to go to Kenya. Can you believe that my flight leaves Missoula tomorrow at 8:10am?! I am so excited, and a little nervous. But, I know it is going to be amazing.
Today I have my card for CPS Sketch 194 to share with you. We were sponsored by Kitchen Sink Stamps this week, so I broke out one of their fun sentiment sets!!
Today I have my card for CPS Sketch 194 to share with you. We were sponsored by Kitchen Sink Stamps this week, so I broke out one of their fun sentiment sets!!
"Warmest Wishes Mr. and Mrs." supplies:
Cardstock: Bazzill Basics
Paper: Glitz Design & Hambly Screen Prints
Stamps: Kitchen Sink (Never a Loss 4 Words)
Ink: Tsukineko (versamark)
Embossing Powder: Ranger Adirondack (espresso)
Ribbon: Renaissance by Design
Flowers: Recollections
Pearls: Kaiser Craft & Zva Creative
Button: Basic Grey
Corner Rounder: EK Success
Diecut Machine: Cricut Expression by Provo Craft
Diecut Cartridge: Tie the Knot by Provo craft
Well, that is all I have to share with you for now. I have a TON to get done, so this post is going to be super short and sweet! The next time you will see a card posted on this blog...I will be in Kenya doing who knows what! I will update you all on the trip when I get home! ♥♥♥
Until later,
~Lea L.

{Sigh} I just love that sentiment...even though I am not a fan of winter, I always welcome the spirit of Christmas in my life. The birth of my Savior....a time to reflect on that....a time to be with family and friends....giving & receiving...such a wonderful time of the year. I will be in Kenya for a large part of the "getting ready" holiday time...and I think it is just going to be amazing. I think it is going to put a lot of things into perspective for me. And I know that I am going to be blessed and changed beyond measure. Can you believe that I leave in less than 9 days? Wow.
Today I have my card for CPS Sketch #193. I also happened to come upon the mother load of Cricut challenges the other day...which is awesome! My card also fits the current "Cooking with Cricut" Holiday challenge.
Today I have my card for CPS Sketch #193. I also happened to come upon the mother load of Cricut challenges the other day...which is awesome! My card also fits the current "Cooking with Cricut" Holiday challenge.
"Welcome Christmas" supplies:
Cardstock: Bazzill Basics
Paper: Making Memories
Stamps: Papertrey Ink (Wreath for All Seasons)
Ink: Clearsnap (Pigment: moss green, cranberry, Tsukineko (Versafine: onyx black) & Ranger (Tim Holtz distress ink: antique linen)
Twine: Darice Inc.
Jewels: Kaiser Craft
Corner Rounder: EK Success
Diecut Machine: Cricut Expression by Provo Craft
Diecut Cartridges: Easter 2010 & Storybook by Provo Craft
Instructions: Make card from cardstock. Round the corners of a paper block and adhere. Cut the scalloped circle at 4" {with the real dial size option selected) from green cardstock using the Cricut Expression & Easter 2010 cartridge. Cut a circle from patterned paper and adhere inside the scalloped circle. Adhere the entire piece to the front of the card. Cut the label at 2.75" from cream cardstock using the Storybook cartridge. Distress ink the edges, and stamp the wreath & sentiment to it. Accent with a twine bow and jewels, and adhere to the front using dimensional adhesive.
{Cricut Tip of the Day} Never be deceived by the title of a Cricut cartridge. The Easter cartridge had the exact cut I needed to make this Christmas card come out how I wanted it. Be sure to explore all of your cartridges to see what they offer to you...especially the licensed character cartridges. They have many cuts on them that don't pertain to the actual character(s).
I don't have an image to go with my gratitude post today...but I am just thankful for this amazing crafting community that I have been part of for the past 7 years. It is awesome to think of all the people I have met, the opportunities that I have gotten, and the fun that I have had. Here is to many more years of fun!! ♥♥♥
Until later,
~Lea L.

....tee hee! While I like to think that, it is also just the title of one of my cards to share with you today! So, how have you been on this fine Tuesday? It has been gloomy and gray out all day long....so I holed up in my room drinking some hot peppermint coffee and making some cards. Mmmm....like a little bit of heaven. :)
I have been working on a lot of things in advance, trying to get ready for my trip to Kenya. But today I wanted to make a couple cards to share with you TODAY! Tee hee! It is funny how your style tends to change over the years. Today I went back to my card roots, and did up two cards that have zero stamping on them. I used to be so SCARED of stamping!! And now you would be hard pressed to find a card on my blog that doesn't have stamping of some sort on it...until today. :)
First off, both cards fit Crazy 4 Challenges #63, which is an easy one this week...to create a Christmas card. This first card also uses Twisted Cards sketch #33...which is an awesome clean & simple sketch if you are searching for one this week. Be sure to check it out!
"I Have Been Really Good This Year" supplies:
Cardstock: Bazzill Basics
Paper/Stickers/Diecut/Jewels: Doodlebug Designs
Ribbon: Renaissance by Design
Instructions: Make card from pink cardstock. Tie ribbon around a patterned paper block and adhere to the front. Embellish a white cardstock block with stickers and diecut sentiment and adhere to the front. Accent with clear jewels.
This next card uses the Mojo Monday 165 sketch. The original sketch has the middle part at an angle...but I just couldn't do it. I very rarely angle anything anyways, but it also just didn't work for my card. So- I made the sketch work for me instead...tee hee! It is a really great sketch too, so be sure to check it out!!
"No Peeking!" supplies:
Cardstock: Bazzill Basics
Paper/Stickers/Diecuts/Jewels: Doodlebug Designs
Ribbon: Michael's brand
Instructions: Make card from cardstock and adhere patterned paper to the front. Cover the bottom of a white cardstock block with glittered paper and border stickers. Tie ribbon around the bottom and adhere to the front. Accent the top of the block with the scalloped circle die, santa sticker, and three jewels.
How CUTE are those Doodlebug products that I used?! I got them in a goodie box recently, and just LOVED how cute and fun they were! I couldn't wait to use them, and today I got the chance to. I realized today that Doodlebug has been making some of my favorite products for a LONG time now. I can't live without their jewels...they are just amazing!
Today I am grateful for my photography clients, and how much they make me enjoy my job. This is from a wedding that I photographed this past September...two of my favorite detail shots.
Weddings are my absolute photography love. Senior portraits come in a very VERY close second. I am so happy that I took the jump and went to photography school. Starting a business is not an easy thing to do, especially when you live in an area saturated with photographers. But every time I am on a shoot, I am reminded of the joy that it brings me. I feel alive when I am behind that camera capturing the story of a wedding day, or the true essence of the person in front of me.
Well, I need to get going for now. I hope that you have a great night! ♥♥♥
Until later,
~Lea L.

Happy Thursday!! I hope that your week has been a wonderful one so far, and that it is even better now that we are so close to the weekend!
I have my card for CPS #192 to share with you today. CPS is being sponsored by Paper Pretties this week, and they let me pick out a cute little set to make my card with. I just LOVE the cute little bird nest, and there are a couple more sentiments that fit it perfectly in the set. This one just fit on my card better than the others! My card also uses some of the newest Glitz Design product from the Hoopla collection. LOVE it! The tulle...and new addition to Glitz this time around. Isn't it fabulous?!

I have my card for CPS #192 to share with you today. CPS is being sponsored by Paper Pretties this week, and they let me pick out a cute little set to make my card with. I just LOVE the cute little bird nest, and there are a couple more sentiments that fit it perfectly in the set. This one just fit on my card better than the others! My card also uses some of the newest Glitz Design product from the Hoopla collection. LOVE it! The tulle...and new addition to Glitz this time around. Isn't it fabulous?!
"Bless this Nest" supplies:
Cardstock: Bazzill Basics
Paper/tulle/jewels: Glitz Designs
Stamps: Paper Pretties (Everyday Miracles set)
Ink: Tsukineko (Versafine: onyx black)
Colored Pencils: craft supply
Glitter: Ranger Stickles
Diecut Machine: Cuttlebug by Provo Craft
Scalloped Border Die: Papertrey Ink
Colored Pencils: craft supply
Glitter: Ranger Stickles
Diecut Machine: Cuttlebug by Provo Craft
Scalloped Border Die: Papertrey Ink
Instructions: Make your card base from cardstock, and layer background paper to the front of it. Stamp the image and sentiment to a cream cardstock block, and color in the image with colored pencils. Cut a scalloped border from dotted paper using a Cuttlebug, and adhere to the top of the stamped block. Tie tulle around the seam, and accent the tulle bow with a large jewel. Adhere the entire block to the front of the card, and glitter the stamped eggs with Stickles.
I just love this little card....it is one of my latest faves!
In keeping up with my attitude of gratitude, today I want to share how thankful I am for my dad.
In terms of flesh and blood, he isn't my biological father. But in terms of unconditional love and care...he is more my dad than anyone will ever be. For awhile I didn't understand why God chose for me to be born of my biological father, but raised and loved by this man. But I get it now. You see, I have the best of both worlds. On my biological father's side, I have the most amazing grandparents, aunts and cousins in the world...and my life wouldn't be the same without them. And when God delivered Rob into my life...I not only got a person who would love me as if I were his own. I also got another amazing grandparent, and more wonderful aunts, uncles and cousins. For that...I am truly blessed. Blessed beyond all the hard parts...
On that note...it is time for me to get going. I hope you have a wonderful day! ♥♥♥
Until later,
~Lea L.

Hi all! Sorry I haven't been around...been a little bit busy with some things. All good things though...I promise. I will catch you up after my card!
I got a card done this evening that I want to share with you. I used 365 Cards: Sunday Sketch, OTWC #32 color challenge, and OCC "Attitude of Gratitude" challenges as inspiration to get it done! Here is my card:


I got a card done this evening that I want to share with you. I used 365 Cards: Sunday Sketch, OTWC #32 color challenge, and OCC "Attitude of Gratitude" challenges as inspiration to get it done! Here is my card:
"Give Thanks" supplies:
Cardstock: Bazzill Basics
Paper: Making Memories
Stamps: Papertrey Ink (Fillable Frames #7) & Lawn Fawn (Harvest Season)
Pigment Ink: Clearsnap (frost white, orange, moss green, chestnut)
Ribbon: Renaissance by Design
Jewels: Doodlebug Designs
Border Punch: Fiskars
Steel Die: Papertrey Ink
Diecut Machine: Cuttlebug by Provo Craft
Instructions: Make card base from kraft cardstock. Layer patterned paper and border strips together, and diecut the frame from it. Trace where the cut-out goes on the card base, and stamp the frame border and sentiment inside of it. Tie ribbon through each side of the cut-out. Adhere the entire block to the front using foam adhesive. Stamp the leaves to kraft cardstock and cut out. Layer to the corner of the frame, and accent with jewels.
Here is the inspiration photo for the OTWC Color challenge!

Here is the inspiration photo for the OTWC Color challenge!

I also have the 6x6 GCD Studios "Christmas Sleigh" winners to announce. Sorry for the wait...but without further ado...here they are!
Congratulations, ladies! Please email me your mailing address to jnllawson @ bresnan.net...and I will get them in the mail to you!
Continuing on in my days of gratitude...I am grateful for my mommy. {Yes...I'm 30 and I still call her mommy sometimes. Deal with it! Tee hee!}
She is just all around awesome. She is so thoughtful and loving, and the best mom in the world. She understands me, and my inner workings, and how I think. And it always seems that she brings me a little gift exactly when it is needed...if I believed in that kind of stuff, I would almost think she was clairvoyant. Tee hee! :)
Well, do you want to know what has been keeping me busy the past few days? I updated my photography website, and I started a blog for my business as well!! It has been a lot of work, but I think the site looks SO much better, and I am going to enjoy having a photography blog as well!! Here are the links to them if you want to check them out. Would love to know what you think!
Website- http://ellephotographymt.com/
Well, that is all I have for you for now! I hope to be back in the next day or so with another card to share! Have a great evening! ♥♥♥
Until later,
~Lea L.

...an Autumn colored any occasion card! Happy Thursday, everyone!! I hope that you are having a great day, and getting excited for the weekend!!
Today I have my card for CPS #191. We were sponsored by Stampin' Up courtesy of Catherine Pooler, and she sent me a little goodie bag to make my card with. This is what I came up with!

Today I have my card for CPS #191. We were sponsored by Stampin' Up courtesy of Catherine Pooler, and she sent me a little goodie bag to make my card with. This is what I came up with!
"Just for You" supplies:
Cardstock, Paper, Stamp, Ribbon, Twine: Stampin' Up courtesy of Catherine Pooler
Ink: Clearsnap (Roussillon, dark brown)
Cardstock, Paper, Stamp, Ribbon, Twine: Stampin' Up courtesy of Catherine Pooler
Ink: Clearsnap (Roussillon, dark brown)
Button: SEI
Flowers: Recollections
Jewels: Michael's brand
Corner Rounder: EK Success
Diecut Machine: Cricut Expression by Provo Craft
Diecut Cartridge: Storybook by Provo Craft
Flowers: Recollections
Jewels: Michael's brand
Corner Rounder: EK Success
Diecut Machine: Cricut Expression by Provo Craft
Diecut Cartridge: Storybook by Provo Craft
Instructions: Fold cardstock in half to make your card base. Round the corners and ink the edges of a brown paper block, and adhere to the front of the card. Cut two 1 3/4" circles from brown cardstock using a Cricut Expression and Storybook cartridge, and adhere to the front. Cut two 1 1/2" circles from patterned paper, and ink the edges. Thread twine through buttons, and tie around the circles. Adhere both circles to the top of the brown circles. Cut a 2 1/2" scalloped circle from green paper, ink the edges, and adhere to the middle. Cut a 2" circle from cream cardstock, and stamp the sentiment to it. Ink the edges of the circle, and adhere to the top of the scalloped circle using dimensional adhesive. Tie a bow from brown ribbon and adhere to the corner of the sentiment circle. Accent the middle of the bow with three paper flowers. Add strips of jewels to the front of the card to finish it.
On day 4 of November I am grateful that I live in such a beautiful state. In my eyes, it is the most beautiful state in the country. We are called Big Sky Country for a reason, and here is just one small one:
Not bad for a girl that doesn't normally shoot landscapes, right? This was at sunrise on our way to Yellowstone last week. We came upon this while curving around a corner and out of the middle of two mountainous areas....and it took my breath away. And I almost told Josh not to stop, so we wouldn't lose time in getting to Yellowstone. Well- I didn't take a photo any more beautiful that this in Yellowstone, so I am glad that we stopped. :) This photo is cropped in a 10x20 format, which is a great print size for landscape images. Just to give you a little printing tip!
Well, I better get going for now. I am on my way to Ronan to get my hair done, and hope to see some of my family while up there. I hope that you have a wonderful day!! ♥♥♥
Until later,
~Lea L.

Happy Wednesday! Today is the last sneak peek before the latest Lawn Fawn stamp release!! Today we have a new alphabet set to share with you, and I chose to use it with "Harvest Season" again. I am just in a Thanksgiving mode right now! I am pretty sure I used every single leaf stamp in the set, and both of the cute flourishes! The best part...Jessie's ABCs goes so well with all of the different Lawn Fawn stamp sets...so it is definitely a must have!
I used FTL #114 from the Clean & Simple Stamping blog...such a great sketch! It is supposed to be a single layer card...but I did change that part up a little. And added a bow. Tee hee! :)
Don't forget that I am also giving away two 6x6 sets of GCD Studio's "Christmas Sleigh" patterned papers! Go to THIS POST and leave me a comment! Two winners will be picked this coming Friday!!
On this third day of sharing my gratitude, I have to bring up this guy- the little bro. Even though there are times I want to either strangle him or smack him upside the head for things he says and does...I take a step back and realize that I have been there and done that. He is just starting to spread his wings and find his own path in this world, and that is a good thing!
 That is his good friend, Tara, that he met at Carroll this year. Isn't she a darling?!! This was after the freshman scrimmage that I drove over for. It was nice to get to watch him play a little bit of football that day! Here is another cute photo of him:
 He is such a goof...and I wouldn't have it any other way! I love him to pieces!
Well, I better get going for now! I hope that the middle of the week brings you happiness! ♥♥♥
Until later,
~Lea L.
I used FTL #114 from the Clean & Simple Stamping blog...such a great sketch! It is supposed to be a single layer card...but I did change that part up a little. And added a bow. Tee hee! :)
"Give Thanks" supplies:
Cardstock: Bazzill Basics
Cardstock: Bazzill Basics
Stamps: Lawn Fawn
Ink: Clearsnap (chestnut, chianti, roussillon, amber)
Ribbon: Renaissance by Design
Twine: Darice Inc.
Button: Basic Grey
Button: Basic Grey
Jewels: Doodlebug Designs
Corner Rounder: EK Success
Instructions: Fold red cardstock in half to make card base, and round the bottom corners. Round the bottom corners of a white cardstock block. Stamp the leaves, swirls and sentiment to the front. Tie ribbon around the top of the card, and add a button to the bow using twine. Adhere the entire stamped block to the front of the red card base. Add three clusters of jewels to finish the card.
Be sure to check out the other Lawn Fawn designers and see what they came up with as well!!
Danni Reid- http://dannisdoodles.typepad.com/
Latisha Yoast- http://crafteebee.blogspot.com/
Lynnette Kauffman- http://nettersnotables.blogspot.com/
Mariana Grigsby- http://marianagrigsby.wordpress.com/
Teri Anderson- http://terisplace.wordpress.com/
Tiffany Johnson- http://tiffguam.com/
Don't forget about all the giveaways going on at the Lawn Fawn blog as well! Here is a post list:
On this third day of sharing my gratitude, I have to bring up this guy- the little bro. Even though there are times I want to either strangle him or smack him upside the head for things he says and does...I take a step back and realize that I have been there and done that. He is just starting to spread his wings and find his own path in this world, and that is a good thing!
Well, I better get going for now! I hope that the middle of the week brings you happiness! ♥♥♥
Until later,
~Lea L.

Happy Tuesday, everyone!! Today I have another card to share with you using a new Lawn Fawn stamp set that will release this week. It is called "Hats Off to You", and it is so super cute and versatile. There are about a million things you can do with it! And while I didn't combine it with "Critters in the Snow", it compliments the set very well! ;)
I used Taylored Expression Sketch #132 for my card, as it fit perfectly with what I wanted to do with the stamp set. I did combine this new set with one of the small leaves from "Harvest Season".
I used Taylored Expression Sketch #132 for my card, as it fit perfectly with what I wanted to do with the stamp set. I did combine this new set with one of the small leaves from "Harvest Season".
"Happy Thanksgiving" supplies:
Cardstock: The Paper Company
Paper: Making Memories & October Afternoon
Stamps: Lawn Fawn
Ink: Clearsnap (chestnut, amber, moss green)
Ribbon: Papertrey Ink
Twine: Darice Inc.
Button: Basic Grey
Pins: Making Memories
Jewels: Doodlebug Designs
Jewels: Doodlebug Designs
Border Punch: Fiskars
Diecut Machine: Cricut Expression by Provo Craft
Diecut Cartridge: Storybook by Provo Craft
Sandpaper
Instructions: Fold kraft cardstock in half to make card base. Sand the edges of a light blue paper block, and adhere it to the front of the card. Punch two border strips from brown dotted paper and lightly sand the edges. Sand the edges of an orange paper block, and adhere a border strip to each side. Adhere the entire block to the front of the card. Cut a 3" circle from cream cardstock using a Cricut Expression & Storybook cartridge. Stamp the sentiment to the bottom of the circle. Stamp the hat to patterned papers, cut out, and layer together. Stamp the leaves to cream cardstock and cut out. Adhere them above the stamped sentiment, and accent the middle with jewels. Adhere the hat over top of these items with dimensional adhesive, and then ink the edges of the circle. Punch a hole in the top of the circle, and thread ribbon through it. Adhere the entire piece to the front of the card, and accent above the bow with pins.
Be sure to check out the other Lawn Fawn designers and see what they came up with as well!!
Danni Reid- http://dannisdoodles.typepad.com/
Latisha Yoast- http://crafteebee.blogspot.com/
Lynnette Kauffman- http://nettersnotables.blogspot.com/
Mariana Grigsby- http://marianagrigsby.wordpress.com/
Teri Anderson- http://terisplace.wordpress.com/
Tiffany Johnson- http://tiffguam.com/
Don't forget about all the giveaways going on at the Lawn Fawn blog as well! Here is a post list:
Don't forget that I am also giving away some 2 6x6 sets of GCD Studio's "Christmas Sleigh" patterned papers! Go to THIS POST and leave me a comment! Two winners will be picked this coming Friday!!
For my day 2 of sharing what I feel thankful for and blessed by...I am being a tad bit jovial and silly. I feel so blessed to have two of THE cutest dogs in the world {who SERIOUSLY need haircuts. No worries...they have an appointment on Wednesday!} Tee hee!
 First I will answer the question that you may be asking if you checked out yesterday's gratitude part of my post. Yes- I do wear my white North Face fleece all of the time. I ♥ it so much! It is warm, and cozy, and soft...and I don't feel like I am 800 pounds when wearing it. :)
So, Halloween night I helped out at the Trunk or Treat party that my church put on with another church from the valley, and when I got home I just had the urge to dress up my little pups and take some photos. Josh obliged me, and photographed me with them too! Aren't they the cutest little moose and bee you have ever seen?!! I love them to pieces!!
I also received a question in my comments yesterday, and I thought I would share it and the answer with you...in case anyone else was wondering as well. First up...here is the question:
 And here is the answer to that question....an adhesive that I couldn't live without. I had a can of it break on me at one point while I was crafting late at night....and I am pretty sure I was on the verge of tears. Seriously...I need it that much when applying glitter.

For my day 2 of sharing what I feel thankful for and blessed by...I am being a tad bit jovial and silly. I feel so blessed to have two of THE cutest dogs in the world {who SERIOUSLY need haircuts. No worries...they have an appointment on Wednesday!} Tee hee!
So, Halloween night I helped out at the Trunk or Treat party that my church put on with another church from the valley, and when I got home I just had the urge to dress up my little pups and take some photos. Josh obliged me, and photographed me with them too! Aren't they the cutest little moose and bee you have ever seen?!! I love them to pieces!!
I also received a question in my comments yesterday, and I thought I would share it and the answer with you...in case anyone else was wondering as well. First up...here is the question:

Well, I hope that you have a wonderful Tuesday!! ♥♥♥
Until later,
~Lea L.

**This is post #2 for the day....please scroll down to see my Lawn Fawn "Critters in the Snow" sneak peek!!**
Happy November everyone!! Can you believe that Christmas is just a little under 2 months away! Craziness, I tell you. Well, today I have an inexpensive and easy gift that you can make for your neighbors, co-workers, or acquaintances. This little set goes perfectly with the fun and whimsical colors and patterns in the GCD Studios "Christmas Sleigh" paper collection...which is what I used here!


 Adding the ingredients into the pretty cellophane was very easy! Just cut a piece, and curve it into your cup. Add 4 tablespoons of cocoa mix, 4 mini candy canes broken up with a hammer, and a hand full of mini marshmallows. Tie it all up with some ribbon, and then cut the top off in order to even it out. I added some tissue paper into the bottom of my cup so that the cocoa mixture would sit higher in it, as it is a pretty deep cup. Then make a cute little tag and card to match, and you have a super easy gift to give out that the receiver is sure to love!!
Enjoy this November, and I hope you have a wonderful time creating all those fabulous handmade gifts this time of year! ♥♥♥
Until later,
~Lea L.
P.S. All stamps used on this project are from Lawn Fawn's "Bows and Holly" set.
Happy November everyone!! Can you believe that Christmas is just a little under 2 months away! Craziness, I tell you. Well, today I have an inexpensive and easy gift that you can make for your neighbors, co-workers, or acquaintances. This little set goes perfectly with the fun and whimsical colors and patterns in the GCD Studios "Christmas Sleigh" paper collection...which is what I used here!
{GIVEAWAY} info:
GCD Studios is also doing a giveaway on the blog! One lucky person is going to win both of the latest GCD Studios Christmas paper collections, "Christmas Sleigh" & "Joyful Peace". So, head on over to THIS POST and leave a comment. But wait before you go...I am going to give you another chance of winning a prize!! Leave a comment on my post here, and two lucky winners will receive a 6x6 paper set of "Christmas Sleigh"!! This will be perfect for some holiday card making!! I will draw a winner this Friday...so get to commenting!!Enjoy this November, and I hope you have a wonderful time creating all those fabulous handmade gifts this time of year! ♥♥♥
Until later,
~Lea L.
P.S. All stamps used on this project are from Lawn Fawn's "Bows and Holly" set.
Subscribe to:
Posts (Atom)


Social Icons