

I know...totally random title post. But it is the truth....I ADORE white cardstock. I always have! When I actually used to scrapbook....it was pretty much the only color of cardstock that I scrapped with. Now, I use all colors of cardstock for cardmaking....but white is definitely a go-to, as is kraft. My favorite white cardstock is the KI white from Bazzill, which has the orange peel texture to it. I think it is the purest white out there. But, I'll use all types of white cardstock, as long as it isn't dingy looking! I am an EOU of white cardstock....tee hee!
So, I went all CAS (clean & simple) the past couple of days, and I have a few cards to share with you. First up is my card for this week's sketch at CPS. I flipped the sketch longways, and used hearts in place of the octagons. Here it is!
Instructions: Stamp the heart six times with rainbow colors of pigment ink, and set aside to dry. Fold black cardstock in half to make your card base, and round the bottom corners. Round the bottom corners of a block of white cardstock and adhere to the front. Add the rub-on sentiment to the middle, and underline with six rainbow colored jewels. Once the ink has dried on the stamped hearts, cut each one out. Layer in a line at the bottom of the card, and accent with a jewel.
This next card is based on FTL76 at the Clean & Simple Stamping blog. The newest sketch was posted today, and I just LOVE it. Had to use it right away. This is what I came up with.

Instructions: Fold white cardstock in half to make card base, and round the bottom corners. Tie ribbon around the front of the card. Draw the lines with pencil first, and then trace over in black pen. Accent the four ends with three pearls. Cut three 1" squares from patterned paper, and round two opposite corners on each block. Adhere to the front of the card where the black lines intersect. Stamp the strawberry directly to the last slot, and then stamp to red and brown cardstock. Cut out, glitter the brown piece, and layer together on the card. Stamp the sentiment below the squares, "hugging" the black line.
And I did this next little cutie just to use those fabulous pink heart sequins!! I ♥ them....and they make a perfect little love tree!! Love it! And here is another case of using a licensed character cartridge to get the perfect cut. The tree trunk comes from the Pooh & friends cartridge, and it is the only cartridge that I own that had this perfect shape. Love finding little treasures where you think you wouldn't!

Instructions: Fold white cardstock in half to make card base, and round the bottom corners. Cut a two inch circle from white cardstock, and heavily coat with spray adhesive. Start layering the heart sequins to the circle. Once it is covered, sit something fairly heavy on it and let dry for a few minutes. Cut the tree trunk at 2 3/4" from kraft cardstocking using a Cricut Expression and the Pooh & Friends cartridge. Adhere both items to the front of the card, and accent with chipboard hearts. Stamp the sentiment directly below the tree using cranberry pigment ink. Add the three pearl accents directly below that, and then draw the black square with a ruler and black pen.
So, how has your week been? A little off schedule here because of Josh's overnights, but they aren't forever. And once he is done, his store will have brand new carpet! So, it will be worth it. I have been researching more wedding album options for my collections, hoping to make them more affordable. I think I have found who I want to use, and the plus is that she is in this state! I love supporting local business owners, and her albums are beautiful and much more affordable than the company I was thinking of using. So, it is a win win for me! Yay!!
So, I loaded a couple of older soundtracks to my iTunes catalog the other day from my humongous CD collection, and I had totally forgotten how much I LOVE this song off the Crazy/Beautiful soundtrack. I thought I would share it.
Is it such a beautiful melody and voice...love it. Sorry about the random video...the other one I found was a little inappropriate for my blog, so I just used this one. I think it is a bunch of random television show and movie couples....but whatever. I just wanted to share the song with you!! Tee hee! I hope you enjoyed listening to it!
Well, I need to get going for now! I hope the start of your weekend has been a fabulous one! ♥
Until later,
~Lea
So, I went all CAS (clean & simple) the past couple of days, and I have a few cards to share with you. First up is my card for this week's sketch at CPS. I flipped the sketch longways, and used hearts in place of the octagons. Here it is!

"I {heart} u" supplies:
Cardstock: Prism (black) & Bazzill Basics (white)
Stamps: Gina K Designs (Happy Hearts set)
Ink: Clearsnap (Pigment: scarlet, orange, canary, lime, surf, violet, heliotrope)
Rub-ons: American Crafts
Jewels: Doodlebug Designs
Corner Rounder: EK Success
Cardstock: Prism (black) & Bazzill Basics (white)
Stamps: Gina K Designs (Happy Hearts set)
Ink: Clearsnap (Pigment: scarlet, orange, canary, lime, surf, violet, heliotrope)
Rub-ons: American Crafts
Jewels: Doodlebug Designs
Corner Rounder: EK Success
Instructions: Stamp the heart six times with rainbow colors of pigment ink, and set aside to dry. Fold black cardstock in half to make your card base, and round the bottom corners. Round the bottom corners of a block of white cardstock and adhere to the front. Add the rub-on sentiment to the middle, and underline with six rainbow colored jewels. Once the ink has dried on the stamped hearts, cut each one out. Layer in a line at the bottom of the card, and accent with a jewel.
This next card is based on FTL76 at the Clean & Simple Stamping blog. The newest sketch was posted today, and I just LOVE it. Had to use it right away. This is what I came up with.

"Chocolate Hugs" supplies:
Cardstock: Bazzill Basics
Paper: K & Company
Ribbon: Renaissance By Design
Pearls: Kaiser Craft
Stamps: Cornish Heritage Farms (Kim Hughes Collection: Hugs and Kisses)
Ink: Clearsnap (Pigment: green, frost white, brown)
Glitter: Making Memories
Pen: Martha Stewart Crafts
Corner Rounder: EK Success & Marvy Uchida
Instructions: Fold white cardstock in half to make card base, and round the bottom corners. Tie ribbon around the front of the card. Draw the lines with pencil first, and then trace over in black pen. Accent the four ends with three pearls. Cut three 1" squares from patterned paper, and round two opposite corners on each block. Adhere to the front of the card where the black lines intersect. Stamp the strawberry directly to the last slot, and then stamp to red and brown cardstock. Cut out, glitter the brown piece, and layer together on the card. Stamp the sentiment below the squares, "hugging" the black line.
And I did this next little cutie just to use those fabulous pink heart sequins!! I ♥ them....and they make a perfect little love tree!! Love it! And here is another case of using a licensed character cartridge to get the perfect cut. The tree trunk comes from the Pooh & friends cartridge, and it is the only cartridge that I own that had this perfect shape. Love finding little treasures where you think you wouldn't!

"Love is in the Air" supplies:
Cardstock: Bazzill Basics
Sequins: Making Memories
Chipboard: KI Memories
Pearls: Darice Inc.
Stamp: The Cat's Pajamas (Puppy Love set)
Ink: Clearsnap (Pigment: cranberry)
Pen: Martha Stewart Crafts
Corner Rounder: EK Success
Diecut Machine: Cricut Expression by Provo Craft
Diecut Cartridge: Pooh & Friends by Provo Craft
Instructions: Fold white cardstock in half to make card base, and round the bottom corners. Cut a two inch circle from white cardstock, and heavily coat with spray adhesive. Start layering the heart sequins to the circle. Once it is covered, sit something fairly heavy on it and let dry for a few minutes. Cut the tree trunk at 2 3/4" from kraft cardstocking using a Cricut Expression and the Pooh & Friends cartridge. Adhere both items to the front of the card, and accent with chipboard hearts. Stamp the sentiment directly below the tree using cranberry pigment ink. Add the three pearl accents directly below that, and then draw the black square with a ruler and black pen.
So, how has your week been? A little off schedule here because of Josh's overnights, but they aren't forever. And once he is done, his store will have brand new carpet! So, it will be worth it. I have been researching more wedding album options for my collections, hoping to make them more affordable. I think I have found who I want to use, and the plus is that she is in this state! I love supporting local business owners, and her albums are beautiful and much more affordable than the company I was thinking of using. So, it is a win win for me! Yay!!
So, I loaded a couple of older soundtracks to my iTunes catalog the other day from my humongous CD collection, and I had totally forgotten how much I LOVE this song off the Crazy/Beautiful soundtrack. I thought I would share it.
Is it such a beautiful melody and voice...love it. Sorry about the random video...the other one I found was a little inappropriate for my blog, so I just used this one. I think it is a bunch of random television show and movie couples....but whatever. I just wanted to share the song with you!! Tee hee! I hope you enjoyed listening to it!
Well, I need to get going for now! I hope the start of your weekend has been a fabulous one! ♥
Until later,
~Lea
....on Teresa Collin's Crush collection. I don't see it on her website anymore, but I can still get it at my local scrapbooking store....and I ♥ it!! Don't be surprised if you continue to see a bunch of projects with it in the future! :)
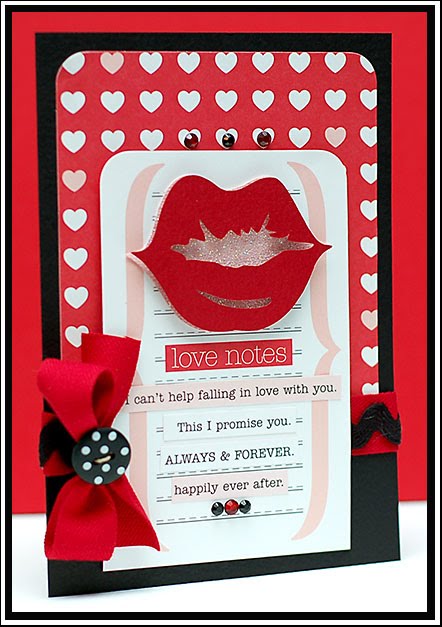
So, let's jump right into the cards I have to share today! This first card is based on 2S4U Laura's Sketch 44, and on 365 Cards: 3 R's challenge (red, rhinestones & ric-rac). I also used one of the latest seasonal Cricut cartridges called "Lovestruck". They are far less expensive than the bigger cartridges because there are no features (ie: shadow, blackout, etc....) and there are fewer cuts. And this one is just awesome! I will be using it again on more Valentine projects in the near future. I really recommend it if you are a Cricut fiend (hint, hint Carla...tee hee!).
Instructions: Fold black cardstock in half to make card base. Round the top corners of a block of red heart paper and adhere to the front. Tie red twill and black ric-rac around the bottom of the card. Tie a button around the bow with twine. Round the top corners of the journal tag. Cut the four love sentiment strips from patterned paper and adhere to the front. Cut the lips at 3" from red cardstock using a Cricut Expression and Lovestruck cartridge. This cartridge does not have a blackout feature, so trace the outside of the lips cut to pink cardstock and cut by hand. Cover the pink blackout cut in glitter, and adhere the red cut to the top using dimensional adhesive. Attach the entire piece to the journal tag, and adhere the entire block to the front of the card. Accent with red and black jewels.
This pastel beauty is based on FTL #75 (sketch- turned longways), Color Chef #36 (dark pink, light pink & white), and TPE #51 (polka dots, bow & pink). More Crush papers....what I love most about these is all the journal tags, diecuts, and text strips are all just sheets of patterned paper. One side normally includes the item you can cut out, and the other side is a matching patterned paper. So- you have multiple choices. For a crafter on a budget (like I am)...papers like these are a dream. Love them!

Instructions: Fold pink cardstock in half to make card base, and round the bottom corners. Round the bottom corners of a block of white cardstock and emboss using the Cuttlebug and Love Languages embossing folder. Adhere the block to the front. Tie ribbon around the left side, and accent the bow with a pink pearl heart and a jewel crown. Round the bottom corners of a block of pink houndstooth paper and adhere to the front. Cut out three love themed tickets from patterned paper. Add the rub-on letters to the polka dotted ticket and adhere all three to the front, using dimensional adhesive on the middle ticket. Accent the bottom ticket with a small pearl heart.
And the last card I have to share with you today is based on Get Sketchy #22 and C4C21 (Pretty In Pink). The angel winged heart cut is from the "Hello Kitty Greetings" cartridge....which I ♥♥♥! It has some of the cutest cuts on them, and as you can see...they don't all have the Hello Kitty character on them. That is what I actually love about most of the licensed carts....they have tons of really cute cuts that don't really have anything to do with the licensed character.

Instructions: Fold white cardstock in half to make the card base. Round the corners of a block of pink dotted paper and adhere to the front. Cut a block of red heart paper in a triangle half, and add a black & white striped scalloped strip to the edge. Round each of the three corners and adhere to the front. Adhere the journal tag to the lower right corner of the card. Cut the winged heart layers at 1 3/4" from black, pink & white cardstock using a Cricut Expression and the Hello Kitty Greetings cartridge. Glue the pink layer (heart) to the black cut. Glitter the white wing cuts and adhere to the black cut using dimensional adhesive. Attach to the journal tag, and embellish with a chipboard heart, sentiment strip, and red heart jewels. Add letter stickers to the top of the journal tag, replacing the "C" with a pink heart jewel.
So, how has your week been going? Mine is good- a little off schedule because Josh had yesterday off and then starts his overnights tonight. The carpet is getting replaced in his store, which means almost two weeks of overnight shifts for him. So- my days are going to be a little turned around...although he will now be sleeping much of the time I am awake. So- I might get back to my regular schedule a little bit...we shall see!
I finally got the chance to watch this movie on Sunday:
 I thought it was so good! And I don't even like to cook....Josh is the chef in this household. But, it was interesting how they combined the life story of Julia Child into Julie Powell's blogging experience. It was just really wonderful...and there was one cooking tip that I did take from it. "Don't crowd the mushrooms!!" I passed that tip along to the chef....tee hee!
Well, I am going to get going for now! I hope you are happy to be at the middle of the week! ♥
Until later,
~Lea
So, let's jump right into the cards I have to share today! This first card is based on 2S4U Laura's Sketch 44, and on 365 Cards: 3 R's challenge (red, rhinestones & ric-rac). I also used one of the latest seasonal Cricut cartridges called "Lovestruck". They are far less expensive than the bigger cartridges because there are no features (ie: shadow, blackout, etc....) and there are fewer cuts. And this one is just awesome! I will be using it again on more Valentine projects in the near future. I really recommend it if you are a Cricut fiend (hint, hint Carla...tee hee!).

"Love Notes" supplies:
Cardstock: Prism (black, red) & Bazzill Basics (pink)
Paper: Teresa Collins Designs
Twill/ric-rac: Wrights
Twine/Jewels: Darice Inc.
Button: Doodlebug Designs
Glitter: DecoArt
Corner Rounder: EK Success
Diecut Machine: Cricut Expression by Provo Craft
Diecut Cartridge: Lovestruck by Provo Craft
Instructions: Fold black cardstock in half to make card base. Round the top corners of a block of red heart paper and adhere to the front. Tie red twill and black ric-rac around the bottom of the card. Tie a button around the bow with twine. Round the top corners of the journal tag. Cut the four love sentiment strips from patterned paper and adhere to the front. Cut the lips at 3" from red cardstock using a Cricut Expression and Lovestruck cartridge. This cartridge does not have a blackout feature, so trace the outside of the lips cut to pink cardstock and cut by hand. Cover the pink blackout cut in glitter, and adhere the red cut to the top using dimensional adhesive. Attach the entire piece to the journal tag, and adhere the entire block to the front of the card. Accent with red and black jewels.
This pastel beauty is based on FTL #75 (sketch- turned longways), Color Chef #36 (dark pink, light pink & white), and TPE #51 (polka dots, bow & pink). More Crush papers....what I love most about these is all the journal tags, diecuts, and text strips are all just sheets of patterned paper. One side normally includes the item you can cut out, and the other side is a matching patterned paper. So- you have multiple choices. For a crafter on a budget (like I am)...papers like these are a dream. Love them!

"To My Sweet Love" supplies:
Cardstock: Bazzill Basics
Paper: Teresa Collins Designs
Rub-ons: American Crafts (letters)
Jewels: Heidi Swapp (crown) & Darice Inc. (hearts)
Ribbon: Renaissance By Designs
Corner Rounder: EK Success
Embossing Machine: Cuttlebug by Provo Craft
Embossing Folder: Love Languages by Provo Craft
Instructions: Fold pink cardstock in half to make card base, and round the bottom corners. Round the bottom corners of a block of white cardstock and emboss using the Cuttlebug and Love Languages embossing folder. Adhere the block to the front. Tie ribbon around the left side, and accent the bow with a pink pearl heart and a jewel crown. Round the bottom corners of a block of pink houndstooth paper and adhere to the front. Cut out three love themed tickets from patterned paper. Add the rub-on letters to the polka dotted ticket and adhere all three to the front, using dimensional adhesive on the middle ticket. Accent the bottom ticket with a small pearl heart.
And the last card I have to share with you today is based on Get Sketchy #22 and C4C21 (Pretty In Pink). The angel winged heart cut is from the "Hello Kitty Greetings" cartridge....which I ♥♥♥! It has some of the cutest cuts on them, and as you can see...they don't all have the Hello Kitty character on them. That is what I actually love about most of the licensed carts....they have tons of really cute cuts that don't really have anything to do with the licensed character.

"True Love" supplies:
Cardstock: Bazzill Basics
Paper: Teresa Collins Designs
Stickers: Making Memories
Chipboard: We R Memory Keepers
Jewels: Westrim Crafts
Glitter: DecoArt
Corner Rounder: EK Success
Diecut Machine: Cricut Expression by Provo Craft
Diecut Cartridge: Hello Kitty Greetings by Provo Craft
Instructions: Fold white cardstock in half to make the card base. Round the corners of a block of pink dotted paper and adhere to the front. Cut a block of red heart paper in a triangle half, and add a black & white striped scalloped strip to the edge. Round each of the three corners and adhere to the front. Adhere the journal tag to the lower right corner of the card. Cut the winged heart layers at 1 3/4" from black, pink & white cardstock using a Cricut Expression and the Hello Kitty Greetings cartridge. Glue the pink layer (heart) to the black cut. Glitter the white wing cuts and adhere to the black cut using dimensional adhesive. Attach to the journal tag, and embellish with a chipboard heart, sentiment strip, and red heart jewels. Add letter stickers to the top of the journal tag, replacing the "C" with a pink heart jewel.
So, how has your week been going? Mine is good- a little off schedule because Josh had yesterday off and then starts his overnights tonight. The carpet is getting replaced in his store, which means almost two weeks of overnight shifts for him. So- my days are going to be a little turned around...although he will now be sleeping much of the time I am awake. So- I might get back to my regular schedule a little bit...we shall see!
I finally got the chance to watch this movie on Sunday:

Well, I am going to get going for now! I hope you are happy to be at the middle of the week! ♥
Until later,
~Lea

I have decided to {finally} participate in this month's Papertrey Ink blog hop. I have read the challenge every month for months....but never had a little bit of extra time to come up with something for it. Well, I purchased some of the December and January released stamps from PTI as a birthday gift to myself....and decided the blog hop challenge was the perfect time break my new stamps out and put them to use! Here are the details of the challenge:
So, without further ado....here is what I came up with. The paper that I used by Doodlebug was perfect for this....other than the fact that the background is stark white. So, to warm it up, and give it that just out of the oven cupcake feel....I warmed it up with antique linen distress ink and that Tim Holtz tool with the sponge on the end (I have no idea what it is called).
That is my cute little baby card! I realized as I was getting the card finished up this afternoon that I am completely out of envelopes. So- decorating an envelope for it will have to come later. I don't actually utilize envelopes that often because handmade cards are normally going along with a present of some sort...so I use them to decorate the package! ♥
Papertrey Ink Stamps & Supplies:
Background Basics: Hearts
Baby Button Bits
Inside & Out: Baby
Vintage Buttons Holiday Mix
Other Supplies:
Cardstock: Bazzill Basics
Paper/Jewel: Doodlebug Designs
Ribbon: Renaissance By Design
Ink: Clearsnap (Pigment: orchid, Cocoa & Chalk: lime pastel, toffee)
Glitter: DecoArt
Corner Rounder: EK Success
Well, I better get going for now! A new Heroes is on tonight....yay! I missed last weeks show because we were out and about doing something, so I am going to go see if it is available on Netflix streaming. If not...I am sure it is online for veiwing! I hope that you have a wonderful rest of your Monday! ♥
Until later,
~Lea
Total Package Challenge
During this month's release there was a lot of chatter about the interior of cards and how they don't
always get the attention they need. This month's challenge is to create a card that has the "total
package". Create any style card you can dream up, then take it the next step. Embellish the interior
and adorn the envelope. You might even want to add a little something to the back of the card! Be sure
to take photos of ever aspect so we can all be inspired with what you create! We can't wait to see what
you make!
So, without further ado....here is what I came up with. The paper that I used by Doodlebug was perfect for this....other than the fact that the background is stark white. So, to warm it up, and give it that just out of the oven cupcake feel....I warmed it up with antique linen distress ink and that Tim Holtz tool with the sponge on the end (I have no idea what it is called).

Papertrey Ink Stamps & Supplies:
Background Basics: Hearts
Baby Button Bits
Inside & Out: Baby
Vintage Buttons Holiday Mix
Other Supplies:
Cardstock: Bazzill Basics
Paper/Jewel: Doodlebug Designs
Ribbon: Renaissance By Design
Ink: Clearsnap (Pigment: orchid, Cocoa & Chalk: lime pastel, toffee)
Glitter: DecoArt
Corner Rounder: EK Success
Well, I better get going for now! A new Heroes is on tonight....yay! I missed last weeks show because we were out and about doing something, so I am going to go see if it is available on Netflix streaming. If not...I am sure it is online for veiwing! I hope that you have a wonderful rest of your Monday! ♥
Until later,
~Lea

Hi there! Tonight I am helping out with the blog hop for one of Gina K's newest stamp sets, Happy Hearts! This set features a plethora of designed hearts, and a mix of words that can make pretty much any love, wedding, anniversary or valentine themed sentiment you can think of!
If you haven't seen, I did a rainbow card with this set earlier this week....here is a link to the post so you can check it out if you like! ♥
And without further ado, here are a couple more cards. How I love this little heart set, and I am sure you will be seeing more with it in the very near future! Thanks to Gina K and Tami Mayberry for letting me be part of this fun blog hop tonight!!

Those are what I came up with for tonight! I hope you like them! ♥
Until later,
~Lea
If you haven't seen, I did a rainbow card with this set earlier this week....here is a link to the post so you can check it out if you like! ♥
And without further ado, here are a couple more cards. How I love this little heart set, and I am sure you will be seeing more with it in the very near future! Thanks to Gina K and Tami Mayberry for letting me be part of this fun blog hop tonight!!
Happy Hearts Topiary Card

You Have My Heart For Always Card

Those are what I came up with for tonight! I hope you like them! ♥
Check out these links for even more inspiration:
Tami Mayberry {Illustrator}
Jessica Fick
Theresa Momber
Nina Brackett
Carolyn King
Lee Murphy
Joan Ervin
Maren Benedict
Lea Lawson
StampTV Idea Center
Jessica Fick
Theresa Momber
Nina Brackett
Carolyn King
Lee Murphy
Joan Ervin
Maren Benedict
Lea Lawson
StampTV Idea Center
Now, it's your turn! Please hop over to Gina's blog to add the direct link to your blog post showcasing Tami's Happy Hearts stamp set in the Mister Linkey Box. Gina will have a special prize for the one link that she chooses out of all the participating bloggers - check out her blog for the details.
Until later,
~Lea

....I have finally emerged from my craft room after holing myself in it to get some Glitzy projects done for CHA!! They are now safely on their way to the show, so check out the Glitz booth at CHA if you want to see them in person.
Before I get to all the Glitz cards....I do want to share my CPS card for the week.
Instructions: Fold kraft cardstock in half to make card base. Round the bottom corners, and emboss the front using the Cuttlebug and Welcome Baby embossing folder. Round the bottom corners of a block of striped paper and adhere to the front. Adhere the sentiment diecut to the journal spot. Cut the house and car elements from patterned paper and adhere to the block. Stamp "love lives here" to the block, accent with jewels, and adhere to the front of the card. Thread twine through 4 buttons, and accent the front of the card.
And now for some Glitz goodness! I have a few cards from each new line, and from Plum Crazy, which is still a current line, to share with you! Make sure to check out the Glitz Blog if you want to see all the fabulous items from each new line!


So, this is what I have been up to for the past couple days! Very busy over here! Well, my next post is going to be all about Happy Hearts and love goodness! Check back Friday night!! ♥
Until later,
~Lea
Before I get to all the Glitz cards....I do want to share my CPS card for the week.

"It's A Good Life" supplies:
Cardstock: Bazzill Basics
Paper/Diecuts: October Afternoon
Buttons: Doodlebug Designs
Twine/Jewels: Darice Inc.
Stamps: Renaissance By Design (Curly Tree set)
Ink: Clearsnap (Pigment: chestnut, ruby)
Corner Rounder: EK Success
Embossing Machine: Cuttlebug by Provo Craft
Embossing Folder: Welcome Baby by Provo Craft
Instructions: Fold kraft cardstock in half to make card base. Round the bottom corners, and emboss the front using the Cuttlebug and Welcome Baby embossing folder. Round the bottom corners of a block of striped paper and adhere to the front. Adhere the sentiment diecut to the journal spot. Cut the house and car elements from patterned paper and adhere to the block. Stamp "love lives here" to the block, accent with jewels, and adhere to the front of the card. Thread twine through 4 buttons, and accent the front of the card.
And now for some Glitz goodness! I have a few cards from each new line, and from Plum Crazy, which is still a current line, to share with you! Make sure to check out the Glitz Blog if you want to see all the fabulous items from each new line!
Maya


Distressed Couture


Vintage Love


Kismet


Plum Crazy


So, this is what I have been up to for the past couple days! Very busy over here! Well, my next post is going to be all about Happy Hearts and love goodness! Check back Friday night!! ♥
Until later,
~Lea

....challenges it seems! I have three cards to share with you today, and they are all based on some fabulous color challenges going on right now. So, let's dive right in!
First up is my card for the latest Moxie Fab challenge, which happens to be a color one. The colors in the challenge include purple, tangerine, dark red, and white. I am actually not sure if it was supposed to be white or gray...but I went with white because that is what the sample cards looked like to me. Tee hee! I think I'm close enough. It is also based on the current contest at BBTB2, to make a valentine's project using your Cricut and the color purple. And this is one of the newest stamp releases by Gina K Designs, and illustrated by none other than my favorite sketch maker, Tami Mayberry! I love this little heart set, and there will be much more to come this week! So, keep your eyes peeled!
Instructions: Fold purple cardstock in half to make card base, and round the bottom corners. Emboss a white cardstock block using a Cuttlebug and Love Languages embossing folder. Round the bottom corners and adhere to the front of the card. Cut the rainbow and its layers from black, white, and glittered cardstock at 3 1/2" using a Cricut Expression and Hello Kitty Greetings cartridge. Layer the cuts together on the front of the card. Stamp three hearts to white cardstock using pigment ink, and cut out. Adhere to the right side of the rainbow using dimensional adhesive. Add the jewel flourish between the hearts. Add the letter stickers to the left side of the cloud, and finish off with the stamped words. Punch tiny hearts from red and orange glittered cardstock and adhere in a scattered affect across the rainbow, and the sentiment. Accent the left end of the rainbow with three matching jewels.
This next card is the current color challenge from Embellish Magazine.com. The colors in this challenge are purple, brown, and kraft.....and you also had to use stripes. I don't have any purple paper with stripes, so I decided to make my own! And I kind-of like that I didn't use patterned paper on this one....it works here. I am normally not a fan of purple, but I think I have found that I like it when I use multiple shades, including some lighter purple.

Instructions: Fold kraft cardstock in half to make card base and round the bottom corners. Punch a scalloped border to a strip of brown cardstock and adhere to the bottom. Cut three strips of purple cardstock, each one slightly thicker and darker than the first, and adhere to the front. Stamp the word "forever" right above the last strip of purple cardstock using violet ink. Accent around it with brown colored pearls. Cut the rings from purple shimmer cardstock at 1 1/2" using a Cricut Expression and Designer's Calendar cartridge. Adhere to the left side of the card and accent with a jewel. Attach the chipboard letters to the front to finish the sentiment.
And this last card is based on the current sketch at Clean & Simple, FTL74, and on the latest SPCC color challenge. The colors on this one are saffron, vanilla, and orange. This card is actually a money holder, but I could figure out a good way to photograph the inside of it. I got frustrated and decided to quit for the day. I can't fold the top half over because of the ribbon, and it just falls back down. So, if you have any thoughts...let me know. If I do end up getting it photographed....I will add it to the post. The inside sentiment says "Just because".

Instructions: Fold cardstock in thirds to make the money holder, and round the right hand corners of the top side. Round the corners and ink the edges of a block of flower paper, and adhere to the front. Tie ribbon around the left side, and attach a button to the bow with twine. Stamp the images to a block of grid paper and add a strip of scalloped paper frill to the right side. Add the sentiment with letter stickers, and accent the stamped images with jewels. Adhere to the front of the card with dimensional adhesive. Inside: (not shown) Punch a scalloped border to the inside flap, and then stamp the images to the right side. Add a strip of dotted paper to the front, and adhere the sentiment to it. Accent the stamped images with jewels. Fill with money. :) Tee hee!
I hope you like my cards today! So, in life stuff. ♥ I finally took down my Christmas decorations today. {blush} I do have winter themed decorations, so it isn't too big of a deal leaving them up this long. We didn't have a chance to do it before going out of town last week, and Josh finally had some time to bring up the boxes and containers that I needed. It is pretty amazing how quickly they come down. It took me an entire week to decorate the house....and just a couple hours to take it all down. Craziness.
And now I can start decorating for Valentine's day! I have a few cute ideas for decorating, and I can't wait to get started on them! I don't go crazy decorating for these smaller holidays....but I do like the house to look festive as much as possible. Plus....its fun! I will share photos when I get things done.
Hmmm....I don't think I have any photos to share with you today. Oh, wait. I didn't post this cute one of me and my little bro at my birthday dinner!
 He thinks he looks like a goober because his eye squints. I think its cute, and adds to the sweetness of his smile. Whatever....differing opinions. And honestly....it isn't fair for one person to look practically perfect, and he pretty much does. So- God gave him the eye thing to bring him slightly closer to the rest of our levels. Tee hee- now I am going to give him a big ego. God's thought process could have gone something like this when He made Casey: "Alright. Awesome eyes...check. Fabulous smile and straight teeth....got it. Good skin....yep. Thin, muscly build with athletic star potential....absolutely. Musicality....mmm hmm. Caring and nice.....most of the time. Hmmm....this might be too much. Let's make his eye squint when he smiles." Tee hee...okay. I am totally rambling about my brother's squinty eye....let's move on. ♥
So, Josh and I watch this show all the time on the travel channel. Do you ever watch it?
 We LOVE this show!! Adam Richman is a hoot! And the man can pack away some food! I am always amazed at how many of the challenges he does end up winning. Well, we found out the other day that season 2 is on streaming Netflix....so we are pretty much all caught up. I think we only have a couple unwatched episodes. Love it.
And I am going to leave you with this video, because we all laughed our butts of the other night watching it on AI.
My dad had it stuck in his head forever....he even texted it to all of us the next day. Hmmm...I forgot to ask if he found a way to add it into his sermon on Sunday. I'll have to find out. Tee hee! Have a wonderful start of your week tomorrow! ♥
Until later,
~Lea
First up is my card for the latest Moxie Fab challenge, which happens to be a color one. The colors in the challenge include purple, tangerine, dark red, and white. I am actually not sure if it was supposed to be white or gray...but I went with white because that is what the sample cards looked like to me. Tee hee! I think I'm close enough. It is also based on the current contest at BBTB2, to make a valentine's project using your Cricut and the color purple. And this is one of the newest stamp releases by Gina K Designs, and illustrated by none other than my favorite sketch maker, Tami Mayberry! I love this little heart set, and there will be much more to come this week! So, keep your eyes peeled!

"Happy Heart Day" supplies:
Cardstock: Bazzill Basics & Doodlebug Designs (glittered)
Stamps: Gina K Designs (Happy Hearts set)
Ink: Clearsnap (Pigment: violet, mango tango, scarlet)
Stickers: Basic Grey
Jewels: Doodlebug Designs & Zva Creative (flourishes)
Corner Rounder: EK Success
Embossing Machine: Cuttlebug by Provo Craft
Embossing Folder: Love Languages by Provo Craft
Diecut Machine: Cricut Expression by Provo Craft
Diecut Cartridge: Kello Kitty Greetings by Provo Craft
Instructions: Fold purple cardstock in half to make card base, and round the bottom corners. Emboss a white cardstock block using a Cuttlebug and Love Languages embossing folder. Round the bottom corners and adhere to the front of the card. Cut the rainbow and its layers from black, white, and glittered cardstock at 3 1/2" using a Cricut Expression and Hello Kitty Greetings cartridge. Layer the cuts together on the front of the card. Stamp three hearts to white cardstock using pigment ink, and cut out. Adhere to the right side of the rainbow using dimensional adhesive. Add the jewel flourish between the hearts. Add the letter stickers to the left side of the cloud, and finish off with the stamped words. Punch tiny hearts from red and orange glittered cardstock and adhere in a scattered affect across the rainbow, and the sentiment. Accent the left end of the rainbow with three matching jewels.
This next card is the current color challenge from Embellish Magazine.com. The colors in this challenge are purple, brown, and kraft.....and you also had to use stripes. I don't have any purple paper with stripes, so I decided to make my own! And I kind-of like that I didn't use patterned paper on this one....it works here. I am normally not a fan of purple, but I think I have found that I like it when I use multiple shades, including some lighter purple.

"Love Forever" supplies:
Cardstock: Bazzill Basics & Wausau (shimmery)
Chipboard: Making Memories
Stamp: Basic Grey
Ink: Clearsnap (Pigment: violet)
Pearls: Kaiser Craft
Jewel: Doodlebug Designs
Corner Rounder: EK Success
Border Punch: Stampin Up
Diecut Machine: Cricut Expression by Provo Craft
Diecut Cartridge: Designer's Calendar by Provo Craft
Instructions: Fold kraft cardstock in half to make card base and round the bottom corners. Punch a scalloped border to a strip of brown cardstock and adhere to the bottom. Cut three strips of purple cardstock, each one slightly thicker and darker than the first, and adhere to the front. Stamp the word "forever" right above the last strip of purple cardstock using violet ink. Accent around it with brown colored pearls. Cut the rings from purple shimmer cardstock at 1 1/2" using a Cricut Expression and Designer's Calendar cartridge. Adhere to the left side of the card and accent with a jewel. Attach the chipboard letters to the front to finish the sentiment.
And this last card is based on the current sketch at Clean & Simple, FTL74, and on the latest SPCC color challenge. The colors on this one are saffron, vanilla, and orange. This card is actually a money holder, but I could figure out a good way to photograph the inside of it. I got frustrated and decided to quit for the day. I can't fold the top half over because of the ribbon, and it just falls back down. So, if you have any thoughts...let me know. If I do end up getting it photographed....I will add it to the post. The inside sentiment says "Just because".

"Just For You" supplies:
Cardstock: Bazzill Basics
Paper: Sassafras, October Afternoon & Scenic Route
Paper Frill/Jewels/Button: Doodlebug Designs
Stamps: Basic Grey
Ink: Clearsnap (Pigment: mango tango & Chalk: tangerine, peach pastel)
Stickers: Making Memories
Ribbon: Renaissance By Design
Ribbon: Renaissance By Design
Twine: Darice Inc.
Corner Rounder: EK Success
Instructions: Fold cardstock in thirds to make the money holder, and round the right hand corners of the top side. Round the corners and ink the edges of a block of flower paper, and adhere to the front. Tie ribbon around the left side, and attach a button to the bow with twine. Stamp the images to a block of grid paper and add a strip of scalloped paper frill to the right side. Add the sentiment with letter stickers, and accent the stamped images with jewels. Adhere to the front of the card with dimensional adhesive. Inside: (not shown) Punch a scalloped border to the inside flap, and then stamp the images to the right side. Add a strip of dotted paper to the front, and adhere the sentiment to it. Accent the stamped images with jewels. Fill with money. :) Tee hee!
I hope you like my cards today! So, in life stuff. ♥ I finally took down my Christmas decorations today. {blush} I do have winter themed decorations, so it isn't too big of a deal leaving them up this long. We didn't have a chance to do it before going out of town last week, and Josh finally had some time to bring up the boxes and containers that I needed. It is pretty amazing how quickly they come down. It took me an entire week to decorate the house....and just a couple hours to take it all down. Craziness.
And now I can start decorating for Valentine's day! I have a few cute ideas for decorating, and I can't wait to get started on them! I don't go crazy decorating for these smaller holidays....but I do like the house to look festive as much as possible. Plus....its fun! I will share photos when I get things done.
Hmmm....I don't think I have any photos to share with you today. Oh, wait. I didn't post this cute one of me and my little bro at my birthday dinner!

So, Josh and I watch this show all the time on the travel channel. Do you ever watch it?

And I am going to leave you with this video, because we all laughed our butts of the other night watching it on AI.
My dad had it stuck in his head forever....he even texted it to all of us the next day. Hmmm...I forgot to ask if he found a way to add it into his sermon on Sunday. I'll have to find out. Tee hee! Have a wonderful start of your week tomorrow! ♥
Until later,
~Lea

A new year and a new age in my life means my blog is getting a new look as well! I have been figuring out the layout that want and how to make changes to it for a couple months now, and it is finally pretty much where I want it. And now I have put together a new header too! Something that is a little more "Lea" current, but still encompasses my love of the cupcakes and sunshine name. That will NEVER go out of style! So, I hope you like it!!
Well, I am full on into love/valentine's mode now that my birthday is over, and I have a couple cards to share with you today! This first card covers a few challenges actually. It is (loosely) based on Taylored Expressions Sketch #98, fits the theme for 365 Cards: Tea for Two challenge, and uses the colors for Stacey's Curtain Call Color Challenge 12 (chocolate chip, Pretty in Pink, Rose Red & Very Vanilla).


Well, I am full on into love/valentine's mode now that my birthday is over, and I have a couple cards to share with you today! This first card covers a few challenges actually. It is (loosely) based on Taylored Expressions Sketch #98, fits the theme for 365 Cards: Tea for Two challenge, and uses the colors for Stacey's Curtain Call Color Challenge 12 (chocolate chip, Pretty in Pink, Rose Red & Very Vanilla).

"You Make Me Bubble" supplies:
Cardstock: Bazzill Basics
Paper: K & Company
Ribbon: Michael's brand
Stickers: Target brand
Ink: Clearsnap (Pigment: chestnut, razzberry, cranberry & Chalk: pink pastel)
Jewels: Creative Cafe (red) & Darice Inc. (pink heart)
Border Punches: Martha Stewart Crafts
Corner Rounder: EK Success
Instructions: Fold chocolate brown cardstock in half to make card base, and round the bottom corners. Round the bottom corners of a block of striped paper and adhere to the bottom. Round the top corners of a block of vanilla cardstock and adhere to the top. Punch a heart border to a block of heart paper and adhere at the seam. Punch a scalloped heart border to dotted paper and cut into a thin strip. Adhere to the front. Tie ribbon around the bottom of the card, and accent with two glitter heart stickers. Stamp the sentiment, mugs and heart to the vanilla cardstock block. Accent with jewels.
And this card isn't based on any challenge. If it isn't clear by now, I love this hearts stamp....so I get the itch to use it a lot! ♥

"Be My Valentine" supplies:
Cardstock: Bazzill Basics
Paper: Imaginisce
Button/Paper Frill: Doodlebug Designs
Ribbon: Michael's brand
Twine: Darice Inc.
Jewels: Westrim Crafts
Rub-on: Making Memories
Stamps: Kitchen Sink Stamps (Plaid Plus! set)
Ink: Clearsnap (Pigment: Cranberry, Razzberry, Pink)
Corner Rounder: EK Success
Instructions: Fold white cardstock in half to make card base, and round the top left & bottom right corners. Add red paper frill to a strip of heart paper and round the top left corner. Adhere to the left side of the card. Add the sentiment rub-on to the lower right corner. Stamp the heart stripes to the front of the card, and accent the bottoms with heart jewels. Tie ribbon around the left side of the card, and attach a button to the middle of the bow with twine. Add a heart jewel to the top of the button.
Now to life stuff! ♥ I have had some great birthday filled days! On Wednesday night, I went to dinner with my family at Lydia's in Butte. I opened my gift from my family after we ordered. They got me a super adorable top, and a new pair of skinny jeans. Skinny jeans are a necessity when you wear cute fuzzy boots a lot during winter, and I really needed a new pair. So, thanks mom!! (They fit too, so no need to exchange! Yay, I didn't have to go a size up! Hee hee!) Then dinner came. It is a neat dining experience...and all these extras come with your meal order. The table gets appetizer to share, and you get a salad. Then spaghetti and raviolis come with your dinner order, and everyone gets ice cream for dessert. It was very yummy! Here we all are at dinner together.

And this was my yummy ice cream, with a candle in it! Everyone else got "turtle" ice cream....but I went with huckleberry. You can't get huckleberry ice cream in very many states....and it is SO good.

Josh and I drove home on Thursday morning, which was my actual birthday. We had a fun day hanging out together, and we went to see this in 3D at the theatre.
It. Was. Awesome. Everything about it. Just an amazing movie, and the CGI was top notch. Considering pretty much everything was computer generated on the movie....just awesome. They did a fabulous job with the 3D work as well. I highly recommend seeing this in the theatre...and I am normally not a big fan of watching things in 3D.
And I got a little surprise at my door yesterday!! Dwight & Vanessa, my mother and father in-law, had these delived to me.

Aren't they so pretty?! They are so fresh and springy, which is a nice feeling in this dull and dismal weather. It has just been grey and yucky here, so these are a little beacon of light in this blah time.
So, do you want to know what my present is from Josh? I get to go on a little scrapbooking product shopping spree. I did recently purchase a couple new stamp sets, which are on there way to me in the next couple days! But, I am waiting to buy some new release items from CHA. Pretty nice little gift, huh?
So, I have been a spoiled little girl this week. But, considering I turned the not so fun number....I think I deserve it. Tee hee!
Well, I am going to get going for now! I hope your Saturday has been whatever you have wanted it to be....fun, peaceful, restful, lazy. All of it! Talk to you soon! ♥
Until later,
~Lea

Hi all! Well, I am officially 30. Yet, I still feel like I am in my 20's. So- life is still good! Tee hee!
It is going to be just a quick post tonight. Sorry I haven't had until now to get a post done....we have just been out and about doing stuff, and hanging out together. I have one little card to share with you today, and that is my card for this week's sketch at CPS. Such a great sketch this week....this is what I came up with.
Instructions: Fold white cardstock in half to make card base and round the bottom corners. Emboss the front of the card using the Cuttlebug and Swiss Dots embossing folder. Cut the sentiment strips at 1" from pink, aqua & yellow cardstock using a Cricut Expression and Graphically speaking cartridge. Cover the back of the aqua strip with yellow cardstock, and round the bottom corners. Adhere the strips to the front of the card as shown. Round the top corners of a block of cardstock, and adhere the rub-on sentiment to the bottom of it. Cut the candle at 2 1/4" from pink & orange cardstock using a Cricut Expression and A Child's Year cartridge. Cut the flame from the orange cut, layer to the pink candle cut, and accent with an orange jewel. Adhere the candle to the white block, and then attach the entire block to the front.
And now down to business regarding the winner of my Imaginisce Giveaway! I generated this number from random.org.....
Which means this is the comment that won the prize:
It is going to be just a quick post tonight. Sorry I haven't had until now to get a post done....we have just been out and about doing stuff, and hanging out together. I have one little card to share with you today, and that is my card for this week's sketch at CPS. Such a great sketch this week....this is what I came up with.

"Celebrate Moments" supplies:
Cardstock: Bazzill Basics
Rub-on: Urban Lily
Jewels: Doodlebug Designs & Jesse James
Corner Rounder: Marvy Uchida
Embossing Machine: Cuttlebug by Provo Craft
Embossing Folder: Swiss Dots by Provo Craft
Diecut Machine: Cricut Expression by Provo Craft
Diecut Cartridge: Graphically Speaking, A Child's Year by Provo Craft
Instructions: Fold white cardstock in half to make card base and round the bottom corners. Emboss the front of the card using the Cuttlebug and Swiss Dots embossing folder. Cut the sentiment strips at 1" from pink, aqua & yellow cardstock using a Cricut Expression and Graphically speaking cartridge. Cover the back of the aqua strip with yellow cardstock, and round the bottom corners. Adhere the strips to the front of the card as shown. Round the top corners of a block of cardstock, and adhere the rub-on sentiment to the bottom of it. Cut the candle at 2 1/4" from pink & orange cardstock using a Cricut Expression and A Child's Year cartridge. Cut the flame from the orange cut, layer to the pink candle cut, and accent with an orange jewel. Adhere the candle to the white block, and then attach the entire block to the front.
And now down to business regarding the winner of my Imaginisce Giveaway! I generated this number from random.org.....
Random Integer Generator
Here are your random numbers:28Timestamp: 2010-01-15 04:45:08 UTC
Which means this is the comment that won the prize:
- WOW!!! These cards are stunning. Loved each one of them..Creativity at its best :)

Getting close to the end of my birthday week!! Which means my Imaginisce Giveaway is almost ready to be picked as well! You have until I get around to posting tomorrow to do the instructions in THIS post and be eligible to win the prize!
My first card is covered in berries and cupcakes....can a birthday card get any better then that? It is based on ICS49 and TPE49. Please note....I will be adding instructions later to this post. I don't have enough time right now to add them.
Next up are a couple cards using some older, but still fabulous Glitz product! This first card is based on Cricut Cardz Challenge #8.

My first card is covered in berries and cupcakes....can a birthday card get any better then that? It is based on ICS49 and TPE49. Please note....I will be adding instructions later to this post. I don't have enough time right now to add them.

"Berry Happy Birthday" supplies:
Cardstock: Bazzill Basics
Paper/Chipboard: Basic Grey
Rub-ons: Gypsies & Basic Grey
Ribbon: Renaissance by Design
Button: Doodlebug Designs
Jewel: Westrim Crafts
Pearl: Kaiser Craft
Ink: Clearsnap (Chalk: pink pastel)
Ink: Clearsnap (Chalk: pink pastel)
Corner Rounder: EK Success
Border Punch: Fiskars
Instructions: Fold berry cardstock in half to make card base, and punch an apron lace border to the bottom. Round the top corners of a block of strawberry paper and ink the edges. Adhere to the front of the card. Round the upper right corner of a block of dotted paper and ink the edges. Adhere to the right side of the card. Round the top corners of a block of white doily paper and ink the edges. Adhere to the top of the card. Tie ribbon around bottom of the card into a bow. Accent the top of the bow with a glittery button, a pink heart jewel, and three green pearls. Add the rub-on journal spot and the rub-on berries directly to the patterned paper on the front of the card. Attach the chipboard cupcake to the front, and accent with pearls and a strawberry cut from patterned paper. Add the sentiment to the left side of the cupcake.
Next up are a couple cards using some older, but still fabulous Glitz product! This first card is based on Cricut Cardz Challenge #8.

"Birthday Rebel" supplies:
Cardstock: Bazzill Basics
Paper: Glitz Designs
Rub-ons: 7Gypsies & Glitz Designs
Ribbon: Renaissance by Design
Jewels: Doodlebug Designs & Westrim Crafts
Ink: Clearsnap (Chalk: charcoal)
Ink: Clearsnap (Chalk: charcoal)
Corner Rounder: EK Success
Diecut Machine: Cricut by Provo Craft
Diecut Cartridge: George & Basic Shapes by Provo Craft
Instructions: Fold kraft cardstock in half to make card base, and round the bottom corners. Round the bottom corners of a block of houndstooth paper and ink the edges. Adhere to the bottom of the card. Apply the rub-on sentiments to the top half of the card. Tie ribbon around the seam, and top the bow with a jewel star. Cut a star at 2" from red cardstock using a Cricut and George & Basic Shapes cartridge. Cut a slit in the right side of the star, and adhere through the ribbon. Accent the lower right corner of the star with three jewels.
And this one isn't based on any challenge, just a little birdie card I whipped up. I think it is pretty adorable!


"Happy Bird Day" supplies:
Cardstock: Bazzill Basics
Paper/rub-ons: Glitz Designs
Stickers: 7Gypsies & Glitz Designs
Jewels: Doodlebug Designs
Ribbon: Renaissance by Design
Corner Rounder: EK Success
Diecut Machine: Cricut by Provo Craft
Diecut Cartridge: Simply Sweet by Provo Craft
Instructions: Fold white cardstock in half to make card base, and round the bottom corners. Cut a block of patterned paper, and adhere a scalloped sticker to the bottom of it. Tie ribbon around the block and adhere to the top of the card using dimensional adhesive. Add the rub-on birds to the bottom of the card. Apply the rub-on flower to white cardstock, and cut out. Accent with jewels, and attach to the upper left side of the card. Cut the letters at 1" from pink cardstock using a Cricut and Simply Sweet cartridge. Adhere to the front of the card, and accent the top with a "happy" sticker.
Well, our time is almost up in Sheridan with the fam. It has been a fun little getaway from Missoula! We are going out to dinner tonight for my birthday, because we are heading home tomorrow morning. It should be a fun night!
I am going to get going for now! Hope the first half of your week has been fabulous! ♥
Until later,
~Lea

Every girl loves a little bling on her birthday....even if it comes on a card instead of a piece of jewelry! :) The first card I have to share with you today has a big focus on pretty jewels, which is the current challenge at Jacksonbelle Embellishments. It is also based on Mojo Monday sketch 121.
Instructions: Round the bottom corners of a kraft colored card base. Round the bottom corners of block of plaid paper and adhere to the front. Cut a strip of dotted glitter paper, and adhere towards the top. Round the bottom corners of a block of white cardstock, and adhere to the front. Attach a scalloped paper frill to the seam. Cover the seam with white ribbon, and tie a button around the bow with twine. Add the jewels present to the white block, and the jewel sentiment to the top strip.
And I have one more card to share today! It isn't completely birthday themed, but it is baby themed....which is kind-of celebrating a birthday in a way! So, I figured it still fits a bit. This card is based on Laura's Sketch 43 at 2 Sketches 4 U this week. Lovely sketch this week!

Instructions: Round the bottom corners of a white card base. Round the bottom corners of a block of aqua striped paper and adhere to the front. Cut baby feet card at 5" from heart kraft paper using a Cricut and New Arrivals cartridge. Cut 3/8" off each side, and cover the cutout inside with white cardstock. Adhere the block to the front. Add a strip of ribbon down the center, cutting it off right before the baby feet. Cut the sentiment block at 3" using patterned paper & kraft cardstock using a Cricut and Storybook cartridge. Layer the cuts together, popping the top layer with dimensional adhesive. Adhere the sentiment block to the front, and accent with pearls. Top the sentiment block with a bow.
If you checked out my rainbow card post from yesterday, I actually ended up changing it. I decided I didn't like how the sentiment looked, so I picked a new one and redid it. It looks much better now....and I have added a new photo to that post. Check it out if you like!
We are still having a fun time in Sheridan with the family! The guys had a great time ice fishing yesterday, and today....they just got back. My dad is getting meatloaf ready now....yum! I so love comfort food! So, I am going to sign off for now. But first, I will leave you with sweet photo of our littlest (or....youngest, actually.) :)

She conked out on the couch like this last night...and slept there forever. Basically until I started to take photos of her, and the flash annoyed her. Then she curled up into a little ball in the same corner of the couch. Isn't she a doll?! ♥
Until later,
~Lea

"Celebrate" supplies:
Cardstock: Bazzill Basics
Paper/Paper Frill/Button: Doodlebug Designs
Jewels: Zva Creative (sentiment) & Basic Grey (present)
Ribbon: Renaissance By Design
Twine: Darice Inc.
Corner Rounder: EK Success
Instructions: Round the bottom corners of a kraft colored card base. Round the bottom corners of block of plaid paper and adhere to the front. Cut a strip of dotted glitter paper, and adhere towards the top. Round the bottom corners of a block of white cardstock, and adhere to the front. Attach a scalloped paper frill to the seam. Cover the seam with white ribbon, and tie a button around the bow with twine. Add the jewels present to the white block, and the jewel sentiment to the top strip.
And I have one more card to share today! It isn't completely birthday themed, but it is baby themed....which is kind-of celebrating a birthday in a way! So, I figured it still fits a bit. This card is based on Laura's Sketch 43 at 2 Sketches 4 U this week. Lovely sketch this week!

"A Wish Came True" supplies:
Cardstock: Bazzill Basics
Paper: K & Company
Pearls: Kaiser Craft
Ribbon: Renaissance By Design
Corner Rounder: EK Success
Diecut Machine: Cricut by Provo Craft
Diecut Cartridges: Storybook, New Arrivals by Provo Craft
Instructions: Round the bottom corners of a white card base. Round the bottom corners of a block of aqua striped paper and adhere to the front. Cut baby feet card at 5" from heart kraft paper using a Cricut and New Arrivals cartridge. Cut 3/8" off each side, and cover the cutout inside with white cardstock. Adhere the block to the front. Add a strip of ribbon down the center, cutting it off right before the baby feet. Cut the sentiment block at 3" using patterned paper & kraft cardstock using a Cricut and Storybook cartridge. Layer the cuts together, popping the top layer with dimensional adhesive. Adhere the sentiment block to the front, and accent with pearls. Top the sentiment block with a bow.
If you checked out my rainbow card post from yesterday, I actually ended up changing it. I decided I didn't like how the sentiment looked, so I picked a new one and redid it. It looks much better now....and I have added a new photo to that post. Check it out if you like!
We are still having a fun time in Sheridan with the family! The guys had a great time ice fishing yesterday, and today....they just got back. My dad is getting meatloaf ready now....yum! I so love comfort food! So, I am going to sign off for now. But first, I will leave you with sweet photo of our littlest (or....youngest, actually.) :)

Until later,
~Lea

Happy Monday everyone!! I am coming to you live from Sheridan, MT...where we are hanging out with the fam for a few days. I brought some stuff with me to make cards, because I knew my mornings/afternoons would be pretty quiet. My dad and Josh are ice fishing, my mom is running her little shop, and Casey is at school.
I have a whimsy little card to share with you today. It is based on Taylored Expressions Sketch #97, and 365 Cards: Crazy Eight challenge. The challenge was to use 8 colors....I say that is EASY when you incorporate a rainbow.♥ You have seven colors right there.....except I omitted indigo, and then added white & pink.
Instructions: Round the corners of a block of red glittered paper and adhere to the front of a white card base. Round the left hand corners of a block of white cardstock, and adhere to the front. Cut the scallop at 3" from pink cardstock using a Cricut and Storybook cartridge. Adhere to the front. Layer pink dotted ribbon over the white and pink cardstock. Cut the circle at 2 1/2" from white cardstock using a Cricut and Storybook cartridge. Adhere the rainbow feltie to the circle, and add the rub-on sentiment directly below it. Attach the circle to the pink scallop using dimensional adhesive. Tie an orange button around a pink bow with twine, and adhere to the right side of the circle. Accent the left side with rainbow colored jewels.
Do you want to see how I can travel so easily with my Cricut cartridges? I took a few photos so you could see.
 I bought these two items at Michael's ages ago, because they were the perfect fit for what I needed. The first photo fits the booklets perfectly, and it is pretty important to have the books with you when you are using a Cricut. The next two photos are of the same item. This carrying case has two zippered sides to it, one side for carts, and the other side for keypads. They are organized exactly the same way, so everything is easy to find. The first row is font cartridges. The next two rows are shape cartridges, and the last row is licensed cartridges (ie: Disney, Hello Kitty, etc....). I didn't have to bring my E with me, because when I got it I gave my mom the baby bug. So, I am just using hers while I am here. But, having a storage system like this doesn't make it too hard to bring the E anywhere if I need to.
And now onto life stuff! ♥ My little bro cooked dinner for Josh and me (and himself) last night. I was pretty impressed...I don't think I have ever seen him cook anything. So, of course, I had to take some photos. Here he is cooking us "piggy burgers".
 You know he is working hard when the tongue sticks out....he has done that ever since he was little. And here he is with his piggy burger. I opted for a lighter "piggy" version....and just had a couple of small pieces of bacon on mine, and held the big chunks of ham. The boys enjoyed the real deal though!
 So, after that he went and lifted for the second time. And he came home and ate even MORE food, including a protein shake. Sigh- to have the metabolism of a 19 year old male athlete. If only, right?
And I just have to share this photo of our little cuties too!
 This is a rare sight. While these two love each other in their own way....they still aren't fond enough of each other to normally lay this close. I think they were both exhausted from the car trip over, and the excitement of being in a different house. They're so adorable....we ♥ them!
Well, I am going to sign off for now. I hope your Monday hasn't been too manic! :)
Until later,
~Lea
PS: If you haven't made yourself eligible for my Imaginisce giveaway yet, be sure to visit this post HERE and get eligible. I will be drawing the winner on Thursday!
I have a whimsy little card to share with you today. It is based on Taylored Expressions Sketch #97, and 365 Cards: Crazy Eight challenge. The challenge was to use 8 colors....I say that is EASY when you incorporate a rainbow.♥ You have seven colors right there.....except I omitted indigo, and then added white & pink.

"Very Happy Birthday"supplies:
Cardstock: Bazzill Basics
Paper/Jewels/Button: Doodlebug Designs
Ribbon: Renaissance By Design
Twine: Darice Inc.
Feltie: Sassafras
Rub-on: American Crafts
Rub-on: American Crafts
Corner Rounder: EK Success
Diecut Machine: Cricut by Provo Craft
Diecut Cartridge: Storybook by Provo Craft
Instructions: Round the corners of a block of red glittered paper and adhere to the front of a white card base. Round the left hand corners of a block of white cardstock, and adhere to the front. Cut the scallop at 3" from pink cardstock using a Cricut and Storybook cartridge. Adhere to the front. Layer pink dotted ribbon over the white and pink cardstock. Cut the circle at 2 1/2" from white cardstock using a Cricut and Storybook cartridge. Adhere the rainbow feltie to the circle, and add the rub-on sentiment directly below it. Attach the circle to the pink scallop using dimensional adhesive. Tie an orange button around a pink bow with twine, and adhere to the right side of the circle. Accent the left side with rainbow colored jewels.
Do you want to see how I can travel so easily with my Cricut cartridges? I took a few photos so you could see.

And now onto life stuff! ♥ My little bro cooked dinner for Josh and me (and himself) last night. I was pretty impressed...I don't think I have ever seen him cook anything. So, of course, I had to take some photos. Here he is cooking us "piggy burgers".


And I just have to share this photo of our little cuties too!

Well, I am going to sign off for now. I hope your Monday hasn't been too manic! :)
Until later,
~Lea
PS: If you haven't made yourself eligible for my Imaginisce giveaway yet, be sure to visit this post HERE and get eligible. I will be drawing the winner on Thursday!
Subscribe to:
Posts (Atom)


Social Icons