
Today I want to catch up on some birthday cards that I've created using the new Winnie & Walter Cutaways!! I wasn't able to participate in "A Week to Die for" on the W&W blog because of our trip to Montana...but I've done a few "make-up" cards in the past few days!
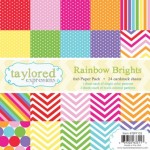
My first card is stamp free, focusing on three different sets of Cutaways! I chose a rainbow color theme...which you know is one of my all-time favorites! Check it out:


- Make A2 card from white cardstock.
- Diecut the scallop trim from rainbow colored cardstocks.
- Layer the scallop trim cuts to the bottom half of the card, then trim the excess.
- Diecut the word "happy" from purple dotted paper.
- Adhere it with foam dots to the top of the scallop trim.
- Diecut the word "birthday" from white glittered cardstock.
- Adhere it slightly overlapping the bottom of the word "happy".
- Accent with jewels to finish.
Challenges:
- ShowCASe Your Style #10 - color challenge
- Verve Stamps March Inspiration challenge - B is for birthday
Supplies:

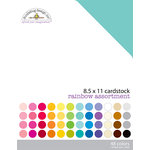


**The white glitter cardstock is not linked above. I purchased it from the scrapbooking paper section at Michael's, and is branded as Recollections.**
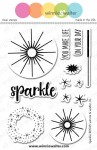
My next card uses layers of stamping & heat embossing, plus some beautiful flourished jewel trims & some confetti cuts. I love how it turned out!!


- Make A2 card from white cardstock.
- Stamp & heat emboss the larger sparkles directly to the card front.
- Stamp & heat emboss the smaller sparkles over top of the larger ones.
- Stamp & heat emboss the stardust over top of the layered sparkles.
- Layer two strips of jeweled trim diagonally to the card front.
- Embellish the stamped sparkles with large jewels.
- Diecut the banner from white cardstock.
- Stamp & heat emboss the word "sparkle" twice.
- Finish the sentiment in black ink, then adhere the banner to the front.
- Diecut the confetti from white glitter cardstock & layer to the top of the trim.
Challenges:
- Virginia's View #13 - all things embossed
- Cupcake Inspirations #300 - sparkle
- Cupcake Inspirations #300 - color challenge
- Cupcake Inspirations #300 - confetti
Supplies:


**The white glittered cardstock & the green jeweled trim are not linked above. I purchased the cardstock from the scrapbooking paper section at Michael's, and is branded as Recollections. The green jeweled trim is from Prima Marketing & the color is listed as Medaline.**
My final card looks a little different from the first two, and uses a colored card base & some patterned papers. It's fun & festive & I think you'll like it! Check it out:


- Make A2 card from red cardstock.
- Diecut the background paper & adhere to the card front.
- Cut 4 2-inch squares from patterned paper, and layer to the front.
- Diecut the circle from patterned paper, & adhere to the middle.
- Tuck stickers into the top & middle of the patterned blocks.
- Diecut the word "happy" from navy cardstock & adhere to the top.
- Add letter stickers to the top & stamp the word "day" below it to finish the sentiment.
- Add a wood veneer birthday cake below the sentiment.
- Add a star sticker & arrow sticker to the wood veneer.
- Diecut the confetti from white glittered paper & adhere to the top.
- Embellish with enamel dots to finish.
Challenges:
Supplies:


**The white glittered cardstock, enamel dots & wood veneer are not linked above. I purchased the cardstock from the scrapbooking paper section at Michael's, and is branded as Recollections. I believe the wood veneer & enamel dots came from a past kit, but am unsure of the company or month. Sorry I can't be of much more help on those items.**
Whew...I know that was A LOT of cards & content to look over in one blog post. Thanks for sticking it out & I really hope that you like them!! Have a great rest of your Tuesday!
Until later,
~L.


16 comments
UM WOW!! I love the way you created the first card with the different colored garlands layered on top of one another. My FAVORITE, though is that second card. That is a WOW factor. STUNNING design!!
ReplyDeleteWow what fabulous cards! Thank you so much for joining us for our 300th challenge!
ReplyDeleteHugs, Debbie, DT Sweetie!
Oh my goodness!!! Completely amazing!
ReplyDeleteBeautiful cards,especially like your bright and cheery card for the House of Cards challenge. d HOC DT
ReplyDeleteWonderful cards! That second one is my favorite, it reminds me of fireworks.
ReplyDeleteOH MY GOODNESS.. These cards are amazingly beautiful! Breathtaking!!!!!!!!!
ReplyDeleteWhat an awesome array of cards!!! They are all simply STUNNING! I love the use of all the bling! Thank you for joining us at House of Cards! HUGS! :) Mynn xx
ReplyDeleteWow! Some amazing card you made! I really like the one you used enamel dots on. So festive. Thanks you for joining us at House of Cards!
ReplyDeleteReally cool! There's a lot of the card yet you kept the focus on the message so well! Love it!
ReplyDeleteToni
HOC DT
Wow! Your cards are just so fabulous! Thanks so much for joining in the fun for the Cupcakes Inspirations 300th Challenge Celebration!
ReplyDeleteAll so gorgeous! Love the cutaways. I bough the W&W stamps and should have got the cutaways too! Love your design layouts! Thanks for sharing it at our 300th challenge at Cupcake Inspirations!
ReplyDeleteReally stunning cards! All so different but all so pretty! Thank you so much for joining us at Simon Says Stamp Monday Challenge. Hugs, Sandra
ReplyDeleteGorgeous cards Lea
ReplyDeleteAmazing cards Lea. Thanks for joining us at House of Cards
ReplyDeleteOh my word, these are all beyond fabulous. Your cards always take my breath away!
ReplyDeleteEach one of your card designs are gorgeous. The wonderful variety of color, layers and unique designs are true inspiration. Thanks for sharing
ReplyDeleteComments warm my heart. Thank you! ♥