
Showing posts with label K and Company. Show all posts
Showing posts with label K and Company. Show all posts

Hey there, everyone! Sorry for the little bit of a break I took from my blog. I had a wedding fair to get ready for this past weekend, and it had been taking up most of my time. The wedding fair was definitely a success, and I had a lot of great compliments on my photography {and on my super cute booth. I will try to remember and share a photo of it once I get them uploaded!!}
Today I have two cards to share with you, both based on CPS Sketch #250. If you frequent my blog at all, you will know that I love both CAS and extremely layered cards. I have used the sketch to create both types of cards, and I hope to do this on my blog more often in the future!! For my first card, I used lots of fun papers, diecuts and embellishments...here is what I created!

Today I have two cards to share with you, both based on CPS Sketch #250. If you frequent my blog at all, you will know that I love both CAS and extremely layered cards. I have used the sketch to create both types of cards, and I hope to do this on my blog more often in the future!! For my first card, I used lots of fun papers, diecuts and embellishments...here is what I created!
"i.love.u" supplies:
Cardstock: Bazzill Basics (pink)
Paper/Diecuts: My Mind's Eye (Love Me 6x6 pad/diecut sheet)
Stamps: WPlus9 (Heartfelt Mix & Love You More sets)
Ink: Clearsnap (Donna Salazar Mixed Media: black, chiffon)
Metal Charms: Making Memories
Pins: Maya Road
Flower: EK Success
Seam Binding: The Ribbon Reel
Twine: May Arts
Bells/Jewels: Michael's brand
Corner Rounder: Creative Memories
Sandpaper
Instructions: Make card from pink cardstock. Cut banner paper slightly smaller, and sand the edges. Cut four 1.75" squares from different papers, round the opposite corner on each one and sand the edges. Arrange and adhere to the middle of the banner paper block. Add three metal charms to the upper right side, and adhere the entire block to the card front. Cut two banners from patterned paper, and adhere to the top and bottom of the card. Add a fabric flower to the middle of the card, and accent the middle with a pearl ribbon charm. Tie a double bow from seam binding & twine, and tie together at the middle with two pink bells. Adhere the entire ribbon accent to the left side of the pearl ribbon charm. Adhere the sentiment flags to pins, and stick into the top of the flower. Stamp the word "4 EVER" right below the striped paper square. Add heart diecuts to the fussy cut banners, then stamp the pins to the top of each one. Accent the hearts with clear jewels to finish.
Card Challenges Used:
-Clearly Inspired #43- valentine's day
-One Stop Craft challenge #164- bingo card (distressing, diecuts/punches, charms/pins)
-The Ribbon Reel challenge #19- inspiration photo + polka dots, pink, & ribbon/twine
-The Pink Elephant #130- hearts
-Simon Says Stamp challenge- spots &/or stripes
-Inky Impressions #41- red, pink, white
For my second card, I did a very clean & simple version for the same exact sketch. I bought these Valentine's diecuts on Tuesday, and I felt like they were just perfect for this card!! I really love how it turned out!
"Be Mine" supplies:
Cardstock: Papertrey Ink (kraft)
Diecuts: K & Compan
Stamps: WPlus9 (Love You More set)
Ink: Clearsnap (Chalk: alabaster) & Tsukineko (Versafine: onyx black)
Jewel: Doodlebug Designs
Letter Sticker: Glitz Design
Instructions: Make card from kraft cardstock, then ink the edges. Adhere the diecut tickets to the middle of the card, then accent the middle with a jewel. Stamp "today, tomorrow, forever" right below the ticket on the end. Cut a letter sticker "x" to size, and adhere inside the box next to the word "yes" to finish.
Card Challenges Used:
-Crazy 4 Challenges #118- use something new
-The Kraft Journal #53- favorite colors
-The Paper Players #77- Love
Well, I hope you enjoyed my one sketch, two styles post today!! As I continue doing this feature in the future, I hope it makes sketches easier for everyone to interpret...regardless of their style!! Have a great rest of your day!! ♥♥♥
Until later,
~Lea L.

Hi everyone!! Today starts the Lawn Fawn sneak peek, and up first is a new item that Lawn Fawn is introducing. It is called "Lawn Trimmings", and they are the cutest little packages of ribbons and trims all bundled together! They are super cute!
Here is my card using the Lawn Trimmings!
Here is my card using the Lawn Trimmings!
"Wedding Wishes" supplies:
Cardstock: The Paper Company
Paper: K & Company
Stamps/Trim: Lawn Fawn (Sophie's Sentiments set)
Ink: Clearsnap (Pigment: cranberry)
Sticker: Bo Bunny
Metal Tabs: Making Memories
Ribbon Charm: craft supply
Corner Rounder: EK Success
Scalloped Die: Papertrey Ink
Diecut Machine: Cuttlebug by Provo Craft
Be sure to check out the other Lawn Fawn designers and see what they came up with as well!!
Latisha Yoast- http://crafteebee.blogspot.com/
Lynnette Kauffman- http://nettersnotables.blogspot.com/
Mariana Grigsby- http://marianagrigsby.wordpress.com/
Teri Anderson- http://terisplace.wordpress.com/
Tiffany Johnson- http://tiffguam.com/
Because I am in Kenya, I can't update all the giveaway links. So be sure to visit each post during the sneak peeks in order to be eligible for each giveaway!
Until later,
~Lea L.

I was very excited this week when I received an email from Natasha at the Clean & Simple blog, asking me to take part in their 100th Sketch celebration! I love that sketch site, and I use the sketches often for the cards on my blog. Here is the card that I came up with for the 100th sketch!!
I hope that you have a wonderful Friday evening, and weekend!
Until later,
~Lea
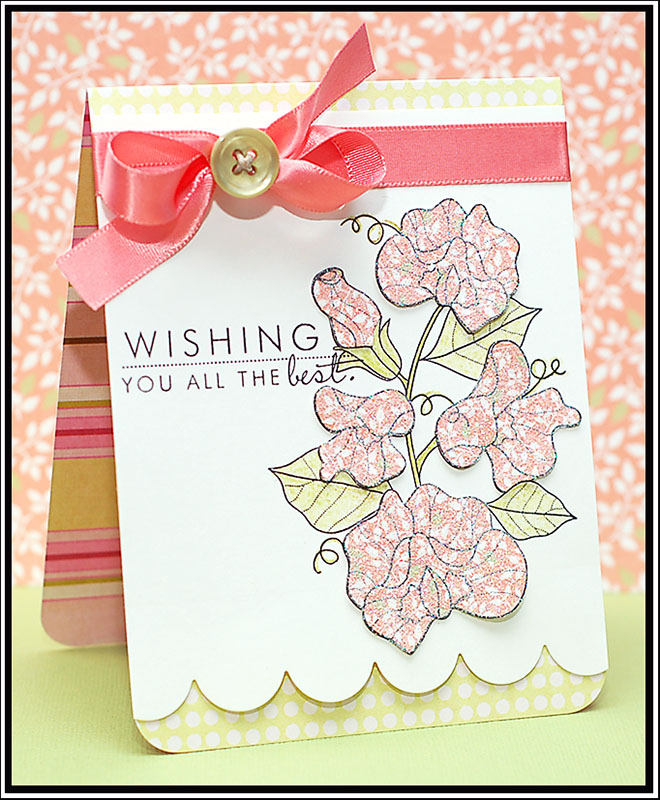
"Wishing You All the Best" supplies:
Cardstock: The Paper Company
Paper: K & Company and Papertrey Ink
Stamp/Ribbon/Button/Die: Papertrey Ink (YOF: Sweet Peas set)
Ink: Tsukineko (Versafine: onyx black)
Twine: Darice Inc.
Glitter: DecoArt
Colored Pencil: Heidi Swapp
Corner Rounder: EK Success
Diecut Machine: Cuttlebug by Provo Craft
Instructions: Fold green dotted paper in half to make card base, and round the bottom corners. Cut a scalloped border to a cream cardstock block using a Cuttlebug and medium scallop die. Stamp the floral image directly to the cardstock block, color in the greenery, and then stamp the sentiment to the front. Stamp the floral image to pink patterned paper, and cut out just the flowers. Glitter them, and piece them on top of the existing stamped image. Adhere the entire block to the front of the card base. Tie ribbon across the top, and add a button to the middle of the bow using twine.
For the celebration, the Clean & Simple blog is doing a blog hop with some amazing card designers!!! Here is the list, starting at the Clean & Simple blog. If you came to my blog for other purposes, I would love for you to check out the blog hop! It is sure to be amazing!! Here you go, and have lots of fun! ♥♥♥
For the celebration, the Clean & Simple blog is doing a blog hop with some amazing card designers!!! Here is the list, starting at the Clean & Simple blog. If you came to my blog for other purposes, I would love for you to check out the blog hop! It is sure to be amazing!! Here you go, and have lots of fun! ♥♥♥
Clean & Simple- http://cleanandsimplestamping.blogspot.com/
Angie Tieman- http://schwooo.blogspot.com/
Becky Carafa- http://www.lakeshorestamper.com/
Harriet Skelly- http://allycatcards.blogspot.com/
Heather Pulvirenti- http://heatherpulvirenti.blogspot.com/
Iwona Palamountain- http://ipalamountain.blogspot.com/
Jen Carter- http://jensinkspot.blogspot.com/
Julie Ebersole- http://papertrufflez.typepad.com/
Julie Lacey- http://stampsandtaxes.blogspot.com/
Kelly Jo- http://kjsstamppad.blogspot.com/
Lea Lawson- http://leascupcakesandsunshine.blogspot.com/ (that's me!)
Natasha Trupp- http://palmtreesandpogosticks.blogspot.com/
Silke Ledlow- http://silkeledlow.blogspot.com/
Susan Raihala- http://simplicitybylateblossom.blogspot.com/
Until later,
~Lea

...can't get any cuter than that!! So- happy Friday everyone! I can't believe it has almost been a week since I posted last! It has been a super busy week! Let me give you a little recap. Last Friday-Saturday we were in Great Falls at Casey's state track meet. It was cold and super rainy...and just pretty darn miserable. Casey took 6th place in the 300m hurdles, but struggled in the rest of his events. It was really cold, and he definitely couldn't keep his muscles warm. After the track meet on Saturday, we drove to Sheridan. A bunch of family was already there for Casey's graduation the next afternoon...so we chatted and had a great time. Casey graduated on Sunday afternoon!!! So proud of him!! Came home on Monday afternoon, and had a photo shoot that night. Tuesday I uploaded and started editing graduation photos, and did some Glitz cards that were needed. Wednesday I got the house ready for two girls that were going to be staying with us that night. They are here to serve as missions/interns to a church in Hungry Horse, but needed a place to stay for the evening. Yesterday I finished editing graduation photos and made the bazillion DVD's....with card making in there also! And today we leave for Sheridan/Butte to attend the Class C All-Star banquet tonight, and the football game tomorrow. So- my days have been packed lately!
But, I do have a couple cards to share with you today! First up is my card for CPS 169 this week. It was a pretty fun sketch this week...I loved the rainbow top! My rainbow actually comes from the banner cut in the Stand and Salute Cricut cartridge....who would have thought, huh? Love that!


But, I do have a couple cards to share with you today! First up is my card for CPS 169 this week. It was a pretty fun sketch this week...I loved the rainbow top! My rainbow actually comes from the banner cut in the Stand and Salute Cricut cartridge....who would have thought, huh? Love that!

"Dance, Sing, Dream" supplies:
Cardstock: Bazzill Basics
Paper/Stickers: Sassafras
Stamps: Renaissance by Design (Strictly Sentiments set)
Ink: Clearsnap (Pigment: black, pink, turquoise, violet)
Jewels: Doodlebug Designs
Pearls: Kaiser Craft
Corner Rounder: EK Success
Diecut Machine: Cricut Expression by Provo Craft
Diecut Cartridge: Stand and Salute by Provo Craft
Instructions: Fold white cardstock in half to make card base, and round the bottom corners. Round the bottom corners of a striped paper block, and adhere to the front. Stamp the sentiment to a white cardstock block, and round the bottom corners. Adhere the block to the front of the card. Add a banner sticker to the top of the white cardstock block, and accent with pearls. Cut the rainbow (banner) from glittered cardstocks using the Cricut Expression & Stand and Salute cartridge. Take out the needed pieces, and adhere to the top of the card in a rainbow shape. Accent the rainbow with jewels and glittered star cuts (leftover from the banner cuts). Accent the lower right corner of the white cardstock with stars and pearls.
And this next card I did just because I love this cute bird nest cut so much! I have used it before...and I am sure it won't be the last time I use it again. Tee hee!

"New Arrival" supplies:
Cardstock: Bazzill Basics
Paper: K & Company
Stickers: Basic Grey
Jewels: Kaiser Craft
Glitter: DecoArt & Ranger Stickles
Corner Rounder: EK Success
Punch: Martha Stewart Crafts
Diecut Machine: Cricut Expression by Provo Craft
Diecut Cartridges: Straight from the Nest, Give A Hoot, George & Basic Shapes by Provo Craft
Instructions: Fold kraft cardstock in half to make card base, and round the bottom corners. Round the bottom corners of an aqua heart paper block, and adhere to the middle. Cut the tree limb at 3 1/4" using the Cricut Expression and Straight from the Nest Cartridge. Cut off the leaves, and adhere to the front of the card. Cut the nests and layers at 2 1/2" using the Give A Hoot cartridge. Layer them together, giving it some dimension. Glitter the pink egg, and adhere with dimensional adhesive. Adhere the entire cut to the front of the card and accent with jewels. Cut the hearts in multiple sizes using the George & Basic Shapes cartridge. Adhere them to the tree limb as the leaves, and accent with jewels. Add the sentiment to the top using letter stickers, and accent with tiny punched hearts. Glitter the punched hearts with Stickles.
Here are some favorites shots from Casey's graduation day! (Be aware...there are a lot of them!) Tee hee!


(This is a little interjection...of course, I took this photo of my beautiful rose from Casey after the ceremony.)


Well all...I need to get going for now!! I hope that you have had a wonderful week, and have an even better weekend ahead of you! I will be watching the boy play some football on Saturday....so super excited about that! I don't have access to the field, but I still plan on taking photos. They might just be further away than I am used to! So- I will probably be sharing some more photos later next week! ♥♥♥
Until later,
~Lea

...tee hee! No, I am not having one. Let's not get that rumor started! I just have a baby card to share with you today, and then some sweet images from a newborn shoot I did this week! So, let's get started!
First up is my card for sketch 163 at CPS this week. I had a heck of a time photographing this card for some reason! I did custom white balances, auto white balances, different angles...it just didn't want to be photographed very well. This was the best I could get it to look...and I am sticking with it!! See- even professional photographers struggle at times! Tee hee!


First up is my card for sketch 163 at CPS this week. I had a heck of a time photographing this card for some reason! I did custom white balances, auto white balances, different angles...it just didn't want to be photographed very well. This was the best I could get it to look...and I am sticking with it!! See- even professional photographers struggle at times! Tee hee!

"Sweet As Can Be" supplies:
Cardstock: Bazzill Basics
Cardstock: Bazzill Basics
Paper: K & Company
Stamps: Papertrey Ink (Baby Button Bits)
Ink: Clearsnap (Pigment: citrine, pink)
Ribbon: Renaissance by Design
Jewels: Doodlebug Designs
Corner Rounder: EK Success
Border Punch: Fiskars
Instructions: Fold white cardstock in half to make card base, and round two opposite corners. Punch a scalloped strip to striped paper, and adhere to a heart paper strip. Adhere the entire strip to the left side of the card. Round the opposite corners of a green dotted paper block. Round the opposite corners of a white cardstock block, stamp the pea pod to it, and adhere to the green dotted block. Stamp the two sentiments to white cardstock strips and cut out. Adhere them to the block, and accent with jewels. Tie ribbon around the green dotted block, and adhere the entire piece to the front of the card using dimensional adhesive.
That is the only card I have to share with you today, but I do have some super sweet newborn photos to share with you. I photographed baby Tyler on Monday. He was a week old, and just so darling. These were my favorite shots from the day. Hope you like them!


Let me know what you think of them!
Well blog readers, this next week is going to be pretty sparse on my end. We are heading out on a little vacation with some friends and family starting tomorrow, and will be gone all week long. I am posting my Curtain Call and CPS cards in advance....and that is all you will be seeing from me. I hope that you all have a really wonderful week ahead of you! ♥♥♥
Until later,
~Lea

....they are some of my very favorite colors! I have a few cards to share with you today that use these colors. So, let's get started.
This first card is for Challenge 13 at the Everything But The Kitchen Sink blog. And it has pink & aqua mixed with kraft....an even better color combo! Yum!
This first card is for Challenge 13 at the Everything But The Kitchen Sink blog. And it has pink & aqua mixed with kraft....an even better color combo! Yum!

"Live & Love" supplies:
Cardstock: Bazzill Basics
Paper: K & Company
Stamps/Ribbon: Renaissance by Design (Darling Damask & Simply Sentiments sets)
Ink: Clearsnap (Pigment: mint, chestnut)
Jewels: Doodlebug Designs
Flowers: Zva Creative & craft supply
Corner Rounder: EK Success
Instructions: Fold kraft paper in half to make card base, and round the bottom corners. Round the bottom corners of a pink heart paper block, and adhere to the bottom of the card. Punch a scalloped border to aqua striped paper, and adhere to the top of the pink heart paper. Stamp the damask pattern and the sentiment to a white cardstock block. Round the top corners and adhere to the front of the card. Tie ribbon around the seam, and top with 3 paper flowers. Accent the top of the card with three pink jewels.
This next one is based on the Sunday Sketch at 365 cards, and on challenge 25 at the Play Date Cafe (use black & white with a splash of color). I love how this one turned out with just the little splash of aqua in places!


"Just For You" supplies:
Cardstock: Bazzill Basics
Stamps: Renaissance By Design (Darling Damask set)
Ink: Clearsnap (Pigment: black, turquoise)
Ribbon: Offray
Jewels/Twine: Darice Inc.
Button: Doodlebug Designs
Instructions: Fold black cardstock in half to make card base. Stamp the damask design to the left side of a white cardstock block. Tie ribbon around the middle, and attach a button to the bow with twine. Adhere the entire block to the front of the card, and accent the two black damasks with a jewel. Stamp the sentiment directly below the bow.
And one last little card that has a whole lotta pink and white. This one is based on Sweet Sunday Sketch 65!


"Thank You" supplies:
Cardstock: Bazzill Basics
Paper: My Mind's Eye
Stamps: Renaissance by Design (Enjoy Life & Strictly Sentiments set)
Ink: Clearsnap (Chalk: rose coral)
Flower: Provo Craft
Ribbon: Bo Bunny
Jewels: Darice Inc.
Corner Rounder: EK Success
Embossing Machine: Cuttlebug by Provo Craft
Embossing Folder: Victoria by Provo Craft
Instructions: Fold white cardstock in half to make card base, and round the bottom corners. Emboss the front using a Cuttlebug and Victoria embossing folder. Round the bottom corners of a pink dot paper block, and adhere to the bottom of the card. Stamp the sentiment to a white cardstock block. Round the top corners and adhere to the left side of the card. Adhere three pink jewels directly below the sentiment. Tie ribbon around the bottom of the card, and add a felt flower to the left side of the bow. Stamp the butterfly on white cardstock and cut out. Adhere to the felt flower, and accent with clear jewels.
Well, that is all I have for you today. I have some stuff to do, so I am going to head out. Have a great day! ♥♥♥
Until later,
~Lea
Subscribe to:
Comments (Atom)


Social Icons