
Showing posts with label American Crafts. Show all posts
Showing posts with label American Crafts. Show all posts


Happy Thursday, blog friends! I hope you've had a wonderful week so far! Today I want to share a card with you using some of the new products from the Simon Says Stamp Fluttering By Release! Today my card is focused on a lot of the adorable butterfly items that were included in the release!
I used the Butterfly Shimmer die, the Stitching Butterflies dies, and the sentiment came from the Mom Flowers stamp set. I live over 1,000 miles away from all my family, and these products just felt perfect for a card letting them know how much I miss them! Here is what I created!
Hey there, blog friends! Welcome to day 2 of the Lil' Inker Designs March release! Today I am sharing some projects with you using our new Foxy line of stamps & dies!! Check out how cute they are!


Here is a closer look at the items I've used:


I hope you liked my projects today! Don't forget to hop along to each of
the design team members, as there will be a winner picked each day for a
$15 gift code to LID!! Here is the blog hop list:
LID Blog http://www.shoplilinker.blogspot.com/
Sarah Jay http://www.criminalgrace.com/
Amy Kolling http://stamp-n-paradise.blogspot.com/
Maureen Merritt http://www.mamamostamps.com/
Chrissy Larson http://chrissycards.blogspot.com/
Lea Lawson www.lealawsoncreates.com/
Karen Baker http://thebalddragonfly.blogspot.com/
Jennifer Carter http://jensinkspot.blogspot.com/
Laura Williams http://lauralooloo.blogspot.com/
Lisa Henke http://mylittlecreativeescape.blogspot.com/
I will be back tomorrow with more projects using our newly released products!!
Until later,
~L.
Until later,
~L.
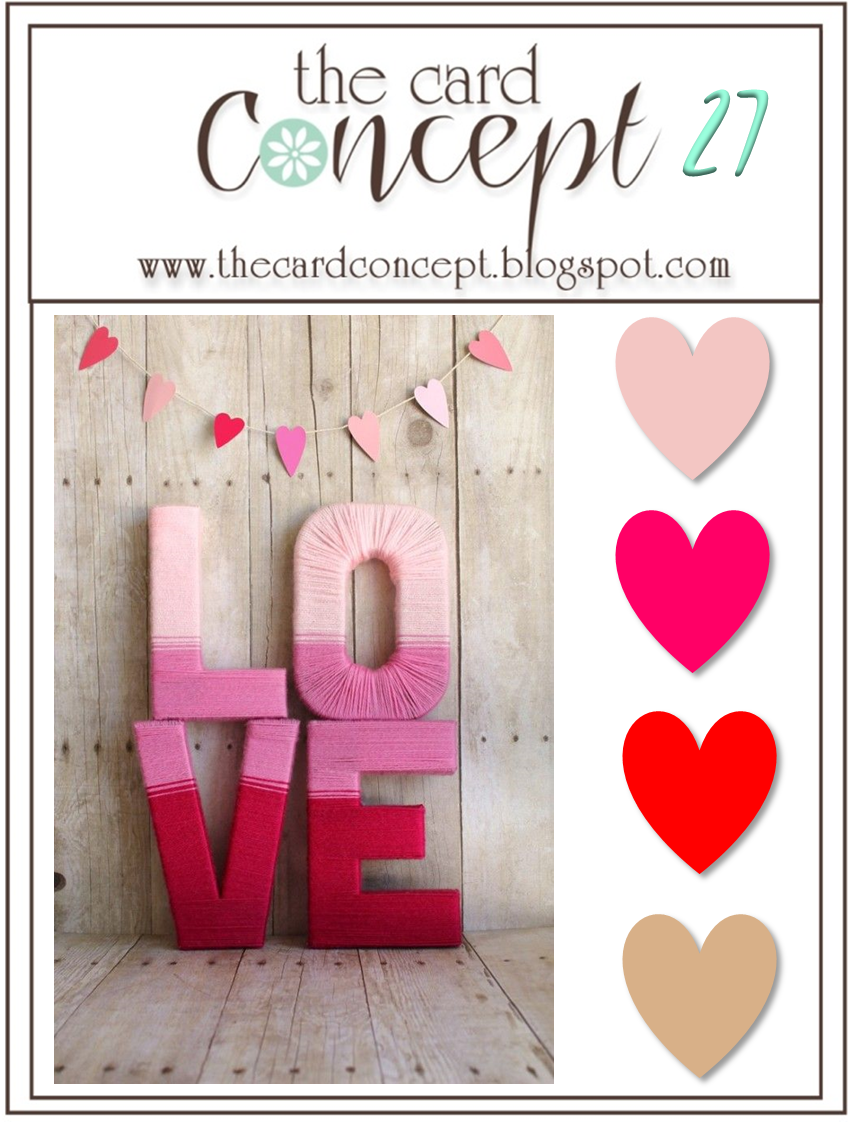
Hey there, blog friends!! How are you doing today? I'm great...just super busy with booking upcoming weddings & lots of crafting stuff that I just can't share quite yet! Today marks a new challenge at The Card Concept!!


That is all that I have for you today! If you want to see sneak peeks of future projects & keep up with me on Facebook, please head on over & like the Lea Lawson Creates page!! And don't forget to become a follower in the right sidebar so you never miss a post. Have an awesome rest of your day!!
Until later,
~L.
Isn't that inspiration photo so much fun? I just love everything about it! My card was inspired by pretty much all of it...the colors, heart banners, ombre lettering, & woodgrain. Check out my card!
I've used a mix of different papers & dies to create this card, which will all be linked below. I fussed with this card for quite awhile...getting the placement of everything just right. But I love how it ended up turning out!!
Other Card Challenges:
I really hope that you will join us in using this beautiful inspiration
photo, & defining what your style of card making is!! Here is a
reminder of the rules:
- Use the Challenge to create a card.
- Choose one of the design team "styles" to create your card. Click HERE for the different styles summary.
- Explain in your post which style you used.
- Link up your blog post here, not your whole blog.
- Comment on the card ahead of you and behind you in the linky. Everyone loves comments!
That is all that I have for you today! If you want to see sneak peeks of future projects & keep up with me on Facebook, please head on over & like the Lea Lawson Creates page!! And don't forget to become a follower in the right sidebar so you never miss a post. Have an awesome rest of your day!!
Until later,
~L.

Hey there, everyone!! Dropping in really quickly from our vacation in Montana to wish Julie Mogford a very special happy birthday!!
A few of us from the card making world have banded together to celebrate Julie, and created a blog hope in her honor! Here is the card I made for her!!


 I hope that you are having a wonderful birthday, Julie!! And I hope you get something sparkley & shiney...lol!!
Here is the rest of the blog hop, so you can see everyone else's fun cards!
Thanks for checking out my card today! Happy birthday, Julie!!
Until later,
~L.
A few of us from the card making world have banded together to celebrate Julie, and created a blog hope in her honor! Here is the card I made for her!!
Here is the rest of the blog hop, so you can see everyone else's fun cards!
Thanks for checking out my card today! Happy birthday, Julie!!
Until later,
~L.

Today is going to be a fabulous day!! Not just because it is the weekend, and most of us have two whole days to craft, spend time with family & friends, watch football, eat great food, etc....but this Saturday is super extra special. Today we are honoring our amazing friend, Cath Edvalson, for all the amazing work she has done for us as an editor of Paper Crafts Magazine & author of the Moxie Fab blog. Cath coined the term "moxie fab" long ago, & it has been an ever present part of this crafting world of ours....and I am sure it will remain even as Cath departs from her position with Paper Crafts Mag.
And this isn't your average blog hop....this is the MOTHER of all blog hops. Cath has reached so many crafters & manufacturers...that 285 of us are taking part in telling her THANK YOU from the bottom of our hearts {yep- I'm yelling it.}
I still remember how happy my heart was when I saw my "Moxie Fabber of the Week" post {holy crap- that was almost THREE years ago} & read the thoughtful words that Cath had to say about me. It truly warms my heart to this day, & it is my gentle reminder that I need to get back to this community of mine. This summer & fall has taken its toll on me...I haven't had the time to be as much of a presence in this industry as I once was. I am looking forward to getting fully settled into my new home & back to being an active part of my crafty community again.
I have been lucky enough to have my cards occasionally featured on the Moxie Fab blog, & I've won a couple contests here & there.....and I will truly miss what Cath shared with us each & every day on the Moxie Fab blog. So, with that being said....here is my card for Cath. Made specifically & just for her! :)

Once again....THANK YOU Cath for all you have done in this industry. Thank you for all the inspiration. Thank you for what Moxie Fab has become to ALL of us. Thank you for your thoughtfulness & encouragement. Thank you for the blog comments! And thank you for just being the amazing person you are!
Since this is the mother of all blog hops, here is some information for you in case you weren't aware of it, or if you've gotten lost along the way.
You should have come to my blog from the Glitz Design blog.
You will now hop on to Heather Nichol's blog.
And there is a complete list of ALL blogs at the Moxie Fab blog.
Alright...I think you've got all the details, and I really hope you just have a wonderful time seeing all the amazing creations today!
Until later,
~L.
Hey there, everyone! Just popping in with a quick post to share this little peek of a card:

And to let you know that it is up on the Simon Says Stamp blog! So head on over there to see it in full, & get the full instructions on recreating it!!
Have a wonderful day!
Until then,
~L.

Happy Thursday, all!! How has your day been so far? Mine has been good! Pretty quiet around here...other than when the dogs bark at something outside. It is so nice & warm in Missoula right now, and I am just loving it! Been sitting on my back deck a bit each day, and just enjoying it while I can. Considering it's only May...we are bound to have another cold spell. It would be great if we didn't...but I'm not counting my lucky stars on that one.
Speaking of stars...that is a main theme in my card today!! I love this sentiment, and the gold glittery stars are the perfect accent for it! I've combined Dear Lizzy "Lucky Charm" with Studio Calico's "Atlantic" on this one...and I think it turned out so sweet! I love the soft shades of pink, and bold navy...and the vellum diecuts just make me swoon a little bit. Here is what I made!
Instructions:
1. Make A2 card from white cardstock.
2. Cut background paper slightly smaller, then adhere.
3. Layer the banner stickers to the left side, popping the top layer with foam adhesive.
4. Add the wood veneer banner & vellum layers to it, then top with a bow & sequins.
5. Diecut the circle printable, then layer to the front.
6. Add the sentiment card to the top of it, then layer three tabs tucked under the right side.
7. Cut out the sqaure & arrow printables, then layer to left of the sentiment.
8. Add the vellum frame over top of everything, cutting away the left section of it.
9. Accent with a wood veneer, then add a jewel & sequins top of the card.
10. Finish the card by adding two gold stars to the front.
Challenges:
-Studio Calico Sunday Sketch - sketch
-The Play Date Cafe #181 - color inspiration
-A Blog Named Hero #23 - glitter
Kind-of loving this cutie of a card right now. It would work for mother's day. It works for just love in general. A girl or young woman would love to get it...lots of possibilities. That is all I have for you today...but thought I would share a photo of this little cutie:
 She was laying like that on my bed last night while I was brushing my teeth & washing my face. And now my secret is out....I never make the bed. Unless I'm having a party. Ha! I'm cool with it though...so don't judge me. :)
Have a great rest of your day!
Until later,
~L.
Supplies:
Cardstock: Papertrey Ink (white) | Paper: Dear Lizzy (Lucky Charm 6x6) | Other:Dear Lizzy (stickers, sentiment card) | Studio Calico (vellum diecuts, bow, glitter stars, wood veneer symbol, printables, sequins) | Teresa Collins Design (bracket tag) | Martha Stewart Crafts (gold glitter tab) | Basic Grey (wood veneer banner) | Prima Marketing (pink jewel)
Speaking of stars...that is a main theme in my card today!! I love this sentiment, and the gold glittery stars are the perfect accent for it! I've combined Dear Lizzy "Lucky Charm" with Studio Calico's "Atlantic" on this one...and I think it turned out so sweet! I love the soft shades of pink, and bold navy...and the vellum diecuts just make me swoon a little bit. Here is what I made!
1. Make A2 card from white cardstock.
2. Cut background paper slightly smaller, then adhere.
3. Layer the banner stickers to the left side, popping the top layer with foam adhesive.
4. Add the wood veneer banner & vellum layers to it, then top with a bow & sequins.
5. Diecut the circle printable, then layer to the front.
6. Add the sentiment card to the top of it, then layer three tabs tucked under the right side.
7. Cut out the sqaure & arrow printables, then layer to left of the sentiment.
8. Add the vellum frame over top of everything, cutting away the left section of it.
9. Accent with a wood veneer, then add a jewel & sequins top of the card.
10. Finish the card by adding two gold stars to the front.
Challenges:
-Studio Calico Sunday Sketch - sketch
-The Play Date Cafe #181 - color inspiration
-A Blog Named Hero #23 - glitter
Have a great rest of your day!
Until later,
~L.
Supplies:
Cardstock: Papertrey Ink (white) | Paper: Dear Lizzy (Lucky Charm 6x6) | Other:Dear Lizzy (stickers, sentiment card) | Studio Calico (vellum diecuts, bow, glitter stars, wood veneer symbol, printables, sequins) | Teresa Collins Design (bracket tag) | Martha Stewart Crafts (gold glitter tab) | Basic Grey (wood veneer banner) | Prima Marketing (pink jewel)

Happy Wednesday, everyone!! Sorry for the lack of posts...I have been busy getting some stuff done in advance, so not a lot of time for daily postings. We ended up not going to Spokane over the weekend, but Josh did have to go work with his agents in Kalispell (he works for Geek Squad)...so I crafted a bit, and got a lot of Glitz stuff taken care of. It was a pretty quiet weekend, and has been a pretty quiet week so far too! Like I said...just working on some stuff in advance, dancing my butt off in Oula (Best. Workout. Ever.), and hanging out with the husband.
So, we had to do the April WPlus9 release a little differently this time around, due to a little bit of a delay from the manufacturer & ship times. So, Dawn did the release all by her lonesome and the designers took a block of days to showcase what we've made with the new stuff! Well, my block starts today...so I am going to have three days of WPlus9 goodness to share with you!! How about we get right to it!
 Instructions:
1. Make A2 card from white cardstock.
2. Cut heart paper slightly smaller.
3. Adhere a heart shaped doily to the heart block, wrapping the excess around the left side.
4.Adhere the entire block to the card front.
5. Stamp the quilt prints & layers to a white cardstock strip, cut out and adhere.
6. Diecut the tag from patterned paper & white cardstock, then layer together.
7. Layer the vellum frame, tag & diecut circle to the card front, then stamp the sentiment to it.
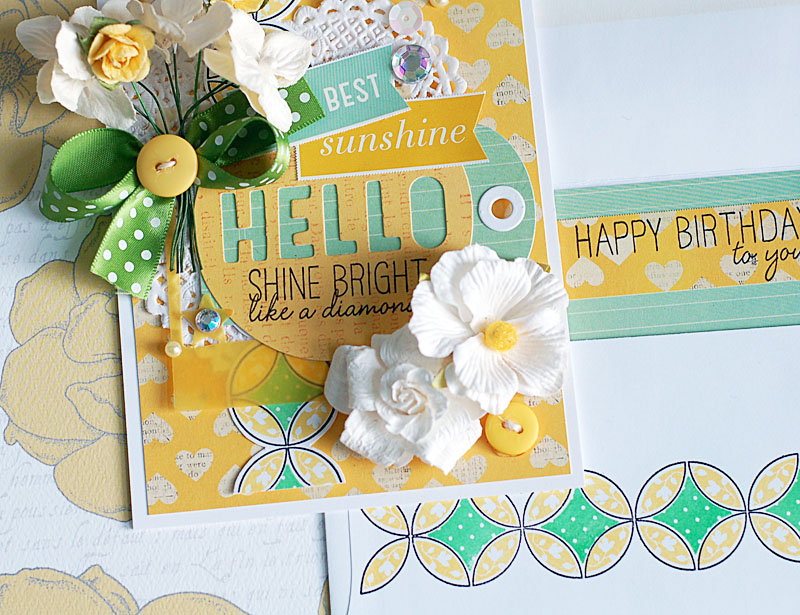
8. Adhere the flower bunch to the upper left corner, and the two white flowers to the lower right.
9. Tie a bow from green ribbon, stitch a button around the center with twine and adhere to the bunch.
10. Stitch another button with twine, and adhere to the lower right corner.
11. Add the sticker banners, then accent with jewels, pearls & a sequin.
12. Decorate the envelope to finish.
Challenges:
-The Shabby Tea Room #163 - Photo Inspiration
-Ribbon Carousel #80 - Showers & Flowers
-Party Time Tuesday #117 - Bingo Card (Buttons, Twine, Flower)
-Craft Your Passion #159 - Diamonds
-Sweet Stampin' - Buttons, Bows & Polka Dots
Now to be completely honest with you...that card isn't going to fit in the envelope. Ha!! That's okay...you could easily just clip them together and then decorate the gift box or bag with them! That is what I do with the majority of my cards...since they tend to be pretty dimensional. You can also send them in a padded envelope if you are just sending a card and not a gift. That is how I deal with the crazy dimensionality of my cards! :)
That is all I have to share with you today! If you have some time and want to be super inspired, head on over to Dawn's Blog to check out what everyone has been creating this month. It is a treat!! Have a great rest of your Wednesday!
Until later,
~L.
Supplies:
Cardstock: WPlus9 (white) | Paper: American Crafts (Dear Lizzy - Lucky Charm 6x6) | Stamps: WPlus9 (Quilt Prints, Strictly Sentiments 1) | Ink: Tsukineko (onyx black, dandelion) | Clearsnap (fresh green) | Dies: WPlus9 (Timeless Tags 2) | Other: Prima Marketing (flowers) | American Crafts (stickers, diecuts) | Studio Calico (vellum diecut) | Kaiser Craft (pearls) | May Arts (twine) | Craft Supply: buttons, ribbon, jewels
So, we had to do the April WPlus9 release a little differently this time around, due to a little bit of a delay from the manufacturer & ship times. So, Dawn did the release all by her lonesome and the designers took a block of days to showcase what we've made with the new stuff! Well, my block starts today...so I am going to have three days of WPlus9 goodness to share with you!! How about we get right to it!
Wplus9 Supplies:
Stamps: Quilt Prints, Strictly Sentiments 1 | Dies: Timeless Tags 2 | Cardstock: White
Stamps: Quilt Prints, Strictly Sentiments 1 | Dies: Timeless Tags 2 | Cardstock: White
1. Make A2 card from white cardstock.
2. Cut heart paper slightly smaller.
3. Adhere a heart shaped doily to the heart block, wrapping the excess around the left side.
4.Adhere the entire block to the card front.
5. Stamp the quilt prints & layers to a white cardstock strip, cut out and adhere.
6. Diecut the tag from patterned paper & white cardstock, then layer together.
7. Layer the vellum frame, tag & diecut circle to the card front, then stamp the sentiment to it.
8. Adhere the flower bunch to the upper left corner, and the two white flowers to the lower right.
9. Tie a bow from green ribbon, stitch a button around the center with twine and adhere to the bunch.
10. Stitch another button with twine, and adhere to the lower right corner.
11. Add the sticker banners, then accent with jewels, pearls & a sequin.
12. Decorate the envelope to finish.
Challenges:
-The Shabby Tea Room #163 - Photo Inspiration
-Ribbon Carousel #80 - Showers & Flowers
-Party Time Tuesday #117 - Bingo Card (Buttons, Twine, Flower)
-Craft Your Passion #159 - Diamonds
-Sweet Stampin' - Buttons, Bows & Polka Dots
Now to be completely honest with you...that card isn't going to fit in the envelope. Ha!! That's okay...you could easily just clip them together and then decorate the gift box or bag with them! That is what I do with the majority of my cards...since they tend to be pretty dimensional. You can also send them in a padded envelope if you are just sending a card and not a gift. That is how I deal with the crazy dimensionality of my cards! :)
That is all I have to share with you today! If you have some time and want to be super inspired, head on over to Dawn's Blog to check out what everyone has been creating this month. It is a treat!! Have a great rest of your Wednesday!
Until later,
~L.
Supplies:
Cardstock: WPlus9 (white) | Paper: American Crafts (Dear Lizzy - Lucky Charm 6x6) | Stamps: WPlus9 (Quilt Prints, Strictly Sentiments 1) | Ink: Tsukineko (onyx black, dandelion) | Clearsnap (fresh green) | Dies: WPlus9 (Timeless Tags 2) | Other: Prima Marketing (flowers) | American Crafts (stickers, diecuts) | Studio Calico (vellum diecut) | Kaiser Craft (pearls) | May Arts (twine) | Craft Supply: buttons, ribbon, jewels

Happy Thursday, all! How have the past couple of days been! It feels like it has been CRAZY here...even though it has mostly just been crazy for Josh. The BBY is making some changes, and he has spent the past 24 hours pretty much on the phone. Ha!! He also has to be in Portland when we are supposed to be flying out for Texas...so we've had to get THAT figured out too. We pretty much have it all taken care of now, so that is a good thing! Tonight we are going to watch the Griz play Syracuse in the big dance...hopefully they will have a Cinderella moment!!
I have a fun and easy friendship card to share with you tonight! It features some of the new Dear Lizzy Lucky Charm collection {which I LOVE!!} and an adorable Lawn Fawn stamp that matches perfectly!! I put this card together in less than 10 minutes. Oh yes- I did!! With stitching and all...I was pretty proud of myself! Here is what I created:
Instructions:
1. Make A2 card from kraft cardstock.
2. Layer circle sticker, green paper block and scalloped papers trip to the card front.
3. Wrap twine around the top seam.
4. Stitch along the bottom of an ombre tag, then layer to the front with a chipboard circle.
5. Stamp the sentiment bubble to white cardstock, adhere to chipboard circle, then accent with a heart.
6. Tie a double bow from twine, add a wooden button to the center and adhere to the tag top.
7. Add a diecut arrow to the bottom of the card, then accent with sequins & a pearl to finish.
Challenges:
-Moxie Fab World Card Creations Week challenge - Ombre
-10 Minute Craft Dash #14 - Colors (9 min, 52 seconds)
-Charisma Cardz #11 - Diecuts
-Lawnscapings #54 - Stitching

Nicole Rixon, the owner of Sweet Stamp Shop, had mentioned on Facebook how she got this big package of sequins...and these colors were in it! I was coveting them like crazy, so I headed out and picked up the same pack so I could have some too. I love them...and I LOVE this card! This Dear Lizzy collection is a fantastic one!!
Well, that is all I have for you tonight! If you are watching basketball and aren't a Syracuse fan...give a little GO GRIZ shout out! Tee hee!
Until later,
~L.
I have a fun and easy friendship card to share with you tonight! It features some of the new Dear Lizzy Lucky Charm collection {which I LOVE!!} and an adorable Lawn Fawn stamp that matches perfectly!! I put this card together in less than 10 minutes. Oh yes- I did!! With stitching and all...I was pretty proud of myself! Here is what I created:
1. Make A2 card from kraft cardstock.
2. Layer circle sticker, green paper block and scalloped papers trip to the card front.
3. Wrap twine around the top seam.
4. Stitch along the bottom of an ombre tag, then layer to the front with a chipboard circle.
5. Stamp the sentiment bubble to white cardstock, adhere to chipboard circle, then accent with a heart.
6. Tie a double bow from twine, add a wooden button to the center and adhere to the tag top.
7. Add a diecut arrow to the bottom of the card, then accent with sequins & a pearl to finish.
Challenges:
-Moxie Fab World Card Creations Week challenge - Ombre
-10 Minute Craft Dash #14 - Colors (9 min, 52 seconds)
-Charisma Cardz #11 - Diecuts
-Lawnscapings #54 - Stitching
Nicole Rixon, the owner of Sweet Stamp Shop, had mentioned on Facebook how she got this big package of sequins...and these colors were in it! I was coveting them like crazy, so I headed out and picked up the same pack so I could have some too. I love them...and I LOVE this card! This Dear Lizzy collection is a fantastic one!!
Well, that is all I have for you tonight! If you are watching basketball and aren't a Syracuse fan...give a little GO GRIZ shout out! Tee hee!
Until later,
~L.

Happy Saturday, everyone! How is your weekend going so far? I am having an awesome one!! Yesterday evening I watched the first Breaking Dawn on DVD with my friend Alex, and then we met a bunch of other ladies at Outback Steakhouse for appetizers before going to the late showing of Breaking Dawn Part 2! It was an EPIC ending...if you are a Twilight fan and haven't seen it yet, you are going to LOVE it!! Today has been pretty quiet...just watching the Griz play the Bobcats (our state rival) and hoping we can sneak a win. It's looking a bit scary right now....
I have a sassy little love card to share with you today! I mixed a bunch of different Paper Smooches Stamps sets together, along with the Love collection by American Crafts. I LOVE the houndstooth background stamp that I used on the cityscape...how cool would a building be painted like this! Tee hee! Here is what I created!
Instructions:
1. Make A2 card from black cardstock, then round the right corners.
2. Cut printed kraft paper strip, and adhere to the left side.
3. Punch a border to a heart paper strip, cover in glitter & adhere to a white cardstock block.
4. Stamp the houndstooth background, then the cityscape to a white cardstock strip.
5. Color in the windows, cut out and adhere to the bottom of the white block.
6. Stamp the sentiment above the cityscape, then color in the outlined parts.
7. Stamp the stars above the cityscape, and then above the top part of the sentiment.
8. Add pearls and a red heart jewel to the card to finish.
Challenges:
-Paper Smooches SPARKS - Sketch
-Clearly Inspired #64 - Clean & Simple
-Cute Card Thursday #243 - Starry Night
-Moving Along with the Times - Stars
-Oh La La Creations #118 - Someone Special

I hope that you liked my cute little love card today, and I hope that you have a wonderful rest of your weekend!!
Until later,
~L.
I have a sassy little love card to share with you today! I mixed a bunch of different Paper Smooches Stamps sets together, along with the Love collection by American Crafts. I LOVE the houndstooth background stamp that I used on the cityscape...how cool would a building be painted like this! Tee hee! Here is what I created!
1. Make A2 card from black cardstock, then round the right corners.
2. Cut printed kraft paper strip, and adhere to the left side.
3. Punch a border to a heart paper strip, cover in glitter & adhere to a white cardstock block.
4. Stamp the houndstooth background, then the cityscape to a white cardstock strip.
5. Color in the windows, cut out and adhere to the bottom of the white block.
6. Stamp the sentiment above the cityscape, then color in the outlined parts.
7. Stamp the stars above the cityscape, and then above the top part of the sentiment.
8. Add pearls and a red heart jewel to the card to finish.
Challenges:
-Paper Smooches SPARKS - Sketch
-Clearly Inspired #64 - Clean & Simple
-Cute Card Thursday #243 - Starry Night
-Moving Along with the Times - Stars
-Oh La La Creations #118 - Someone Special
I hope that you liked my cute little love card today, and I hope that you have a wonderful rest of your weekend!!
Until later,
~L.

Hey there, everyone!! Happy Monday....I hope that you had a fabulous weekend!! Ours was great....we went to the farmer's market with our friends and their family in the morning...then we all had a BBQ that evening. The weather has turned super nice here, and I am just hoping it is here to stay. It is making me deliriously happy!
Before I get to the card I have to share with you today, I wanted to post the winner of the $20 gift certificate from StopAndScrap.com from our design team announcement blog hop last week. Drum roll please........
Congratulations, Karen! Please email me at jnllawson @ bresnan.net (without the spaces, of course) and I will get your code sent off to you! Thanks to everyone who participated in the blog hop, and for all the wonderful comments and congratulations! I really do appreciate it!
Now on to my card for today! I wasn't sure of how this card was coming along at first, and then once I just kept adding things here and there....the finished product kind-of makes me swoon a little. It isn't a typical card from me, but I like that....definitely gotta keep some spice in life when it comes to card making! Here is what I created:

Before I get to the card I have to share with you today, I wanted to post the winner of the $20 gift certificate from StopAndScrap.com from our design team announcement blog hop last week. Drum roll please........
Now on to my card for today! I wasn't sure of how this card was coming along at first, and then once I just kept adding things here and there....the finished product kind-of makes me swoon a little. It isn't a typical card from me, but I like that....definitely gotta keep some spice in life when it comes to card making! Here is what I created:
Paper/Button: American Crafts (Dear Lizzy "Neopolitan" 6x6 pad)
Stamps: Lawn Fawn (Clear to See & Smitty's ABCs sets)
Ink: Clearsnap (Pigment: antique pewter & Donna Salazer Mixed Media: chiffon)
Trim: Webster's Pages
Twine: May Arts
Pearls: Michael's brand
Corner Rounder: Creative Memories
Instructions: Make card from kraft cardstock and round the bottom corners. Cut a block of pink grid paper, round the bottom corners and adhere. Cut a strip of grey dotted paper, and adhere to the top of the pink grid block. Adhere trims to the top of the paper block. Cut a block of pink lined paper and stamp the sentiment to it. Adhere below the trims, on top of the pink grid paper. Cut the "smile" strip from patterned paper, and adhere to the right of the sentiment. Tie a double bow from pink twine, adhere to the trim and top with a wooden button. Punch confetti pieces from patterned paper, and adhere to the top and bottom in a scattered pattern. Add pink pearls randomly into the confetti to finish.
Card Challenges Used:
-Moxie Fab World challenge- spectacular spectacles
-Moxie Fab World challenge- spectacular spectacles
-CardPatterns #165- sketch
-Cupcake Inspirations #160- photo inspiration
-The Pink Elephant #148- polka dots & stripes
-Our Craft Lounge #117- inspired by pinterest (http://pinterest.com/pin/14425661276614884/)
Well, I hope that you enjoyed my sweet little card today! I need to go get dinner made so I can bring it to my hard working hubbie who doesn't get to come home for dinner tonight...so I better get going. Have a great evening!! ♥♥♥
Until later,
~Lea L.

**This is my second post of the evening. Please scroll down to see my WPlus9 Group Post.**
Hey there, everyone!! For the month of December, I will be the guest designer at The Shabby Tea Room! I love playing along with that fun challenge whenever I get the chance, so I am super excited to be on board for this month! My first challenge for the month is called "The Magic of Christmas", and is inspired by a beautiful photo that you will see on The Shabby Tea Room's #91 blog post....so be sure to check it out! The challenge is to create a project inspired by the photo using pink, gold, neutrals, flowers & snowflakes.
This card probably seems a little bit bulky. But, the fun part about it is the snowflake is only slightly adhered. This way it can be pulled off the card front, and made a Christmas ornament once the receiver is done showcasing the card as is. I think that is a fun idea, and a great way to add a little gift! I created this card for some other challenges as well, and those are all linked at the bottom of the post. Here is what I created!
Until later,
~Lea L.
Lovely Challenges I Used Today:
-Papercraft Star #73- sketch
-Sugar Creek Hollow- non traditional Christmas
-Really Reasonable Ribbon #37- silver & gold w/ ribbon
-One Stop Craft Challenge #160- let it snow
-Totally PaperCrafts #95- let it snow
-Raise the Bar #86- Christmas
-Clearly Inspired #41- Christmas
-For Fun Challenge- Christmas
Hey there, everyone!! For the month of December, I will be the guest designer at The Shabby Tea Room! I love playing along with that fun challenge whenever I get the chance, so I am super excited to be on board for this month! My first challenge for the month is called "The Magic of Christmas", and is inspired by a beautiful photo that you will see on The Shabby Tea Room's #91 blog post....so be sure to check it out! The challenge is to create a project inspired by the photo using pink, gold, neutrals, flowers & snowflakes.
This card probably seems a little bit bulky. But, the fun part about it is the snowflake is only slightly adhered. This way it can be pulled off the card front, and made a Christmas ornament once the receiver is done showcasing the card as is. I think that is a fun idea, and a great way to add a little gift! I created this card for some other challenges as well, and those are all linked at the bottom of the post. Here is what I created!
"Christmas Joy" supplies:
Cardstock: Papertrey Ink (vintage cream)
Paper: American Crafts (Merry Christmas: merry & bright) & Glitz Design (Beautiful Dreamer: stripe)
Doily: Wilton
Doily: Wilton
Stamps: Crafty Secrets (Vintage Christmas set)
Ink: Clearsnap (Stephanie Bernard Dye: chocolate)
Distress Ink/Blending Tool: Tim Holtz (antique linen)
Snowflake Ornament/Ribbon: Michael's brand
Flowers: Recollections
Glitter: Doodlebug Designs
Instructions: Make card from vintage cream cardstock. Cut gold dot paper slightly smaller and adhere. Cut a floral block and adhere to the bottom. Cut banner edges to a striped paper strip, and adhere right above the floral block. Distress ink the doily and adhere to the top of the card. Stamp the sentiment below the doily on the floral block. Tie a bow from gold ribbon, adhere to the top of the ornament and accent with pink flowers. Glitter a larger pink flower, and adhere to the middle of the snowflake. Adhere the entire ornament to the top of the doily with non-permanent adhesive for easy removal.
Be sure to check out the regular designers for The Shabby Tea Room and see what they have created for the week!!
I hope that you have a great day!! ♥♥♥Until later,
~Lea L.
Lovely Challenges I Used Today:
-Papercraft Star #73- sketch
-Sugar Creek Hollow- non traditional Christmas
-Really Reasonable Ribbon #37- silver & gold w/ ribbon
-One Stop Craft Challenge #160- let it snow
-Totally PaperCrafts #95- let it snow
-Raise the Bar #86- Christmas
-Clearly Inspired #41- Christmas
-For Fun Challenge- Christmas
Subscribe to:
Comments (Atom)


Social Icons